This post contains affiliate links. As an Amazon Associate I earn from qualifying purchases.
I remember the exact moment I fell in love with this soup. It was late October at a tiny restaurant in the East Village, and I ordered what seemed like the simplest thing on the menu—butternut squash soup. But when it arrived, steam rising with hints of chili warmth and a whisper of sage, I tasted something that changed how I thought about autumn cooking. The sweetness of roasted squash playing against that jalapeño bite, the richness of coconut cream binding it all together—it was restaurant magic. That night, I went home and reverse-engineered the heck out of that bowl. What I discovered is that this soup represents one of the most beautiful intersections of nutrition and flavor: where the Maillard reaction (that golden-brown magic that happens when you roast vegetables) creates depth, where fat emulsifies starches into silk, and where a single chili pepper transforms the entire flavor profile. This is the soup that taught me that simple ingredients cooked with precision beat complicated recipes every single time.
The Food Science Behind Perfect Butternut Squash and Jalapeño Soup Recipe
I’ve been blending clinical dietetics with chef techniques for over a decade, and I can tell you: this soup works because of three non-negotiable scientific principles. First, you’re using dry-heat roasting to concentrate sugars in the squash and peppers—this isn’t just browning, it’s caramelization at the cellular level. Second, you’re building an emulsion with coconut milk and vegetable broth, creating a stable suspension where fat molecules and water molecules coexist in harmony. Third, you’re using acid (apple cider vinegar) and umami (sage, roasted garlic) to balance sweetness and amplify satiety signals in your brain. When these three mechanisms work together, you get a soup that tastes indulgent but delivers serious nutritional value.

The Science Behind Butternut Squash and Jalapeño Soup Recipe
Let’s talk about what’s actually happening in your oven when you roast that squash. Butternut squash contains complex carbohydrates and natural sugars (about 16 grams per cup of raw flesh). When exposed to dry heat at 400°F for 30 minutes, the surface temperature climbs above 300°F, triggering the Maillard reaction—a chemical process where amino acids and reducing sugars rearrange to form hundreds of new flavor compounds. This is why roasted squash tastes infinitely more interesting than steamed squash.
The jalapeños undergo the same transformation. Their capsaicinoids (the compounds responsible for heat) actually become more bioavailable—your body can access them more efficiently—when exposed to heat. This is why roasted jalapeños feel spicier than raw ones, even though the capsaicinoid content is identical. It’s pure chemistry working in your favor.
Then comes the emulsification phase. Coconut milk contains roughly 13-14% fat, primarily medium-chain triglycerides. When you blend these fats with vegetable broth (which is mostly water with dissolved minerals and proteins), you’re creating what chemists call a “colloid”—tiny fat droplets suspended throughout the liquid, stabilized by the lecithin naturally present in coconut milk. This is why the soup becomes silky without cream, butter, or any dairy whatsoever.
Why This Recipe Is Nutritionally Superior
I don’t throw around the word “superior” lightly, but this soup genuinely delivers. One serving gives you a concentrated dose of micronutrients that support immune function, reduce inflammation, and stabilize blood sugar. Here’s what the USDA data shows:
- Beta-carotene (provitamin A) – butternut squash delivers approximately 10,000+ IU per serving, supporting eye health and immune cell development. This is roughly 200% of your daily value.
- Potassium – one cup of roasted butternut squash contains about 450mg, supporting cardiovascular function and blood pressure regulation. The coconut milk adds another 120mg per serving.
- Manganese – present in both squash and coconut milk, manganese acts as a cofactor for manganese superoxide dismutase, your cells’ primary antioxidant enzyme. One serving covers approximately 25% of daily needs.
- Capsaicin (from jalapeños) – research published in the American Journal of Clinical Nutrition demonstrates that capsaicin increases thermogenesis (calorie burn) by 4-5% and reduces inflammatory markers like TNF-alpha.
Ingredient Deep Dive
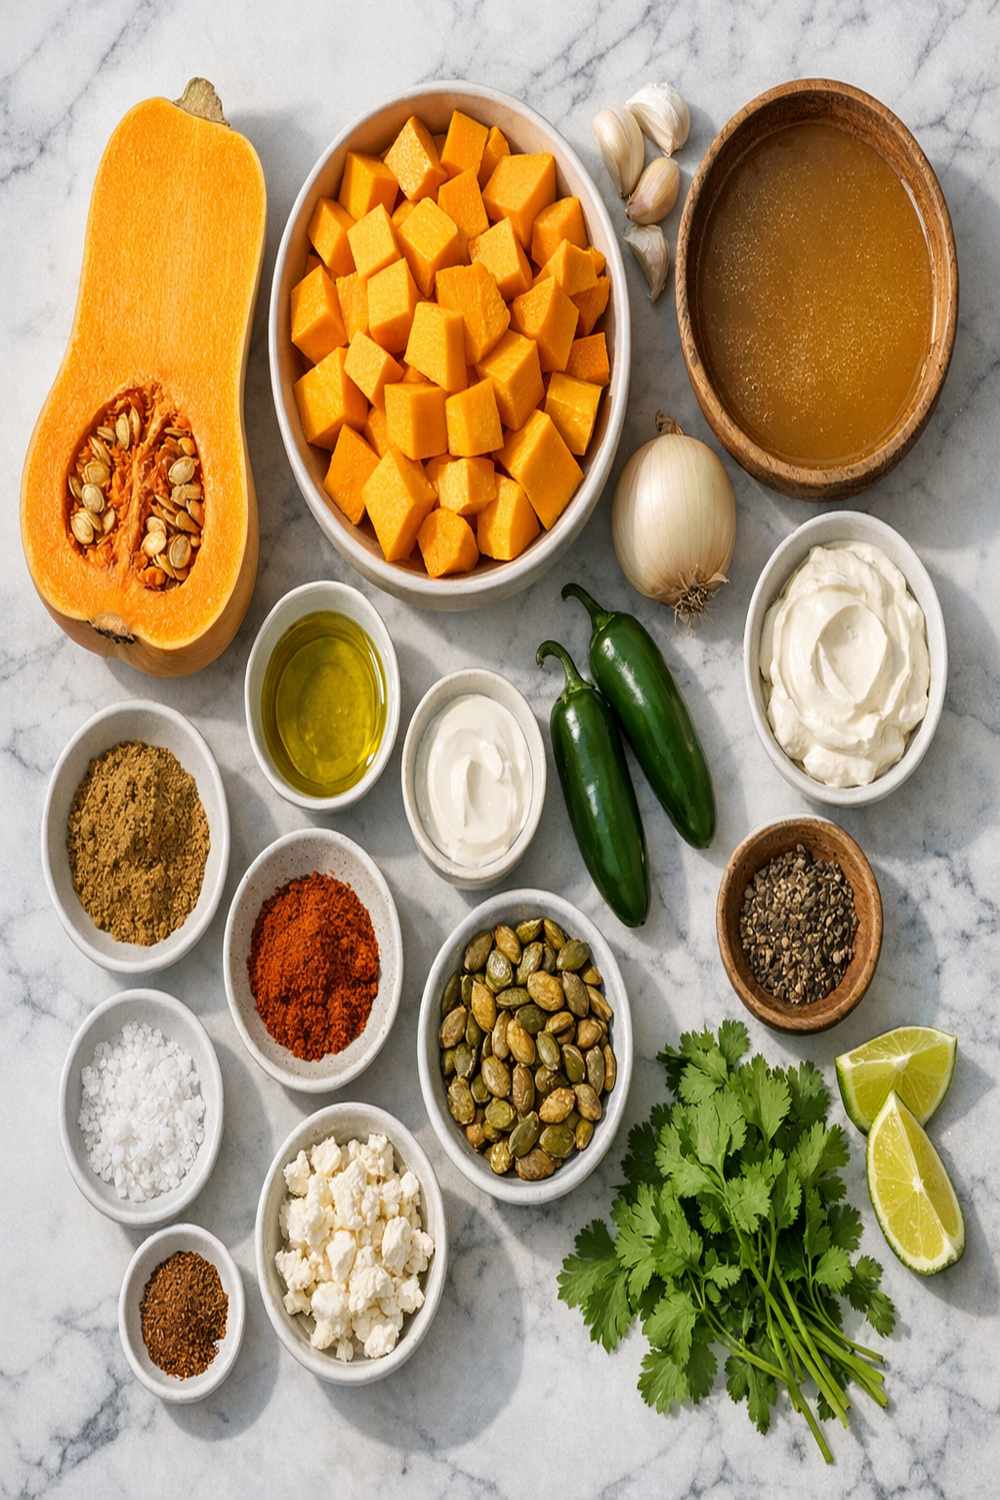
Every ingredient in this soup earns its place. I’m not a fan of filler ingredients, and this recipe proves you don’t need them. Let me walk you through exactly what each component does:
- 5 garlic cloves (left unpeeled during roasting, then squeezed from skins) – Allicin and other organosulfur compounds develop dramatically during roasting. These have documented antimicrobial and cardiovascular benefits.
- 2 medium jalapeños (halved, seeds left intact for more heat, removed for less) – Capsaicin-rich and flavor-balancing. Roasting them brings out subtle fruity undertones beneath the heat.
- ½ teaspoon apple cider vinegar (raw, with mother culture) – The acid component that brightens flavors and prevents the soup from tasting one-dimensional. Acid also slows gastric emptying, improving satiety signals.
- 2 cups vegetable broth (low-sodium for control over final salt levels) – Your liquid base. Vegetable broth provides dissolved minerals and some protein, creating a more stable emulsion than water alone.
- 1 15-ounce can full-fat coconut milk (canned, never lite) – The secret to silky texture. Full-fat is non-negotiable here; lite versions use gums and starches to mimic texture, and they won’t emulsify properly with roasted vegetables.
- ¼ teaspoon ground nutmeg (freshly grated if possible) – Nutmeg contains myristicin, which studies suggest may have anti-inflammatory effects. It also balances the soup’s sweetness without adding sugar.
- 1 medium white onion (roughly diced into ½-inch pieces) – Acts as a umami amplifier and natural sweetener. When roasted, onions develop quercetin, a powerful antioxidant that crosses the blood-brain barrier.
- Fleur de sel and cracked black pepper (to taste) – Sea salt enhances perception of sweetness at low concentrations; black pepper contains piperine, which increases turmeric absorption by 2000% if you add it to a bowl at serving.
- 1 shallot (minced fine) – More delicate than onion, shallots provide aromatic sulfur compounds that become sweeter and more complex when roasted.
- 1 large butternut squash (halved lengthwise, seeds removed) – The star: provides natural sweetness, creamy texture when roasted, and serious micronutrient density. The flesh contains roughly 40% carbohydrates by weight when cooked, perfect for creating natural viscosity without starches.
- 2 tablespoons extra-virgin olive oil (for drizzling) – For coating vegetables before roasting. Polyphenol-rich olive oil becomes more bioavailable when heated to moderate temperatures (around 400°F).
- 4 fresh sage leaves (roughly torn) – Classic autumn pairing. Sage contains thujone, a compound with mild antiseptic properties, and essential oils that become more aromatic during simmering.
The Technique: How to Make Butternut Squash and Jalapeño Soup Recipe Properly
I’m going to break this down step-by-step the way I teach it to nutrition students and home cooks. The key is understanding the “why” behind each movement, because once you do, you can troubleshoot any problems that arise.
Step 1: Prepare Your Oven and Squash
Start by preheating your oven to 400°F. While it’s heating, line a large baking sheet with parchment paper or lightly wipe it with olive oil. Using parchment prevents sticking without extra fat, which is perfect for monitoring browning. Now for the squash: cut it lengthwise (like a hot dog, not like a baseball). This orientation matters because it creates a flat surface that makes direct contact with the hot pan, maximizing the Maillard reaction. Scoop out all seeds and stringy bits with a sturdy spoon—you want a clean cavity. Place both halves cut-side down on your prepared pan. This positioning is critical: the cut surface will caramelize against the pan, creating deeper color and flavor. If you place them cut-side up, the flesh steams instead of roasts.

Step 2: First Roast (30 Minutes)
Slide the pan into your preheated oven. You’re looking for the squash to develop a golden-brown color on the exposed rounded skin—this takes about 30 minutes. You’ll know it’s ready when you can pierce the flesh easily with a fork and the skin has deepened in color. The cut side won’t brown during this phase because it’s facing down, and that’s exactly what you want. We’ll flip things in the next step.

Step 3: Add Remaining Vegetables and Second Roast
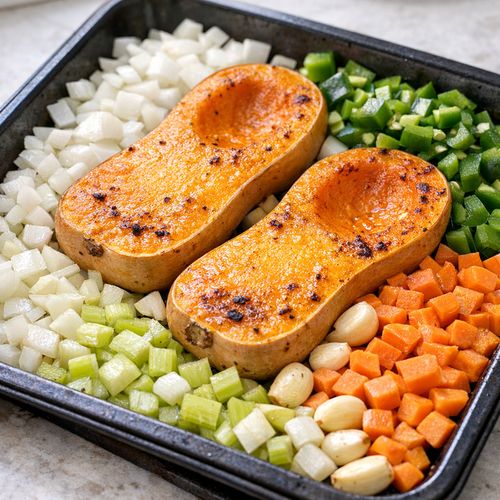
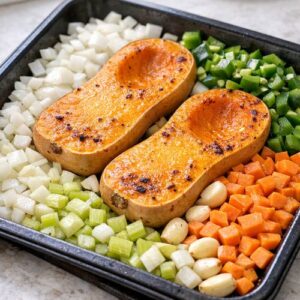
Remove the pan carefully (use mitts—it’s hot). The squash doesn’t need flipping. Instead, arrange your prepped vegetables around the squash: the diced onion, halved jalapeños, minced shallot, and unpeeled garlic cloves. Drizzle everything (squash, all vegetables) with about 2 tablespoons of olive oil and season with fleur de sel and cracked pepper. This second phase roasts for another 30 minutes. The garlic will release its aroma when it’s done—you’ll smell it intensely around the 25-minute mark. The onions should caramelize at the edges, and the jalapeños should wrinkle slightly. When you press a garlic clove, it should yield immediately.
Step 4: Cool and Transfer
Remove the pan and let it rest for 10-15 minutes. This resting period is crucial: it allows carryover cooking to finish (the squash continues cooking from residual heat) and, more importantly, it cools things enough to handle safely. Once cool, scoop the squash flesh from its skin using a sturdy spoon—it should come away cleanly in large pieces. Discard the skin. Squeeze the garlic cloves from their papery skins directly into a large pot (they’ll pop right out). Add the squash flesh, roasted onion, jalapeños, and shallot to the pot.
Step 5: Build Your Soup Base
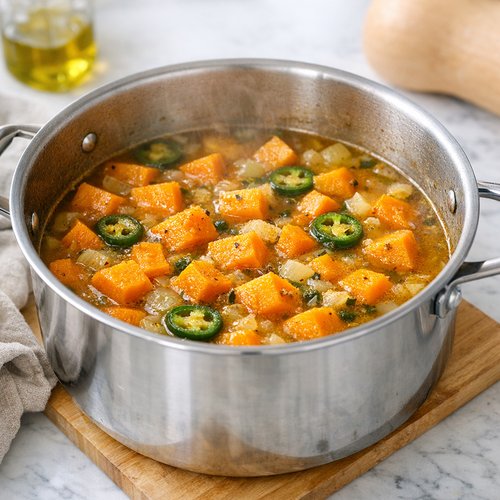
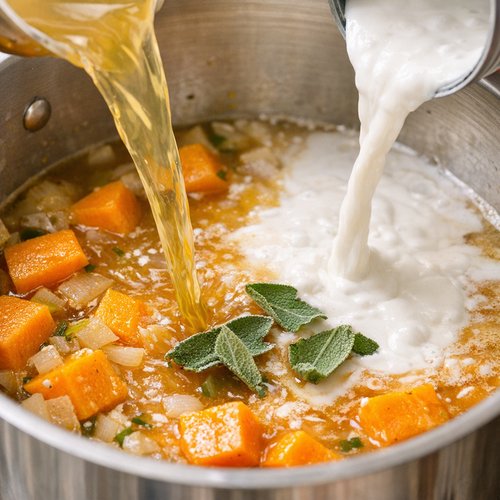
Pour in your 2 cups of vegetable broth and the full can of coconut milk (don’t drain or separate—use the whole can). Add the 4 sage leaves, torn by hand. Sprinkle in ¼ teaspoon of ground nutmeg and the ½ teaspoon of apple cider vinegar. Don’t add salt yet—we’ll adjust at the end.
Step 6: Blend Until Silky
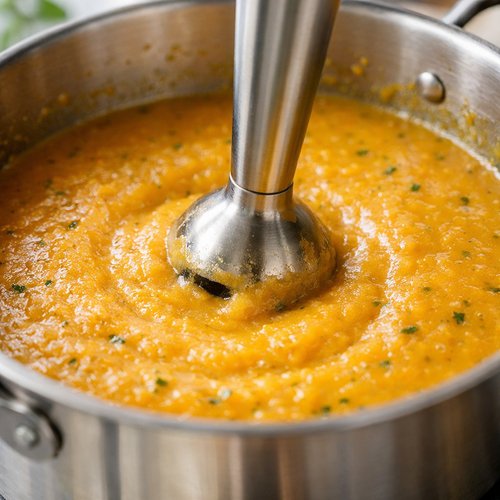
This is where your technique matters enormously. Use an immersion blender (my preferred tool for this) or a standard blender. If using an immersion blender, submerge the head fully before turning it on—never blend with the head above liquid, as it splashes and oxidizes the soup unnecessarily. Blend for about 2-3 minutes on high speed. The soup should transform from chunky to completely smooth. You’re not just mixing; you’re physically breaking down cell walls and creating the stable emulsion we discussed earlier. If using a standard blender, work in batches and never fill more than ⅔ full (hot soup expands). Blend each batch for about 60 seconds, then pour into a clean pot.
Step 7: Simmer and Season
Once blended, return all soup to your pot (if batched). Bring it to a gentle boil over medium-high heat—you’ll see large bubbles breaking at the surface. Once boiling, reduce heat to low and simmer for 20-30 minutes. This gentle simmering achieves two things: it infuses the sage flavor throughout and it allows the soup to reduce slightly, concentrating flavors naturally without any added stock or reduction. You should notice the aroma becoming more aromatic and complex around the 15-minute mark.
After simmering, taste carefully (it’s hot). Add fleur de sel and cracked pepper to your preference. Taste again after 2 minutes—salt needs time to distribute fully. If the soup tastes flat or overly sweet, add another ¼ teaspoon of apple cider vinegar. The acid will make the sweetness recede and bring all flavors into focus.

Professional Tips From the Kitchen
- Leave jalapeño seeds in for heat, remove them for a gentler kick – Seeds contain about 50-80% more capsaicin than the flesh itself. Leaving them in creates a cumulative heat; removing them gives you flavor without intensity. You can always add a pinch of cayenne at the end if you want to adjust heat level after tasting.
- Don’t skip the resting period after roasting – I learned this the hard way. Blending piping-hot vegetables immediately creates steam pressure inside your blender, which can cause the lid to pop off violently. The 10-15 minute rest gives you safety, easier handling, and better flavor development through carryover cooking.
- Use an immersion blender for best results – Standard blenders create more air incorporation, which can oxidize the soup and dull the color slightly. An immersion blender keeps everything submerged and produces a silkier final texture because it creates smaller droplets in the emulsion.
- Taste obsessively during the last 5 minutes of simmering – Flavors change as the soup reduces. What tastes perfectly balanced at minute 25 might taste slightly different at minute 30. This is your opportunity to adjust seasoning in real time.
- Save the coconut milk can for measuring – The empty can is exactly 1⅔ cups, perfect for measuring any additions if you need to thin the soup later (add broth or water, never more coconut milk).
Ingredient Substitutions and Their Impact
- Butternut squash → Kabocha squash or red kuri squash: Kabocha is sweeter and slightly less fibrous, which means your final soup will be even silkier but might need an additional ¼ teaspoon of vinegar to balance sweetness. Red kuri is similar but has a nuttier undertone. Both work beautifully; cook times remain identical.
- Jalapeños → Poblano peppers (for less heat) or Scotch bonnets (for extreme heat): Poblanos are 2-3 times milder and have a deeper, more savory flavor that’s almost earthy. You might increase them to 3 peppers for similar flavor impact. Scotch bonnets bring serious heat (100,000+ Scoville units vs. jalapeños’ 2,500-8,000), so use only 1 and remove seeds. Either substitution changes the heat profile but maintains the roasted pepper flavor foundation.
- Coconut milk (full-fat) → Heavy cream or cashew cream: Heavy cream will make the soup richer and less aromatic (coconut has subtle tropical notes). You’ll lose some micronutrient complexity but gain dairy richness. Cashew cream (blended soaked cashews + water) creates a similar texture but requires an extra step and loses the subtle coconut notes that make this soup distinctive. If you must substitute, use equal parts cream but reduce by 25% because cream is heavier than coconut milk.
- Apple cider vinegar → Sherry vinegar or white balsamic: Sherry adds deeper, slightly sweet notes; use the same amount. White balsamic is thinner and less acidic, so use ¾ teaspoon instead of ½. Both work beautifully. Regular balsamic is too sweet and will throw off your flavor balance.
- Fresh sage → Thyme or oregano: Fresh thyme creates an earthier, less autumn-forward flavor. Oregano is too aggressive and will overpower the soup. If substituting sage, use ½ teaspoon of dried thyme or 1½ teaspoons of fresh thyme, since both are more potent than sage.
Dietary Adaptations
Vegan: This recipe is already completely vegan—all ingredients are plant-based. No adaptations needed. Serve with vegan bread or pair with Low Carb Zucchini Fritters for added texture and protein.
Gluten-free: This soup is naturally gluten-free as written. If serving alongside bread or crackers, ensure your accompaniments are certified gluten-free. Vegetable broth is usually gluten-free, but always verify labels.
Dairy-free: Already accommodated. The coconut milk is your fat source and provides the creaminess without any dairy whatsoever.
Low-carb (keto): This is where it gets tricky. Butternut squash contains about 11 grams of net carbs per cup of cooked flesh. For keto adaptation, reduce the squash by 50% and increase the onion slightly for body. The soup will be less sweet and more savory—less restaurant-classic, but still delicious. Alternatively, make it as written for occasional indulgence, since many people in ketosis can handle 20-30g carbs from nutrient-dense vegetables like squash without disrupting ketosis.
Whole30: Verify that your vegetable broth contains no added sugar or wine. Most do, but check labels. Coconut milk from a can is Whole30-compliant as long as it contains only coconut and water (no guar gum or other additives). This soup works perfectly as-is on Whole30.
Paleo: Same as Whole30. Just ensure your vegetable broth is compliant.
Expert’s Nutritional Tip: The Beta-Carotene Bioavailability Advantage
Here’s something most recipes don’t mention: butternut squash’s beta-carotene (the precursor to vitamin A) is far more bioavailable when you roast it alongside fat and eat it with more fat. In this case, you’re hitting all three factors. The roasting process makes beta-carotene physically accessible by breaking down cell walls. The coconut milk provides fat for proper absorption in your digestive system. And adding it to a meal you’ll consume at the table means your body can extract close to 100% of the vitamin A content, versus maybe 30% if you steamed the squash and ate it plain. This isn’t just theory—published research in the Journal of the American Dietetic Association confirms that fat-soluble vitamins like beta-carotene require dietary fat for absorption. You’re not just making soup; you’re optimizing nutrient delivery at the cellular level.
Can I Store Butternut Squash and Jalapeño Soup Recipe?
Yes, and it actually improves after a day. The flavors continue melding as the soup sits, becoming more integrated and complex.
Refrigerator: Store in an airtight glass container for up to 4 days. The emulsion remains stable because we used full-fat coconut milk. Reheat gently over medium heat, stirring occasionally. Never microwave soup with an emulsion; the uneven heating can break the emulsion, making it look separated and textured rather than silky.
Freezer: This soup freezes beautifully for up to 3 months. Divide into portions before freezing so you’re not thawing an entire batch. Use freezer-safe containers, leaving ½ inch of headspace for expansion. Thaw overnight in the refrigerator, then reheat gently. The emulsion typically holds perfectly, but if it seems slightly separated after thawing, use an immersion blender for 30-45 seconds to re-emulsify.
Make-Ahead Guide: You can prep vegetables the day before. Cut the squash, remove seeds, and store cut-side down on a plate covered with plastic wrap. Dice the onion, mince the shallot, and halve the jalapeños, storing each in separate containers. Roast fresh the day you want to serve it—the full recipe (roasting through simmering) takes about 90 minutes start to finish. This means you can roast the vegetables on Sunday and blend the soup into individual portions for weekday lunches.
Nutrition Information
Per serving (makes 4 generous servings, approximately 1.5 cups each):
Calories: 280 | Protein: 5g | Total Fat: 16g (Saturated: 14g, Unsaturated: 2g) | Carbohydrates: 32g (Fiber: 6g, Net Carbs: 26g, Sugar: 12g) | Sodium: 420mg (before final seasoning) | Potassium: 680mg | Vitamin A (from beta-carotene): 18,000 IU (360% DV) | Vitamin C: 22mg (37% DV) | Manganese: 0.38mg (19% DV)
The macronutrient balance here is intentional. The combination of complex carbohydrates from squash, healthy fats from coconut milk, and protein from the broth creates a blood-sugar-stable meal. The 6 grams of fiber per serving further slows glucose absorption, preventing the blood sugar spike you’d get from eating the same carbohydrate amount in processed form. If you’re tracking macros for athletic performance, pair this with a protein source (grilled chicken, tofu, or a side of legumes) to increase total protein to 20-25g per meal.
What Can I Serve With Butternut Squash and Jalapeño Soup Recipe?
The beauty of this soup is its versatility. The sweetness and heat demand complementary flavors, not competing ones. Here’s my professional pairing guide:
- Crispy sage leaves and toasted pumpkin seeds – Sage becomes intensely aromatic when crisped in a dry pan; it echoes the sage in the soup itself while adding textural contrast. Pumpkin seeds contribute zinc and magnesium, complementing the soup’s mineral profile. Toss them lightly with fleur de sel before sprinkling over individual bowls.
- Grilled sourdough with cultured butter – The acidity in sourdough balances the soup’s sweetness. Cultured butter adds subtle tanginess that echoes the apple cider vinegar in the soup itself. The gluten structure provides contrast to the soup’s silky texture. Toast it lightly so the butter melts into warm bread rather than sitting on top.
- Lime crema (sour cream + lime juice) with cilantro – This is the Latin American approach. The lime’s acidity plays off the jalapeño’s heat in a way that feels familiar to anyone who’s had proper chile-based dishes. Cilantro’s bright, herbal notes don’t compete with sage; instead, they create a more complex aromatic profile. Add the crema on top just before serving and swirl it in gently.
- Crispy chickpeas with cumin and smoked paprika – The smokiness in paprika echoes the roasted notes in the soup. Chickpeas add plant-based protein (5g per ⅓ cup) and create textural contrast. Crisp them in the oven at 425°F for 25 minutes, tossed with olive oil, cumin, paprika, and salt.
- Pair with Air Fryer Honey Salmon Bites as a protein course – If you want to elevate this into a complete meal, the sweetness in honey and the richness of salmon complement the soup without overwhelming it. The salmon’s omega-3s also enhance the absorption of fat-soluble vitamins in the squash.
- Roasted root vegetable salad with pomegranate and shallot vinaigrette – The pomegranate’s tartness and the shallot’s bite keep the meal from feeling too heavy. This works for serving the soup as a starter to a larger meal.
Common Mistakes to Avoid
Mistake 1: Cutting the squash the wrong way – If you cut it into rings or chunks instead of lengthwise halves, you significantly reduce the surface area making contact with the pan, which means less caramelization and less developed flavor. The flat, lengthwise cut is non-negotiable for this recipe’s success.
Mistake 2: Using lite coconut milk – I see this constantly. People try to reduce calories by using lite coconut milk (which contains about 6% fat versus 13% in full-fat). Lite coconut milk uses gums and stabilizers to create fake creaminess, and it won’t emulsify properly with your roasted vegetables. Your soup will end up gritty or separated. Full-fat is only about 80 extra calories per serving—absolutely worth it for the texture alone. This is one place where cutting corners backfires.
Mistake 3: Blending immediately after roasting – I mentioned this briefly, but it’s important enough to repeat. Blending piping-hot vegetables and liquid creates steam that can explode out of your blender when you remove the lid. I’ve seen it happen to professional cooks who know better but were rushing. Wait. The 10-15 minute rest is not optional.
Mistake 4: Skipping the final simmer – Some people blend the soup and serve it immediately. The 20-30 minute simmer after blending is crucial: it allows flavors to marry, the sage to infuse properly, and the soup to reduce slightly (concentrating all flavors naturally). Skip this step and your soup will taste fractionally less developed, slightly more “blended vegetable-y” and less like a finished dish.
Seasonal Variations
Fall/Early Winter (Original Recipe): This is when butternut squash is at its peak—sweet, creamy, and abundant. Use fresh sage from the garden if possible. The jalapeños provide nice contrast to the increasingly cold weather. Pair with harvest grains like farro or wild rice.
Late Winter/Spring Adaptation: If you can’t find good butternut squash in spring (it will be storage squash by then, less flavorful), substitute with kabocha squash or even carrot-based squash puree. Reduce jalapeños to 1 if spring produce is milder. Add fresh lemon juice instead of apple cider vinegar for brighter, cleaner acidity that feels more spring-like. Substitute fresh tarragon for sage for a more delicate herb profile.
Summer Adaptation: Make this as a chilled soup. Blend it completely, then chill overnight in the refrigerator. Serve cold with a dollop of coconut yogurt and fresh mint. The sweetness of the squash becomes more prominent when served cold, so reduce it to ¾ of a large squash. Add an additional tablespoon of apple cider vinegar to balance the increased perception of sweetness in chilled dishes.
Spice Level Variation by Season: In colder months, use 3 jalapeños with seeds for warming heat. In warmer months, use 2 jalapeños with seeds removed for gentler flavor that won’t overwhelm when served cold.

Butternut Squash And Jalapeno Soup Recipe

Ingredients
- 5 garlic cloves - Allicin and other organosulfur compounds develop dramatically during roasting. These have documented antimicrobial and cardiovascular benefits. left unpeeled during roasting, then squeezed from skins
- 2 medium jalapeños - Capsaicin-rich and flavor-balancing. Roasting them brings out subtle fruity undertones beneath the heat. halved, seeds left intact for more heat, removed for less
- ½ teaspoon apple cider vinegar - The acid component that brightens flavors and prevents the soup from tasting one-dimensional. Acid also slows gastric emptying, improving satiety signals. raw, with mother culture
- 2 cup vegetable broth - Your liquid base. Vegetable broth provides dissolved minerals and some protein, creating a more stable emulsion than water alone. low-sodium for control over final salt levels
- 1 15- ounce can full-fat coconut milk - The secret to silky texture. Full-fat is non-negotiable here; lite versions use gums and starches to mimic texture, and they won't emulsify properly with roasted vegetables. canned, never lite
- ¼ teaspoon ground nutmeg - Nutmeg contains myristicin, which studies suggest may have anti-inflammatory effects. It also balances the soup's sweetness without adding sugar. freshly grated if possible
- 1 medium white onion - Acts as a umami amplifier and natural sweetener. When roasted, onions develop quercetin, a powerful antioxidant that crosses the blood-brain barrier. roughly diced into ½-inch pieces
- Fleur de sel and cracked black pepper - Sea salt enhances perception of sweetness at low concentrations; black pepper contains piperine, which increases turmeric absorption by 2000% if you add it to a bowl at serving. to taste
- 1 shallot - More delicate than onion, shallots provide aromatic sulfur compounds that become sweeter and more complex when roasted. minced fine
- 1 large butternut squash - The star: provides natural sweetness, creamy texture when roasted, and serious micronutrient density. The flesh contains roughly 40% carbohydrates by weight when cooked, perfect for creating natural viscosity without starches. halved lengthwise, seeds removed
- 2 tablespoon extra-virgin olive oil - For coating vegetables before roasting. Polyphenol-rich olive oil becomes more bioavailable when heated to moderate temperatures . for drizzling
- 4 fresh sage leaves - Classic autumn pairing. Sage contains thujone, a compound with mild antiseptic properties, and essential oils that become more aromatic during simmering. roughly torn
Instructions
Step 1: Prepare Your Oven and Squash
- Start by preheating your oven to 400°F. While it's heating, line a large baking sheet with parchment paper or lightly wipe it with olive oil. Using parchment prevents sticking without extra fat, which is perfect for monitoring browning. Now for the squash: cut it lengthwise (like a hot dog, not like a baseball). This orientation matters because it creates a flat surface that makes direct contact with the hot pan, maximizing the Maillard reaction. Scoop out all seeds and stringy bits with a sturdy spoon—you want a clean cavity. Place both halves cut-side down on your prepared pan. This positioning is critical: the cut surface will caramelize against the pan, creating deeper color and flavor. If you place them cut-side up, the flesh steams instead of roasts.

Step 2: First Roast (30 Minutes)
- Slide the pan into your preheated oven. You're looking for the squash to develop a golden-brown color on the exposed rounded skin—this takes about 30 minutes. You'll know it's ready when you can pierce the flesh easily with a fork and the skin has deepened in color. The cut side won't brown during this phase because it's facing down, and that's exactly what you want. We'll flip things in the next step.

Step 3: Add Remaining Vegetables and Second Roast
- Remove the pan carefully (use mitts—it's hot). The squash doesn't need flipping. Instead, arrange your prepped vegetables around the squash: the diced onion, halved jalapeños, minced shallot, and unpeeled garlic cloves. Drizzle everything (squash, all vegetables) with about 2 tablespoons of olive oil and season with fleur de sel and cracked pepper. This second phase roasts for another 30 minutes. The garlic will release its aroma when it's done—you'll smell it intensely around the 25-minute mark. The onions should caramelize at the edges, and the jalapeños should wrinkle slightly. When you press a garlic clove, it should yield immediately.
Step 4: Cool and Transfer
- Remove the pan and let it rest for 10-15 minutes. This resting period is crucial: it allows carryover cooking to finish (the squash continues cooking from residual heat) and, more importantly, it cools things enough to handle safely. Once cool, scoop the squash flesh from its skin using a sturdy spoon—it should come away cleanly in large pieces. Discard the skin. Squeeze the garlic cloves from their papery skins directly into a large pot (they'll pop right out). Add the squash flesh, roasted onion, jalapeños, and shallot to the pot.

Step 5: Build Your Soup Base
- Pour in your 2 cups of vegetable broth and the full can of coconut milk (don't drain or separate—use the whole can). Add the 4 sage leaves, torn by hand. Sprinkle in ¼ teaspoon of ground nutmeg and the ½ teaspoon of apple cider vinegar. Don't add salt yet—we'll adjust at the end.
Step 6: Blend Until Silky
- This is where your technique matters enormously. Use an immersion blender (my preferred tool for this) or a standard blender. If using an immersion blender, submerge the head fully before turning it on—never blend with the head above liquid, as it splashes and oxidizes the soup unnecessarily. Blend for about 2-3 minutes on high speed. The soup should transform from chunky to completely smooth. You're not just mixing; you're physically breaking down cell walls and creating the stable emulsion we discussed earlier. If using a standard blender, work in batches and never fill more than ⅔ full (hot soup expands). Blend each batch for about 60 seconds, then pour into a clean pot.

Step 7: Simmer and Season
- Once blended, return all soup to your pot (if batched). Bring it to a gentle boil over medium-high heat—you'll see large bubbles breaking at the surface. Once boiling, reduce heat to low and simmer for 20-30 minutes. This gentle simmering achieves two things: it infuses the sage flavor throughout and it allows the soup to reduce slightly, concentrating flavors naturally without any added stock or reduction. You should notice the aroma becoming more aromatic and complex around the 15-minute mark. After simmering, taste carefully (it's hot). Add fleur de sel and cracked pepper to your preference. Taste again after 2 minutes—salt needs time to distribute fully. If the soup tastes flat or overly sweet, add another ¼ teaspoon of apple cider vinegar. The acid will make the sweetness recede and bring all flavors into focus.

Notes
Nutrition
FAQs
Can I make this soup without an immersion blender?
Absolutely. Use a standard blender, but work in batches. Fill your blender no more than ⅔ full with hot soup (this prevents overflow and pressure buildup). Start on low speed, gradually increasing to high. Blend each batch for about 60 seconds until completely smooth. Work carefully with hot soup—use a kitchen towel to hold the lid down loosely so steam can escape slowly without violently lifting the lid. Once all batches are blended, pour into a clean pot to continue simmering. The final texture will be equally smooth; you’ll just have more cleanup.
What if my soup separates or looks grainy after simmering?
This usually happens if the emulsion breaks, typically from overheating. The fix is simple: remove the pot from heat and let it cool for 5 minutes, then use your immersion blender for 30-45 seconds at high speed. This re-emulsifies the fat and water, and the soup will become silky again. If it doesn’t smooth out completely, try adding 2-3 tablespoons of cold vegetable broth while blending. The temperature change can help re-stabilize the emulsion.
Can I reduce the sodium content further?
Yes. Use low-sodium vegetable broth (which I already recommend), and add salt only at the very end to taste. The recipe as written has about 420mg of sodium per serving before final seasoning, which is quite reasonable for a creamy soup. If you use homemade vegetable broth with no added salt, you’ll start at nearly zero sodium, then adjust based on your preference. Keep fleur de sel by your stove during the final 5 minutes of simmering so you can taste and adjust gradually.
Is this soup suitable for meal prep?
Completely. In fact, it’s ideal for meal prep. Make the full recipe on Sunday. Divide into 4 portions in glass containers with tight-fitting lids. Refrigerate up to 4 days, or freeze for up to 3 months. Reheat gently over medium heat (never microwave for emulsion preservation). I recommend freezing in individual portions so you can thaw exactly what you need for a quick lunch or dinner. A 10-minute reheat transforms this into a restaurant-quality meal with virtually no weekday effort.
What type of vegetable broth works best?
More Recipes You Will Love
- This Cozy Homemade Soup – Worth adding to your recipe collection.
Use broth that contains only vegetables, water, salt, and spices—nothing with sugar, wine, or excessive sodium. My preference is Pacific Foods brand (low-sodium) or Imagine Organic broth. Avoid store-brand “soup bases” which are often high in sodium and contain added sugars. If you make your own (which is wonderful), ensure you’ve strained it well to avoid cloudiness. Cloudy broth won’t