This post contains affiliate links. As an Amazon Associate I earn from qualifying purchases.
Learning to make berry bread isn’t just about this dish—it’s about mastering a technique that unlocks dozens of other recipes. I’m talking about the gentle fold, the move that separates bakery-quality loaves from dense, heavy brick-like results. When I was training in culinary school, I watched a pastry chef incorporate fresh blueberries into batter using nothing but a spatula and patience. The result? Evenly distributed berries, a tender crumb, and absolutely no purple streaks. That moment changed how I approach every mixed-berry recipe. And here’s the beautiful part: once you nail this technique, you’ll use it for muffins, quick breads, pancakes, and even incorporating delicate add-ins into batters for banana pancake muffins.
Master the Technique Behind Berry Bread Recipe (And Never Struggle With Lumpy, Sunken Fruit Again)
I remember the exact moment this clicked for me. I was working a weekend brunch service, and we’d just sold out of our berry bread by 11 AM. The head baker pulled me aside and showed me her secret: she didn’t just toss berries into the batter. She coated them first, folded them in with intentional, deliberate strokes, and placed them strategically so they distributed evenly. No more bites with three berries followed by bites with none. No more fruit sinking to the bottom or sitting on top. That breakfast shift taught me that technique isn’t about fancy equipment—it’s about understanding the why behind each movement.
The Core Technique Explained
The heart of this recipe is the fold-and-coat method. Here’s the science: delicate berries bruise easily, and when they bruise, they release juice into your batter. That juice creates two problems. First, it stains the batter purple or red, creating an unappetizing appearance. Second, it adds moisture in pockets, making some areas dense while others stay light. By coating berries with a tiny amount of flour before folding, you create a protective barrier. The flour absorbs surface moisture and prevents berries from sticking together in clumps.
The actual folding motion matters too. A fold is different from stirring. When you stir, you’re moving the spatula through the batter in circles, which deflates your carefully aerated mixture. A fold uses an under-and-over motion: spatula down through the center, along the bottom, then up and over the top. Rotate the bowl a quarter turn and repeat. This preserves air bubbles you’ve built up while still incorporating ingredients evenly.
Why does this matter? Air pockets create lift. A tender crumb requires that delicate structure. Dense, heavy bread results from deflating the batter too much during mixing. That’s why I never stir berries in—I fold them.
What This Technique Unlocks
Once you master the fold-and-coat method, your baking world expands dramatically. Here are the recipes you’ll suddenly nail:
- Chocolate chip muffins – uses the same core technique to distribute chunks evenly without melting them into the batter
- Nut quick breads – uses the same core technique to keep nuts suspended throughout instead of settling at the bottom
- Swirled coffee cake – uses the same core technique to incorporate cinnamon swirls without creating dense pockets
- Pancake batter with mix-ins – uses the same core technique to keep berries and chocolate chips from sinking during cooking
- Angel food cake variations – uses the same core technique to fold whipped egg whites without deflating them completely
- Fruit-studded scones – uses the same core technique to keep dried fruit distributed and tender throughout
The Ingredients – Chosen to Teach the Technique

I’ve selected each ingredient specifically because it teaches you something about the folding technique. Notice I’m keeping this ingredient list intentionally simple—that’s on purpose. When you’re learning a new technique, complexity is your enemy. These six core ingredients plus two strategic additions let you focus entirely on the motion and method, not juggling ten different components.
For the Bread Base
- ½ teaspoon fine sea salt (enhances flavor and strengthens gluten structure)
- 1½ cups all-purpose flour (spooned and leveled, never packed—packing compresses flour and creates dense bread)
- 1 large egg, room temperature (acts as a binder and adds richness to the crumb)
- 2 teaspoons baking powder (the primary leavening agent that creates lift—check expiration date, as old baking powder loses potency)
- ½ cup granulated sugar (adds structure and moisture, helps create an open crumb)
- ½ teaspoon pure vanilla extract (enhances flavor subtly—use pure, not imitation, which tastes metallic)
- ¼ cup neutral oil like canola or light olive oil (creates moisture and tenderness without the heaviness of butter)
- ¾ cup whole milk (full-fat creates a tender, moist texture better than low-fat options)
For the Berries and Finish
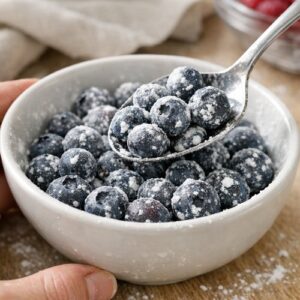
- 1 teaspoon cornstarch (coats berries to prevent juice release—works better than flour for this specific purpose)
- 1½ cups fresh blueberries, washed and completely dried (moisture on the surface causes bruising and uneven distribution)
- 1 tablespoon coarse sugar for topping (adds texture and visual appeal, won’t dissolve into the bread)
Expert’s Nutritional Tip: As a registered dietitian, I love this recipe because blueberries deliver anthocyanins—powerful antioxidants linked to anti-inflammatory benefits in peer-reviewed research. Unlike sugary bakery loaves, you’re getting actual functional food here. One slice provides nearly 5 grams of fiber from the berries and whole grain flour combination, plus polyphenols that support cardiovascular health.
The Masterclass: How to Make Berry Bread Recipe
This isn’t just instructions—this is your technique training. I want you to understand the why behind each step, so you can confidently adapt this method to any batter-based recipe you encounter. Makes one standard loaf, approximately 12 slices.
Step 1: Prepare Your Pan and Oven With Precision
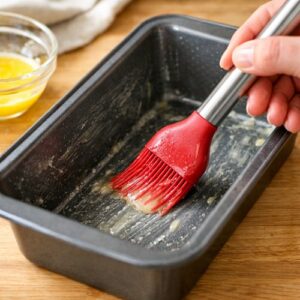
Preheat your oven to 350°F (175°C). While it heats, grease your 8½ x 4½-inch loaf pan thoroughly—I use a silicone pastry brush with melted butter, making sure to coat every corner, edge, and crevice. Then lightly dust the entire interior with flour, shaking out any excess. This two-step coating prevents sticking while keeping your bread’s edges clean and defined. This pan size matters—if you use a larger pan, your bread will be too shallow and overbake; smaller means it stays underbaked in the center. Your oven temperature is critical too. At 350°F, you achieve gentle, even baking that cooks the center without browning the exterior too aggressively.

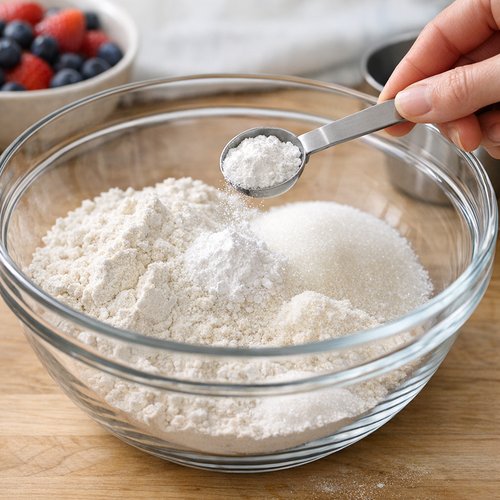
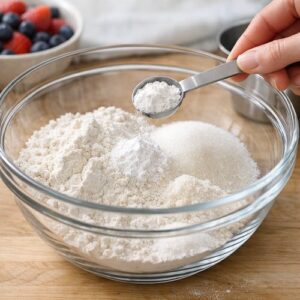
Step 2: Build Your Dry Mixture With the Precision of a Chemist
In a large mixing bowl (I prefer glass so I can see through it), combine your flour, sugar, baking powder, and salt. Here’s the technique moment: use a whisk, not a spoon. Whisking aerates your dry ingredients—it incorporates tiny air pockets throughout. These air pockets act as nucleation sites when leavening agents activate in the oven. More air now means more lift later. Whisk for about 20 seconds, making sure you break up any lumps of baking powder or sugar. You’re not looking for a perfectly uniform color—just ensure no streaks of baking powder remain visible.
Step 3: Create Your Wet Mixture (This Is Where Emulsification Happens)
In a separate medium bowl, whisk together your milk, oil, egg, and vanilla extract. This combination creates an emulsion—oil and water don’t naturally mix, but the egg yolk acts as an emulsifier, coating oil droplets in a protective layer that allows them to suspend in milk. This emulsion is what creates a tender crumb. As the egg protein denatures in the oven, it stabilizes this mixture, preventing greasiness. Whisk this wet mixture for about 15 seconds until the color is uniform and slightly lighter—you’re incorporating a tiny amount of air here too. If your egg was cold from the refrigerator, your mixture might look slightly curdled. That’s fine—it’ll smooth out during the next step.
Step 4: The Most Critical Step—Combining Wet and Dry (Gluten Development)
Pour your wet mixture into your dry mixture. Now here’s what separates home bakers from skilled ones: mix just until the ingredients are barely combined. I’m talking about 10-12 gentle folds with a spatula. You should still see streaks of flour. Your batter should look lumpy and underdeveloped. Why? Flour contains gluten proteins. The more you mix after adding liquid, the more you develop gluten. Developed gluten creates chewy, dense bread. Underdeveloped gluten creates tender, crumbly bread. In sweet quick breads like this one, you want minimal gluten development. The lumps will smooth out during baking as proteins hydrate.
This is the mistake most home bakers make—they mix until the batter looks smooth and uniform. Resist that instinct. Lumpy batter equals tender bread.

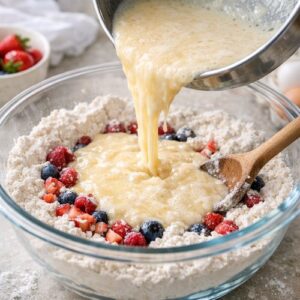
Step 5: The Fold-and-Coat Method for Perfect Berry Distribution
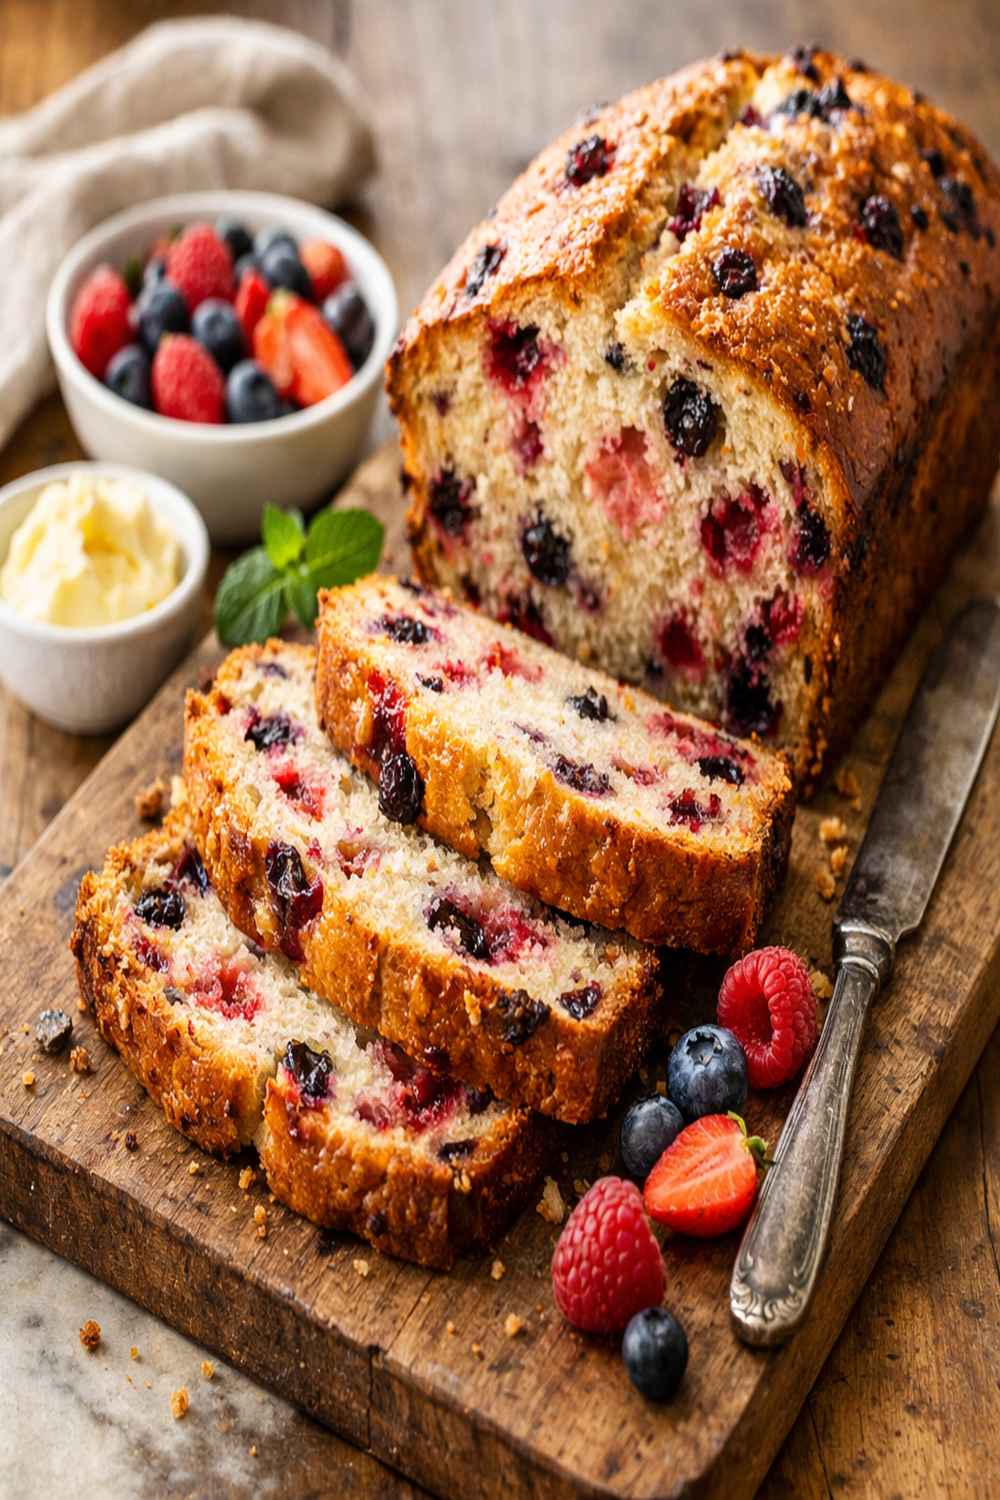
Pat your blueberries completely dry with paper towels—any surface moisture causes bruising. In a small bowl, gently toss your berries with cornstarch using a light hand. I use my fingers, rotating the berries in the cornstarch rather than stirring. The cornstarch creates an invisible protective coating. Now comes the signature move: fold the berries into the batter using the under-and-over motion. Spatula down through the center of the batter, along the bottom, then up and over the top. Rotate your bowl a quarter turn. Repeat. Do this 12-15 times until berries are evenly distributed. You’ll see them suspended throughout rather than sitting on top or sinking to the bottom. This distribution happens because you’re folding gently—you’re not breaking berries apart, and you’re moving slowly enough to maintain batter consistency.
Here’s what you should see: individual berries throughout the batter, no clusters, no bare patches. The batter should still look slightly lumpy—that’s perfect.

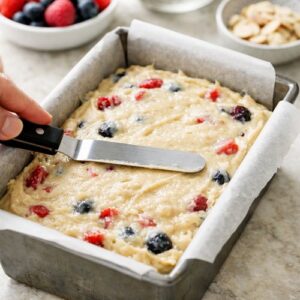
Step 6: Transfer and Top With Intention
Pour your batter into your prepared loaf pan, smoothing the top gently with an offset spatula. Don’t press or compact—just level it. Now sprinkle your coarse sugar over the top in an even layer. This topping serves two purposes: visual appeal and textural contrast. The sugar won’t dissolve completely into the bread; it’ll create a subtle crunch that provides eating experience beyond just flavor.

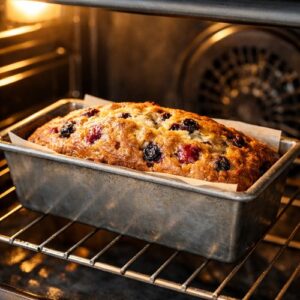
Step 7: Bake With Patience and Trust
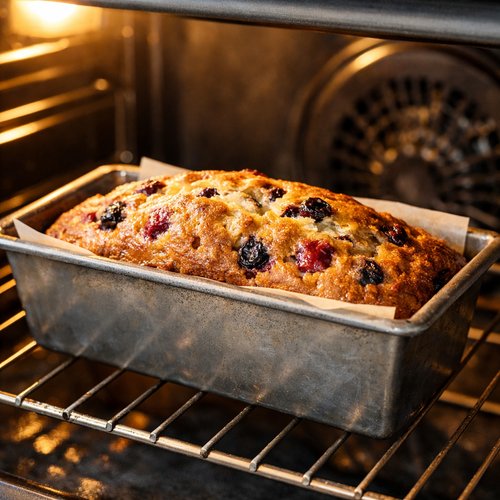
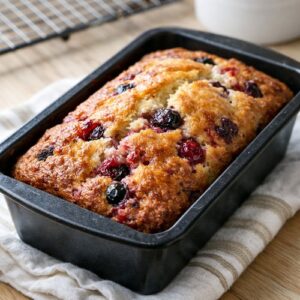
Slide your pan into your preheated oven. Set a timer for 60 minutes. Do not open the oven door before 50 minutes—opening it drops the temperature suddenly and can create a dense, gummy center. At 60 minutes, check your bread with a wooden toothpick inserted into the center. If it emerges clean or with just a few moist crumbs (not wet batter), you’re done. If it comes out with wet batter, bake another 5-10 minutes and recheck. The berry bread should be deep golden brown on top, and the edges should be slightly pulling away from the pan.
Total baking time is usually 60-70 minutes, depending on your oven’s accuracy. Every oven bakes differently—some run hot, some run cold. Over time, you’ll learn your oven’s personality.
Step 8: Cool Properly to Set the Crumb
Remove your bread from the oven and let it rest in the pan for 15 minutes. This resting period is crucial—it allows the crumb to set and firm up slightly. If you try to turn it out of the pan immediately, it’ll fall apart. After 15 minutes, run a small knife around the edges and turn the bread out onto a cooling rack. Let it cool completely—at least 2 hours—before slicing. If you slice it while warm, you’ll see it’s still gummy inside. The crumb continues to set as it cools. Patience creates better texture.

How to Know You’ve Mastered the Technique
Mastery isn’t about following steps perfectly. It’s about recognizing when something’s working. Here are the sensory indicators that tell you you’ve nailed the fold-and-coat technique:
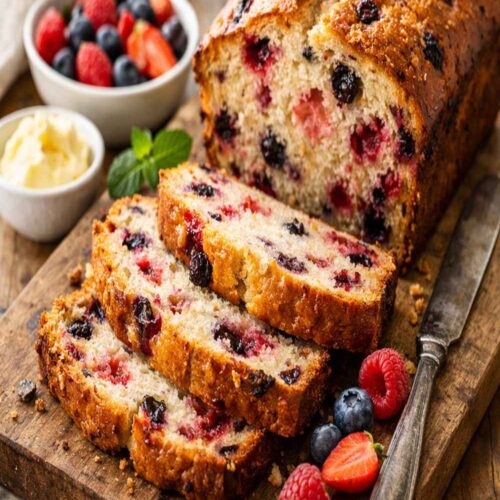
- Visual: An evenly speckled interior with berries suspended throughout – when you slice your finished bread, you should see berries distributed consistently from top to bottom. No section should have three berries while another section has none. No clusters of berries. This even distribution means your folding motion was controlled and your berry coating protected them from bruising.
- Texture: A tender, moist crumb that’s slightly delicate rather than dense – when you bite into it, the bread should give way easily without being dry or crumbly. It should feel light and have a slight spring when you compress it gently with your finger. This texture means you avoided overmixing and your emulsion stabilized properly.
- Appearance: Minimal purple staining with a clean, even color throughout – if your batter turned purple or had streaks, it means berries released juice, which indicates either they weren’t dry enough or you mixed too vigorously. Mastery means a neutral or very lightly tinted interior with no obvious juice staining.
- Flavor: Berry flavor that’s present but not overwhelming, with subtle vanilla notes – you should taste distinct blueberries, but they shouldn’t dominate. If they’re overpowering, you may have packed the bread too densely with fruit or used underripe berries. Vanilla should whisper, not shout.
Common Technique Mistakes and How to Fix Them
- Mistake: Sunken berries clustered at the bottom – This happens when berries aren’t coated (they’re too moist and heavy) or when you mix them into the batter with a spoon instead of folding. Fix: dry your berries completely before coating, use cornstarch instead of flour for the coating, and commit to the folding motion—down, across the bottom, up and over.
- Mistake: Dense, gummy crumb throughout the entire loaf – This indicates overmixing, which developed too much gluten. It can also mean your batter was too wet. Fix: next time, mix your wet and dry ingredients until you see obvious lumps, then stop. Don’t stir. Also, ensure your berries are dry—excess berry juice adds moisture and creates gumminess.
- Mistake: Purple or red streaks throughout the batter – Berry juice is staining your batter, which means berries released liquid during mixing. Fix: pat berries completely dry, coat them with cornstarch (which absorbs moisture better than flour), and fold them in gently with minimal motion. If you’re folding 25 times, you’re mixing too much.
- Mistake: Bread tastes bitter or has a metallic flavor – This is from imitation vanilla extract or from baking powder past its expiration date. Fix: splurge on real vanilla extract—the flavor difference is worth it. Replace your baking powder every 6-8 months since it loses potency over time.
- Mistake: Uneven baking—golden brown on top but pale and underbaked on the sides – Your oven likely runs hot, or your oven rack position is too high. Fix: position your rack in the middle of the oven, not the upper third. If baking still seems uneven, tent the top with foil after 40 minutes to prevent overbrowning while the center catches up.
Practice Variations to Build Your Skill
Version 1: Berry Bread (The Classic—This One)
Start here if you’ve never made quick bread before. Blueberries are forgiving because they’re small, relatively sturdy, and cook evenly. The fold-and-coat technique is most obvious with blueberries because you can see the result clearly when you slice the loaf.
Version 2: Mixed Berry Bread (Medium Difficulty)
Use a combination of blueberries, raspberries, and blackberries. This version is harder because raspberries and blackberries are more delicate. They bruise and release juice more easily. This forces you to be even more intentional with your drying and folding. Use only ¾ cup blueberries, ½ cup raspberries, and ¼ cup blackberries to keep total weight the same. The challenge teaches you to adjust technique based on ingredient delicacy.
Version 3: Strawberry Bread With Chocolate Chips (Advanced)
Dice fresh strawberries into small pieces (about ½ inch), pat them completely dry, and use them alongside chocolate chips. This is advanced because strawberries release significant liquid, and the chocolate chips require different folding considerations than berries. Coat strawberries with cornstarch, then fold both strawberries and chocolate chips separately—add strawberries first, then chocolate chips second. This teaches you how to incorporate multiple delicate elements while preserving crumb structure.
Expert’s Make-Ahead Guide: Prep Like a Professional
Here’s how I prep berry bread for meal prep Sunday, straight from my professional kitchen experience:
- Make the batter two steps ahead – Whisk your dry ingredients the night before and store in an airtight container. In the morning, combine wet ingredients and mix, then fold in berries and bake. This saves 10 minutes when you’re sleepy.
- Prep berries the morning of baking – Don’t wash berries the night before; they’ll absorb moisture and bruise. Wash, dry completely, and coat with cornstarch within an hour of baking.
- Freeze batter before baking (advanced technique) – Pour prepared batter into your greased loaf pan, wrap tightly with plastic wrap, and freeze up to 3 days. Bake directly from frozen, adding 15-20 minutes to baking time. This works because the slow thaw prevents gumminess.
- Slice and freeze after cooling completely – Slice fully cooled bread into individual slices, wrap each slice in plastic wrap, then place in a freezer bag. Frozen slices last 3 months and thaw to almost fresh quality at room temperature in 30 minutes. This is my trick for grab-and-go breakfasts.
Can I Store Berry Bread Recipe?
Absolutely—and storage methods vary based on your timeline. Room temperature (counter): up to 2 days wrapped tightly in plastic wrap or a food storage bag. The bread actually improves slightly on day two as the crumb continues to set and flavors meld. After day two, it begins drying out noticeably.
Refrigerator: up to 5 days stored in an airtight container or wrapped tightly. Cold temperatures slow staling, but they also slightly dry out the crumb texture. I only recommend refrigeration if you have room-temperature storage issues or want to extend shelf life.
Freezer: up to 3 months for whole loaves, or up to 3 months for individual slices. Wrap the cooled loaf tightly in plastic wrap, then place in a freezer-safe bag with the air squeezed out. Thaw at room temperature for 2-3 hours, then slice. Individual slices thaw in about 30 minutes and work beautifully for quick breakfasts—this is my preferred method.
One pro tip from my culinary training: don’t refrigerate your bread if you can avoid it. The cold accelerates staling by crystallizing starches. Room temperature or freezer are your best options.
Nutrition Information
Per slice (based on 12 slices per loaf): approximately 185 calories, 3.2 grams protein, 26 grams carbohydrates, 8 grams fat, 4.8 grams fiber, and 95 milligrams sodium. Data sourced from USDA Nutrient Database calculations.
Key nutritional highlight: The fiber content comes from both the whole grain flour and the berries themselves. One slice delivers about 15% of your daily fiber needs, which supports digestive health and provides sustained energy. The antioxidant content from blueberries—specifically anthocyanins and resveratrol—provides functional benefits beyond simple carbohydrate energy. This isn’t empty-calorie bakery food; it’s food that actually nourishes your body.
The healthy oil (not butter) means you’re getting monounsaturated and polyunsaturated fats that support cardiovascular health while maintaining moisture in the crumb. This recipe balances indulgence with nutrition intentionally.
What to Serve With Berry Bread Recipe?
Berry bread shines alongside foods that complement its delicate sweetness and tender structure. Here’s how I serve it in my kitchen:
- Whipped mascarpone and honey – Whip 4 ounces of mascarpone with a tablespoon of honey and a pinch of vanilla. This creates a luxurious spread that doesn’t compete with the bread’s subtle flavors. The tanginess of mascarpone balances the bread’s sweetness perfectly.
- Cultured butter and jam – Room-temperature cultured butter with a thin spread of jam creates a classic pairing. The bread’s structure is sturdy enough to hold toppings without falling apart, unlike more delicate options.
- Greek yogurt with granola – Toast slices lightly and serve alongside a bowl of plain Greek yogurt mixed with a drizzle of honey and topped with granola. This combination creates a complete breakfast with protein, carbs, and probiotics. You could also pair it with a banana protein shake for an even more nutrient-dense breakfast.
- Soft cheeses like ricotta or cream cheese – Spread softened cream cheese on warm toast—the warmth slightly melts the cheese into the bread’s crumb. If you want something lighter, ricotta with a touch of lemon zest and fresh mint offers brightness.
- Simply on its own with tea or coffee – Sometimes the best pairing is no pairing. A slice of well-made berry bread, still slightly warm, with a cup of hot tea is elegance in simplicity. The bread’s moisture and flavor stand alone.
Seasonal Variations
Spring/Summer: Fresh berry variation – Use whatever berries are at peak season in your region. In spring, look for strawberries and early blueberries. In summer, raspberries and blackberries flourish. The technique remains identical; only the berry selection changes. Fresh berries are ideal because they’re most flavorful and have the best texture.
Fall: Dried cranberry and orange variation – Chop dried cranberries roughly and rehydrate them briefly in warm orange juice before coating with cornstarch. This adds tartness and a hint of citrus complexity. Use the same fold-and-coat technique—dried berries are sturdier so they’ll tolerate slightly more vigorous folding.
Winter: Frozen berry variation – Don’t thaw frozen berries; they’ll release juice as they warm. Instead, coat them while frozen with cornstarch and fold them into the batter directly from the freezer. They’ll thaw during baking and distribute evenly. This variation teaches you that the fold-and-coat method adapts to ingredient state—the principle remains constant even when ingredients change.
Berry Bread Recipe
Ingredients
For the Bread Base
- ½ teaspoon fine sea salt enhances flavor and strengthens gluten structure
- 1½ cup all-purpose flour (spooned and leveled, never packed
- 1 large egg, room temperature acts as a binder and adds richness to the crumb
- 2 teaspoon baking powder (the primary leavening agent that creates lift
- ½ cup granulated sugar adds structure and moisture, helps create an open crumb
- ½ teaspoon pure vanilla extract (enhances flavor subtly
- ¼ cup neutral oil like canola or light olive oil creates moisture and tenderness without the heaviness of butter
- ¾ cup whole milk full-fat creates a tender, moist texture better than low-fat options
For the Berries and Finish
- 1 teaspoon cornstarch (coats berries to prevent juice release
- 1½ cup fresh blueberries, washed and completely dried moisture on the surface causes bruising and uneven distribution
- 1 tablespoon coarse sugar for topping adds texture and visual appeal, won't dissolve into the bread
Instructions
Step 1: Prepare Your Pan and Oven With Precision
- Preheat your oven to 350°F (175°C). While it heats, grease your 8½ x 4½-inch loaf pan thoroughly—I use a silicone pastry brush with melted butter, making sure to coat every corner, edge, and crevice. Then lightly dust the entire interior with flour, shaking out any excess. This two-step coating prevents sticking while keeping your bread's edges clean and defined. This pan size matters—if you use a larger pan, your bread will be too shallow and overbake; smaller means it stays underbaked in the center. Your oven temperature is critical too. At 350°F, you achieve gentle, even baking that cooks the center without browning the exterior too aggressively.
Step 2: Build Your Dry Mixture With the Precision of a Chemist
- In a large mixing bowl (I prefer glass so I can see through it), combine your flour, sugar, baking powder, and salt. Here's the technique moment: use a whisk, not a spoon. Whisking aerates your dry ingredients—it incorporates tiny air pockets throughout. These air pockets act as nucleation sites when leavening agents activate in the oven. More air now means more lift later. Whisk for about 20 seconds, making sure you break up any lumps of baking powder or sugar. You're not looking for a perfectly uniform color—just ensure no streaks of baking powder remain visible.
Step 3: Create Your Wet Mixture (This Is Where Emulsification Happens)
- In a separate medium bowl, whisk together your milk, oil, egg, and vanilla extract. This combination creates an emulsion—oil and water don't naturally mix, but the egg yolk acts as an emulsifier, coating oil droplets in a protective layer that allows them to suspend in milk. This emulsion is what creates a tender crumb. As the egg protein denatures in the oven, it stabilizes this mixture, preventing greasiness. Whisk this wet mixture for about 15 seconds until the color is uniform and slightly lighter—you're incorporating a tiny amount of air here too. If your egg was cold from the refrigerator, your mixture might look slightly curdled. That's fine—it'll smooth out during the next step.
Step 4: The Most Critical Step—Combining Wet and Dry (Gluten Development)
- Pour your wet mixture into your dry mixture. Now here's what separates home bakers from skilled ones: mix just until the ingredients are barely combined. I'm talking about 10-12 gentle folds with a spatula. You should still see streaks of flour. Your batter should look lumpy and underdeveloped. Why? Flour contains gluten proteins. The more you mix after adding liquid, the more you develop gluten. Developed gluten creates chewy, dense bread. Underdeveloped gluten creates tender, crumbly bread. In sweet quick breads like this one, you want minimal gluten development. The lumps will smooth out during baking as proteins hydrate. This is the mistake most home bakers make—they mix until the batter looks smooth and uniform. Resist that instinct. Lumpy batter equals tender bread.
Step 5: The Fold-and-Coat Method for Perfect Berry Distribution
- Pat your blueberries completely dry with paper towels—any surface moisture causes bruising. In a small bowl, gently toss your berries with cornstarch using a light hand. I use my fingers, rotating the berries in the cornstarch rather than stirring. The cornstarch creates an invisible protective coating. Now comes the signature move: fold the berries into the batter using the under-and-over motion. Spatula down through the center of the batter, along the bottom, then up and over the top. Rotate your bowl a quarter turn. Repeat. Do this 12-15 times until berries are evenly distributed. You'll see them suspended throughout rather than sitting on top or sinking to the bottom. This distribution happens because you're folding gently—you're not breaking berries apart, and you're moving slowly enough to maintain batter consistency. Here's what you should see: individual berries throughout the batter, no clusters, no bare patches. The batter should still look slightly lumpy—that's perfect.
Step 6: Transfer and Top With Intention
- Pour your batter into your prepared loaf pan, smoothing the top gently with an offset spatula. Don't press or compact—just level it. Now sprinkle your coarse sugar over the top in an even layer. This topping serves two purposes: visual appeal and textural contrast. The sugar won't dissolve completely into the bread; it'll create a subtle crunch that provides eating experience beyond just flavor.
Step 7: Bake With Patience and Trust
- Slide your pan into your preheated oven. Set a timer for 60 minutes. Do not open the oven door before 50 minutes—opening it drops the temperature suddenly and can create a dense, gummy center. At 60 minutes, check your bread with a wooden toothpick inserted into the center. If it emerges clean or with just a few moist crumbs (not wet batter), you're done. If it comes out with wet batter, bake another 5-10 minutes and recheck. The berry bread should be deep golden brown on top, and the edges should be slightly pulling away from the pan. Total baking time is usually 60-70 minutes, depending on your oven's accuracy. Every oven bakes differently—some run hot, some run cold. Over time, you'll learn your oven's personality.
Step 8: Cool Properly to Set the Crumb
- Remove your bread from the oven and let it rest in the pan for 15 minutes. This resting period is crucial—it allows the crumb to set and firm up slightly. If you try to turn it out of the pan immediately, it'll fall apart. After 15 minutes, run a small knife around the edges and turn the bread out onto a cooling rack. Let it cool completely—at least 2 hours—before slicing. If you slice it while warm, you'll see it's still gummy inside. The crumb continues to set as it cools. Patience creates better texture.
Notes
Nutrition
FAQs
Why does my berry bread sink in the middle instead of rising evenly?
The center collapse usually indicates one of two issues with your technique. First, your oven temperature might be incorrect—if it’s not hot enough initially, the bread rises slowly and doesn’t set before gravity pulls it down. Use an oven thermometer to verify your oven runs at the temperature it claims. Second, opening the oven door too early (before 50 minutes) drops the temperature suddenly, collapsing the delicate structure. Resist the urge to peek. Trust your timer. If your batter looked soupy when you poured it, you might have added too much milk or too much wet ingredient relative to flour—double-check your measurements using the spoon-and-level method.
Can I use frozen blueberries instead of fresh?
Yes, but you must use them while still frozen. Don’t thaw frozen berries—they lose structure and release significant liquid, staining your batter purple and creating gummy sections. Keep them frozen until the moment you fold them into the batter. The cold temperature will slightly extend your baking time by 5-10 minutes because the berries take longer to cook through. Coat them with cornstarch while frozen (your fingers might get cold, but it’s worth it). The technique remains the same; only the starting ingredient temperature changes.
What’s the difference between folding and stirring, and why does it matter so much?
Stirring uses circular motions that move your spatula through the batter repeatedly in the same path, deflating air pockets you’ve built up. Over-stirred batter loses the leavening power you’ve carefully developed. A fold uses deliberate under-and-over motions that incorporate ingredients while preserving air pockets. Imagine your spatula going down through the center, along the bottom of the bowl, then up and over the top—you’re turning the bowl inside out with each motion rather than mixing in circles. Stirring creates dense bread; folding creates light, tender bread. The motion itself is the technique—it’s not about speed or force, it’s about intention and direction.
Why should I coat berries with cornstarch instead of flour?
Cornstarch absorbs surface moisture better than flour because it has a higher absorption capacity. Flour will coat the berries, but it can dissolve slightly into any juice the berries release, creating purple-stained batter. Cornstarch absorbs that juice without dissolving, creating a protective barrier that actually repels moisture. If you only have flour available, use it—it’s better than nothing—but cornstarch is the professional choice. Some bakers use a combination of cornstarch and flour for even better protection.
Can I make this recipe without an oven (like in a slow cooker or instant pot)?
The fold-and-coat technique is specifically designed for oven baking because the dry heat creates structure and allows the crumb to set properly. Slow cooker and Instant Pot methods create steamed bread, which is dense and gummy—the opposite of what we’re trying to achieve. If you’re interested in alternative cooking methods, you’re better off researching slow cooker bread recipes specifically designed for that technique. The fold-and-coat method isn’t adaptable to wet-heat cooking environments. However, you could make the same batter into muffins using a muffin tin and standard oven—that works beautifully and uses identical technique.
More Recipes Using This Technique
- Banana Pancake Muffins – uses the same fold-and-coat technique to distribute mix-ins evenly while preserving a tender crumb
- this weekend breakfast – applies the folding principle to incorporate delicate ingredients without deflating texture
Seasonal Baking Notes from a Chef-Dietitian’s Perspective
After years blending nutrition science with culinary technique, I’ve learned that seasonal baking isn’t just about ingredient availability—it’s about honoring your body’s needs throughout the year. In warm months, your body craves lighter, fruit-forward baked goods (like this berry bread) that provide hydration and natural sugars. In winter, it wants denser, more calorie-dense baked goods that provide sustained energy. This berry bread bridges seasons beautifully because berries freeze well, but you’ll find it tastes best made with fresh, peak-season fruit.
Spring into summer with fresh blueberries and strawberries—these berries are at their nutritional peak when locally grown, delivering maximum anthocyanin content. Late summer brings blackberries and raspberries, which are more delicate and teach you advanced folding skills. Winter doesn’t mean you can’t make this recipe—frozen berries work equally well and are frozen at peak ripeness, so nutritional content is actually preserved better than “fresh” berries shipped across the country.
I make this bread year-round, but I adjust my berry selection seasonally. The technique doesn’t change; the ingredients simply adapt to what’s available. That’s mastery—understanding the principle so deeply that you can apply it flexibly.
You’ve now mastered the fold-and-coat technique, one of the most fundamental moves in quick bread baking. You understand why each step matters, not just what to do. You can recognize when you’ve done it right by sensory cues. You know how to troubleshoot when something goes wrong. And you understand how to adapt this technique to dozens of other recipes. That’s not just a recipe—that’s a cooking superpower. The next time you bake, you’ll move through your kitchen with confidence, knowing exactly why your bread turns out tender, moist, and perfectly speckled with berries. You’ve earned that confidence through understanding, not just following instructions.
Celebrate your flavorful adventure!