This post contains affiliate links. As an Amazon Associate I earn from qualifying purchases.
There’s something magical about walking into a restaurant, watching steam rise from a sizzling plate, and tasting that perfect balance of savory, sweet, and spicy. I wanted to bring that exact experience into my own kitchen—without the takeout prices or MSG concerns. This air fryer Asian chicken recipe does exactly that. It pairs beautifully with steamed broccoli, cauliflower rice, or jasmine rice. If you’re looking for more chicken thigh inspiration, my Barbecue Chicken Thigh Recipe is another game-changer that deserves a spot in your weeknight rotation.
The Restaurant-Quality Meal I Never Knew Was This Simple
I’ll never forget the moment this recipe changed my dinner routine. It was a Tuesday night in my Manhattan kitchen—one of those evenings where I had forty-five minutes before friends arrived and absolutely no takeout budget left. I’d been studying how air fryers concentrate flavors while keeping proteins lean and juicy, and I decided to test a theory: could I replicate that glossy, caramelized Asian chicken I craved from my favorite spot in Chinatown?
I trimmed chicken thighs, threw together a marinade with soy sauce, balsamic vinegar, honey, and ginger, and hit the air fryer. Fourteen minutes later? Pure magic. The skin crisped without any oil, the marinade reduced into a silky glaze, and everyone asked for the recipe before dessert even hit the table. That’s when I realized: restaurant-quality doesn’t require restaurant bills.
What is Air Fryer Asian Chicken Recipe?
This is a modern take on classic Asian-inspired glazed chicken—think the umami-rich, slightly sweet profiles you’d find in authentic Cantonese and pan-Asian cuisine. What makes this version special is the air fryer technique, which lets us achieve restaurant-quality caramelization with minimal oil while keeping the meat incredibly tender inside.
The marinade blends low-sodium soy sauce for deep savory notes, balsamic vinegar for acidity and subtle sweetness, raw honey for shine, crushed garlic for pungency, fresh ginger for warmth, and a touch of sriracha for heat. The chicken thighs absorb all these flavors while the air fryer’s circulating heat creates a glossy, reduced glaze right on the meat.
This isn’t fried chicken—it’s precision cooking that respects both nutritional science and flavor development. As someone trained in clinical nutrition, I love that this recipe delivers restaurant results while keeping sodium controlled and protein optimal for muscle recovery and satiety.
Why You’ll Love This Air Fryer Asian Chicken Recipe
- Restaurant-quality results in under 20 minutes of active time – The air fryer does the heavy lifting while you handle other tasks. No babysitting required, no stovetop splatters, zero stress.
- Naturally lean protein with incredible flavor – Chicken thighs contain more fat than breasts (which keeps them juicy), but they’re still significantly leaner than skin-on options. You get tender, flavorful meat without excess calories.
- Umami-rich marinade that tastes indulgent but stays nutritionally balanced – The combination of soy sauce, balsamic, and ginger creates deep savory notes that satisfy cravings without added sugar or heavy ingredients.
- Budget-friendly and meal-prep ready – Chicken thighs are typically less expensive than breasts, and this recipe scales beautifully. Make a double batch on Sunday, portion it, and you’ve got lunch ready for three days.
- Adaptable to dietary preferences – Swap soy sauce for tamari for gluten-free needs, use coconut aminos for a soy-free option, or adjust heat levels by controlling sriracha. It’s a framework, not a rigid formula.
- No special equipment beyond what most kitchens already have – You need a bowl for marinating and an air fryer. That’s genuinely it. No complicated techniques, no culinary school degree required.
The Ingredients
I’ve curated these ingredients specifically to deliver maximum flavor with minimal fuss. Most are pantry staples you probably already have on hand. Serves 4 people generously with about 2 chicken thighs per person.
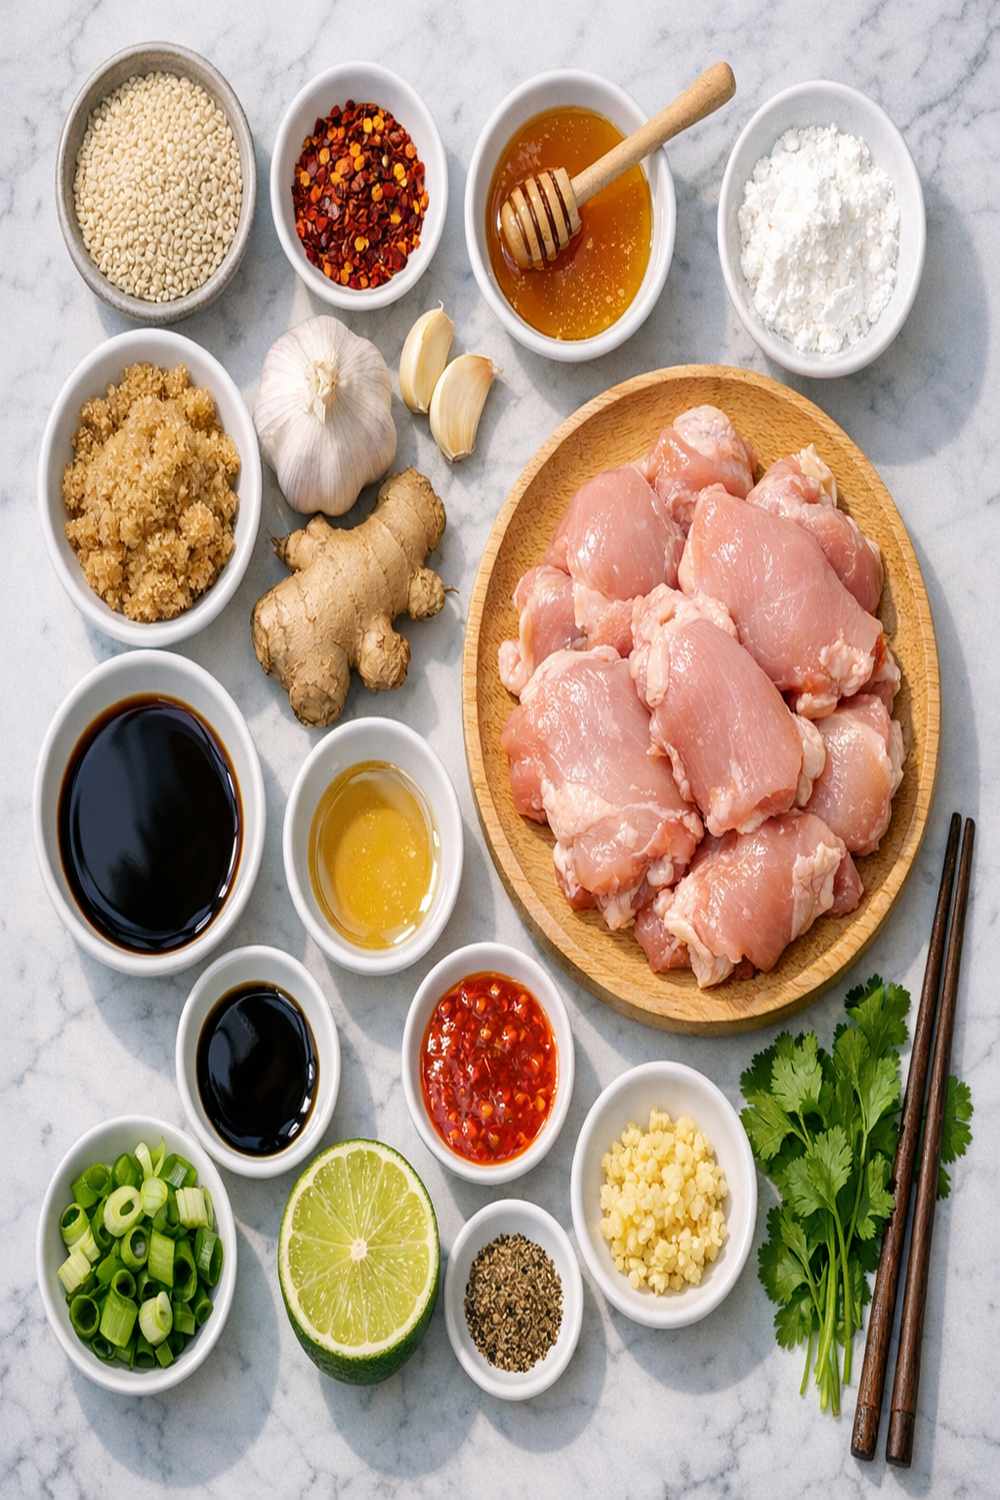
- 3 cloves fresh garlic crushed (pre-minced garlic works in a pinch, but freshly crushed releases more aromatic compounds)
- 1 teaspoon sriracha hot sauce (or swap for gochujang, sambal oelek, or even jalapeño paste depending on heat preference)
- 8 boneless, skinless chicken thighs trimmed of visible fat (32 ounces total, which provides perfect individual portions)
- 1 tablespoon raw honey (adds gloss and slight sweetness; maple syrup or agave nectar work beautifully as alternatives)
- 1 scallion green parts only sliced thin (for garnish and fresh bite; white parts can be saved for stock)
- 1 teaspoon sesame oil (just a touch for authentic aroma—optional but makes a noticeable difference)
- ¼ cup low-sodium soy sauce (keeps salt intake controlled while maintaining that signature umami punch)
- 2½ tablespoons aged balsamic vinegar (this creates acidity and subtle caramelization—not the thick syrupy kind)
- 1 teaspoon fresh ginger grated (truly fresh only—powdered ginger is a different flavor profile entirely)
- 2 tablespoons rice vinegar (I add this to brighten the glaze without additional heat)
How to Make Air Fryer Asian Chicken Recipe?
I’ve broken this into digestible steps that guide you from marinade to plate. The timing is precise because I’ve tested this method dozens of times. Follow along, and you’ll nail it every single time.
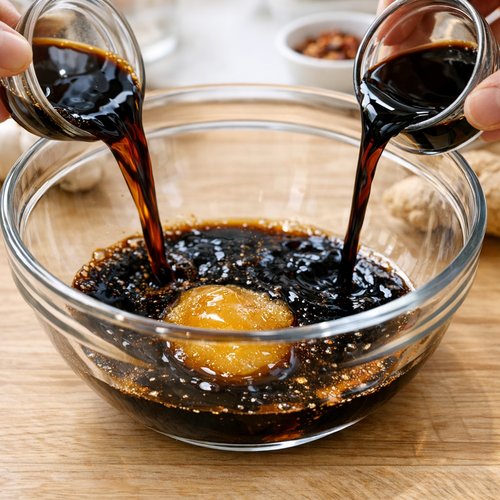
Step 1: Build Your Flavor Foundation with the Marinade
Grab a small mixing bowl—nothing fancy required. Pour in your ¼ cup low-sodium soy sauce, then add 2½ tablespoons balsamic vinegar, 1 tablespoon raw honey, 1 teaspoon freshly grated ginger, 3 crushed cloves of garlic, and 1 teaspoon sriracha. Whisk everything together vigorously for about 30 seconds until the honey fully dissolves and you see no grainy texture at the bottom.
This is where the magic starts. You should smell garlic, ginger warmth, and that deep balsamic sweetness. If the marinade smells appealing to you, you’re on track. Trust your nose—it’s an underrated tool in cooking.
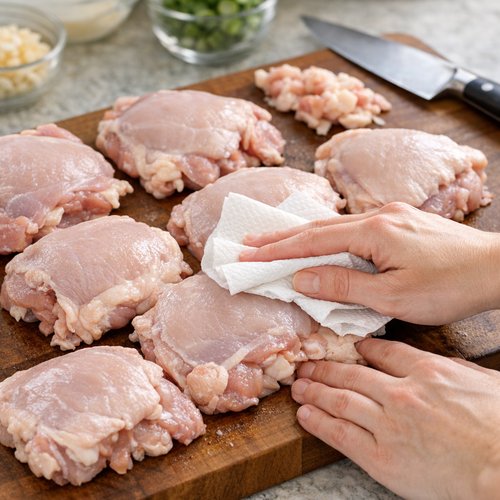
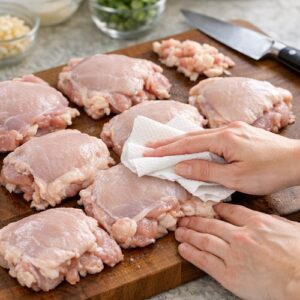
Step 2: Prepare Your Chicken for Maximum Flavor Absorption
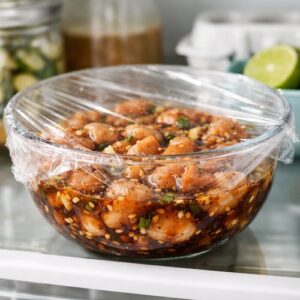
Pat your 8 chicken thighs completely dry with paper towels. Any surface moisture blocks marinade penetration. Trim any visible fat deposits—we want lean protein, not excess calories. Place your trimmed thighs into a large mixing bowl or gallon-sized zip-top bag.
Pour exactly half of your marinade (about ¼ cup) over the chicken thighs, using your hands or tongs to coat every surface. You want each piece glistening. Reserve the remaining half in a small container for your finishing glaze.
Step 3: Let Time Do the Work with Strategic Marinating
Cover your bowl with plastic wrap or seal your bag, then place everything in the refrigerator. Here’s where patience pays off: marinate for at least 2 hours, but ideally 8 to 12 hours overnight. The longer the chicken sits, the deeper the flavor penetration. If you’re using a zip-top bag, marinate in a baking dish on a shelf where it won’t leak.
The enzymes in ginger and garlic are literally breaking down proteins and creating more tender meat while the soy and vinegar add complexity. This isn’t just flavor—it’s food science working in your favor.
Step 4: Preheat Your Air Fryer to Temperature
About 15 minutes before you’re ready to cook, turn your air fryer on to 400°F. This temperature is the sweet spot for chicken thighs—hot enough to create golden, crispy edges while staying low enough that the inside cooks through gently without drying out. Let it preheat fully. A fully preheated basket cooks more evenly.
While the air fryer heats, transfer your reserved marinade (the half you didn’t use for marinating) into a small saucepan. You’ll cook this down into a glaze in just a moment.

Step 5: Remove Chicken from Marinade and Arrange Strategically
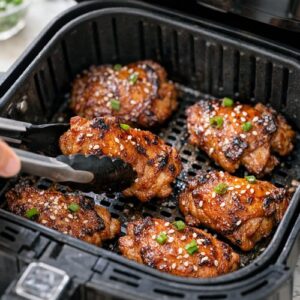
Remove each chicken thigh from the marinade, shaking off excess (that excess liquid should drip back into the bowl—don’t waste it). Arrange your thighs in a single layer in your air fryer basket. They should not touch or overlap. If your basket feels crowded, you’ll need to cook in two batches.
This spacing matters. Crowded baskets create steam instead of that crispy exterior we’re hunting for. If your air fryer feels small, don’t panic—just do batches. The recipe scales effortlessly.

Step 6: Cook with Strategic Turning for Even Caramelization
Place your basket in the preheated air fryer and set the timer for 14 minutes total. At the 7-minute mark, pause the cooking, open the basket carefully, and flip each thigh over. This ensures even browning on both sides.
Your kitchen will smell incredible around minute 10—that’s the Maillard reaction creating caramelization. Resist the urge to check constantly. Let the heat work. When you open the basket at minute 7, look for golden-brown skin developing. The meat should feel firm to the touch but still give slightly when pressed.

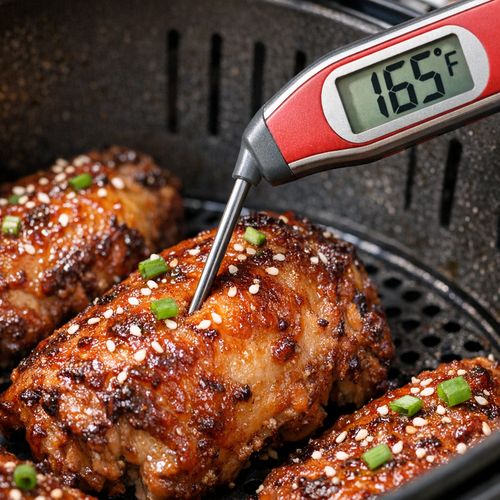
Step 7: Verify Doneness with the Only Test That Matters
At 14 minutes, check the thickest piece by inserting an instant-read thermometer into the center without touching bone. You’re looking for 165°F (74°C) minimum. If any pieces are still below that, give them 2-3 more minutes. Undercooked chicken is a food safety risk—no shortcuts here.
Once everything reads 165°F, carefully remove the basket. The chicken will be steaming and fragrant. Let it rest in the basket for 2 minutes—this allows carryover cooking and helps juices redistribute.
Step 8: Create Your Finishing Glaze with Precision Timing
While the chicken rests, place that reserved marinade into your small saucepan over medium-low heat. You’re not boiling—you’re gently reducing for 1 to 2 minutes. The liquid will thicken slightly, become glossier, and darken slightly as the sugars concentrate.
Stir occasionally and watch carefully. The glaze should coat the back of a spoon lightly. If it starts thickening too much, remove it from heat immediately. This glaze is about enhancing flavor, not making a thick syrup.
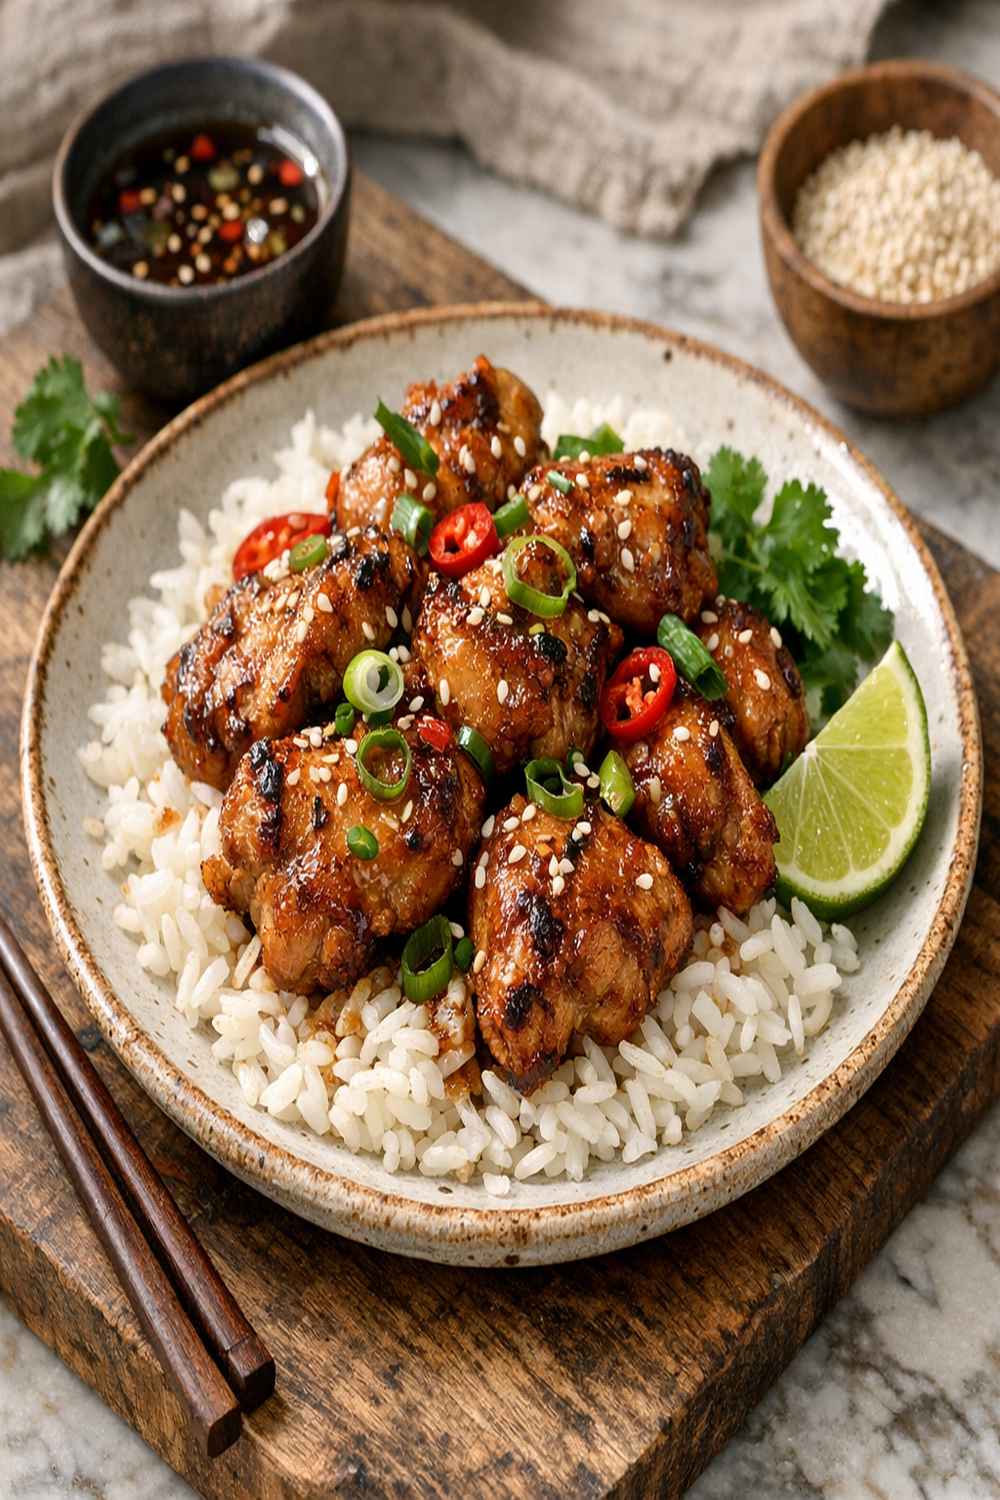
Step 9: Plate and Finish with Fresh Garnish
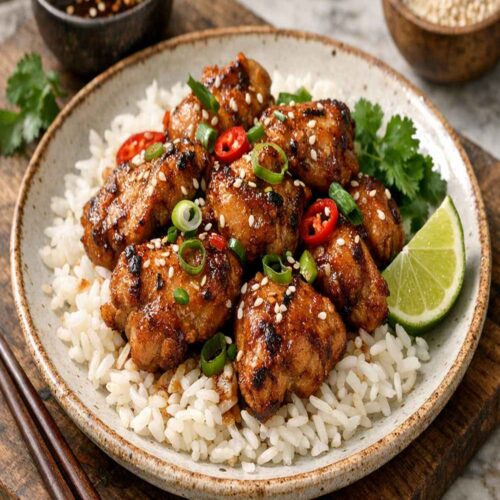
Transfer your cooked chicken thighs to a serving platter or individual plates. Drizzle the warm glaze evenly over each piece—don’t overdo it; a light coating is elegant and lets the chicken shine. Scatter your thinly sliced scallion greens over the top. That fresh green note brightens everything and adds textural contrast.
Serve immediately while the glaze is still warm and the chicken edges are at their crispiest. This dish is best enjoyed fresh, though leftovers are absolutely delicious cold the next day.
Expert’s Nutritional Tip
As a registered dietitian, I want to highlight why chicken thighs deserve more love in lean-eating conversations. While white meat chicken breast is lower in fat, thighs contain more iron, zinc, and B vitamins—nutrients many people don’t consume enough of. The additional fat in thighs (about 4-5g per 3-ounce serving versus 1-2g in breasts) makes you feel more satisfied, stabilizes blood sugar, and actually improves the absorption of fat-soluble vitamins like vitamin A and K.
The lower-sodium soy sauce here is crucial too. A standard soy sauce can pack 800-1000mg sodium per tablespoon, but low-sodium versions deliver the umami impact while keeping sodium closer to 200-300mg per tablespoon. Over the course of a day, this adjustment matters for blood pressure management and overall cardiovascular health.
Make-Ahead Guide for Meal Prep Masters
This recipe is my go-to for Sunday meal prep because it scales beautifully and stores well. Here’s my professional approach:
- Full Make-Ahead Option (Best for Busy Weeks) – Complete steps 1-3 on Sunday evening. Marinate chicken overnight. Monday morning, cook the full batch right before work or during your lunch break if you have air fryer access at work. Store cooked chicken in an airtight container for up to 4 days. The glaze can be made fresh each day (takes 3 minutes) or made in bulk and stored separately in a small jar.
- Partial Prep (Balanced Approach) – Prep and marinate your chicken thighs in batches throughout the week so you always have marinated chicken ready. You can store raw marinated chicken in the refrigerator for up to 12 hours before cooking. This keeps flavors fresh while saving time on busy nights.
- Freezer-Friendly Strategy – Freeze marinated chicken thighs in a zip-top bag for up to 3 months. Thaw in the refrigerator overnight, then air fry as directed. The extended marinating time from freezing actually deepens flavor.
- Glaze Preparation – Make the glaze in bulk (multiply the proportions), store in a glass jar in the refrigerator for up to 2 weeks, and simply reheat gently in a small saucepan before serving.
Common Mistakes to Avoid
- Skipping the Dry-Off Step – Wet chicken won’t crisp in the air fryer. Moisture creates steam, which blocks browning. Always pat thighs completely dry with paper towels before marinating or cooking. This single step separates soggy results from crispy ones.
- Crowding the Air Fryer Basket – I see this constantly in my kitchen when friends “help” cook. Overlapping chicken steams instead of fries. If pieces touch, you’ll regret it. Work in batches if needed—there’s no shame in that.
- Using Powdered Ginger Instead of Fresh – Powdered ginger is lovely for baking but creates a different, more earthy flavor profile. Fresh ginger is essential here for that bright, slightly spicy warmth. If you can’t find fresh, reduce powdered ginger to ¼ teaspoon maximum.
- Marinating for Less Than 2 Hours – If you’re short on time, even 1 hour helps, but you’ll lose complexity. The longer the marinade works, the more flavorful your result. Plan ahead when possible.
- Forgetting to Reserve Half the Marinade – Save that second half for your glaze! Using the marinating liquid (after contact with raw chicken) is food-safe only if you heat it to a boil, which this recipe does. This trick maximizes flavor without extra prep.
Seasonal Variations to Keep It Fresh Year-Round
- Spring Version (April-May) – Add 1 tablespoon fresh lemon juice and 1 teaspoon fresh mint to your marinade. Serve over a bright spring salad with snap peas and radishes. The citrus lifts the heavier ginger-garlic profile beautifully as weather warms.
- Summer Version (June-August) – Reduce honey to ½ tablespoon and add 2 tablespoons fresh lime juice instead. Serve with cold sesame noodles or alongside grilled summer vegetables. Add Thai basil to your garnish instead of scallions for that aromatic, slightly licorice note.
- Fall Version (September-October) – Add ½ teaspoon five-spice powder and 1 tablespoon rice vinegar to the marinade. Serve over roasted butternut squash or alongside sautéed bok choy. The warming spices echo autumn perfectly.
- Winter Version (November-February) – Add 1 teaspoon dark sesame oil and a pinch of white pepper to the marinade. Serve over creamy cauliflower rice or alongside braised mushrooms. The richer flavors feel more comforting as temperatures drop.
Tips and Tricks From My Kitchen to Yours
- Upgrade Your Garlic Game – Crushed garlic releases more flavor compounds than minced. Use the flat side of your knife blade to crush cloves slightly before mincing. Your nose will tell you when you’ve released enough oils.
- Temperature Matters More Than Time – Different air fryer brands vary slightly in heat intensity. If your chicken reads 165°F at 12 minutes, that’s perfect. If it needs 16 minutes, adjust next time. Trust your thermometer, not the clock.
- Make Extra Glaze for Serving – Double or triple your glaze batch. Drizzle over rice, roasted vegetables, or even eggs the next morning. This marinade-inspired glaze is liquid gold in your kitchen.
- Leftover Chicken Gets Better When Repurposed – Shred cold leftover chicken and toss into green salads, grain bowls, or lettuce wraps. The concentrated flavors actually taste even more vibrant at room temperature.
- Customize Heat Levels Without Guesswork – If sriracha isn’t your thing, try gochujang (deeper, funkier), sambal oelek (fruitier heat), or even diced fresh jalapeño (fresher profile). Start with less than the recipe calls for, taste the raw marinade, then add more if needed.
- Save Time with Prep Containers – Measure your soy sauce, vinegar, honey, and sriracha into small glass prep containers the night before. Cooking becomes assembly when ingredients are ready to go.
Can I Store Air Fryer Asian Chicken Recipe?
Refrigerator Storage – Cooked chicken keeps beautifully in an airtight container for up to 4 days. Store the glaze separately in a small jar; it will thicken slightly as it cools but rewarms easily. I actually prefer eating this cold on salads the next day—the flavors feel even more concentrated.
Freezer Storage – Fully cooked chicken thighs freeze extremely well for up to 3 months. Layer pieces with parchment paper in a freezer-safe container to prevent sticking. Thaw in the refrigerator overnight, then reheat gently in a 325°F oven for about 10 minutes until warmed through. The glaze can be made fresh or you can freeze it too—just let it thaw and reheat gently.
Raw Marinated Chicken – Keeps in the refrigerator for up to 12 hours before cooking (this is actually ideal for flavor development). Don’t freeze marinated chicken for more than 1 week before the marinade starts breaking down the proteins excessively, making texture mushy. If you want to freeze marinated chicken for longer, cook it first, then freeze.
Reheating Tips – For crispy edges, reheat cooked chicken in a 375°F air fryer for 3-4 minutes instead of a microwave. This restores the texture beautifully. The microwave will create a softer, steamed texture, which works fine if you’re topping a salad or grain bowl.
Nutrition Information
Based on USDA nutrient database analysis for a serving of 2 chicken thighs (approximately 200g total), this recipe delivers roughly 280 calories, 35g lean protein, 8g total fat (with 2g saturated fat), 4g carbohydrates, and 520mg sodium (from the low-sodium soy sauce and added glaze).
The protein-to-calorie ratio makes this exceptionally satisfying—you’re getting nearly 50% of calories from protein, which supports muscle recovery and keeps you full for hours. The fat content includes beneficial monounsaturated and polyunsaturated fats from the sesame oil and chicken itself, while saturated fat stays well within recommended daily limits.
Carbohydrates come primarily from the honey and vinegar, which are minimal. This makes the recipe keto-friendly if you serve it with low-carb sides (like cauliflower rice or spiralized vegetables). Sodium is controlled thanks to low-sodium soy sauce, though if you’re managing blood pressure closely, rinse the cooked chicken briefly or reduce soy sauce by 1 tablespoon.
What Can I Serve With Air Fryer Asian Chicken Recipe?
This chicken is flexible and pairs brilliantly with nearly everything. I’ve built this around clean, vibrant sides that let the glaze shine. If you’re building a complete meal, my Quick Honey Garlic Shrimp and Broccoli follows a similar flavor profile and would create a stunning surf-and-turf combination.
- Steamed or Stir-Fried Broccoli with Sesame Seeds – The brassica’s slight bitterness balances the glaze’s sweetness perfectly. Toss with a bit of sesame oil and crushed garlic for echo flavors.
- Jasmine or Coconut Rice – Let the fluffy rice absorb the glaze that pools on the plate. The coconut version adds subtle sweetness that complements ginger-garlic beautifully.
- Cauliflower Rice for Low-Carb Versions – Roast with sesame oil and scallions for a lighter option that still feels indulgent when dressed with the glaze.
- Sautéed Bok Choy or Gai Lan – These Asian greens are traditional for a reason—their tender stems cook quickly while leaves add texture. Finish with garlic and a splash of soy sauce.
- Crispy Sweet Potato Fries – The natural sweetness creates a lovely contrast with the savory-spicy marinade. Air fry at 400°F for about 12 minutes until golden.
- Quick Cucumber Salad with Rice Vinegar – Slice cucumbers thinly, toss with rice vinegar, a touch of sugar, salt, and fresh cilantro. The cooling effect is perfect after eating spiced chicken.
- Roasted Mushroom Medley – Cremini, shiitake, or oyster mushrooms roasted with soy sauce and ginger echo your marinade beautifully and add umami depth.
- Cold Sesame Noodles – Toss cooked soba or ramen noodles with sesame oil, low-sodium soy sauce, rice vinegar, and julienned vegetables. Serve the chicken on top for a composed bowl.
Substitutes
- Soy Sauce Alternative (Tamari) – Use tamari instead of soy sauce for a gluten-free version. The flavor is nearly identical, slightly deeper actually. Use the same amount. Tamari is my go-to when cooking for clients with celiac disease.
- Soy Sauce Alternative (Coconut Aminos) – This soy-free, paleo-friendly sauce offers similar umami with a slightly sweeter profile. Use slightly less (about 3 tablespoons instead of ¼ cup) since it’s already sweeter than soy sauce.
- Honey Alternatives – Maple syrup creates a deeper, earthier sweetness. Agave nectar is more neutral. Brown rice syrup works beautifully for Asian profiles. Use the same amount. Avoid artificial sweeteners—they can taste metallic when reduced.
- Sriracha Alternative – Gochujang paste (1 teaspoon), sambal oelek, or even diced fresh jalapeños work here. Each brings a different heat profile. Start with less than the recipe calls for since fresh peppers vary in intensity.
- Balsamic Vinegar Alternative – Rice vinegar (use 2 tablespoons instead of 2½, since it’s less thick) or sherry vinegar work beautifully. These are lighter and let the ginger-garlic shine through more. Avoid white vinegar—it’s too sharp.
- Ginger Alternative – Fresh ginger is irreplaceable for this application, but if you’re truly stuck, use the zest of 1 lime plus ¼ teaspoon ground white pepper. It’s not identical, but it captures some brightness and warmth.
- Chicken Thighs Alternative – This recipe works with bone-in, skin-on thighs too—just add 3-4 minutes to cooking time and increase temperature to 410°F. Chicken breasts work but will be slightly drier; reduce cooking time to 10-12 minutes. Pork tenderloin or thick salmon fillets are delicious alternatives.
- Air Fryer Alternative – Bake at 425°F on a lined sheet pan for 18-20 minutes, flipping halfway. You’ll lose some of the crispy exterior but keep all the flavor. For a stovetop version, sear thighs skin-side down in a skillet for 5 minutes, flip, add glaze, and finish in a 375°F oven for 12 minutes.
Air Fryer Asian Chicken Recipe
Ingredients
- 3 clove fresh garlic crushed pre-minced garlic works in a pinch, but freshly crushed releases more aromatic compounds
- 1 teaspoon sriracha hot sauce or swap for gochujang, sambal oelek, or even jalapeño paste depending on heat preference
- 8 boneless, skinless chicken thighs trimmed of visible fat 32 ounces total, which provides perfect individual portions
- 1 tablespoon raw honey adds gloss and slight sweetness; maple syrup or agave nectar work beautifully as alternatives
- 1 scallion green parts only sliced thin for garnish and fresh bite; white parts can be saved for stock
- 1 teaspoon sesame oil (just a touch for authentic aroma
- ¼ cup low-sodium soy sauce keeps salt intake controlled while maintaining that signature umami punch
- 2½ tablespoon aged balsamic vinegar (this creates acidity and subtle caramelization
- 1 teaspoon fresh ginger grated (truly fresh only
- 2 tablespoon rice vinegar I add this to brighten the glaze without additional heat
Instructions
Step 1: Build Your Flavor Foundation with the Marinade
- Grab a small mixing bowl—nothing fancy required. Pour in your ¼ cup low-sodium soy sauce, then add 2½ tablespoons balsamic vinegar, 1 tablespoon raw honey, 1 teaspoon freshly grated ginger, 3 crushed cloves of garlic, and 1 teaspoon sriracha. Whisk everything together vigorously for about 30 seconds until the honey fully dissolves and you see no grainy texture at the bottom. This is where the magic starts. You should smell garlic, ginger warmth, and that deep balsamic sweetness. If the marinade smells appealing to you, you're on track. Trust your nose—it's an underrated tool in cooking.

Step 2: Prepare Your Chicken for Maximum Flavor Absorption
- Pat your 8 chicken thighs completely dry with paper towels. Any surface moisture blocks marinade penetration. Trim any visible fat deposits—we want lean protein, not excess calories. Place your trimmed thighs into a large mixing bowl or gallon-sized zip-top bag. Pour exactly half of your marinade (about ¼ cup) over the chicken thighs, using your hands or tongs to coat every surface. You want each piece glistening. Reserve the remaining half in a small container for your finishing glaze.
Step 3: Let Time Do the Work with Strategic Marinating
- Cover your bowl with plastic wrap or seal your bag, then place everything in the refrigerator. Here's where patience pays off: marinate for at least 2 hours, but ideally 8 to 12 hours overnight. The longer the chicken sits, the deeper the flavor penetration. If you're using a zip-top bag, marinate in a baking dish on a shelf where it won't leak. The enzymes in ginger and garlic are literally breaking down proteins and creating more tender meat while the soy and vinegar add complexity. This isn't just flavor—it's food science working in your favor.
Step 4: Preheat Your Air Fryer to Temperature
- About 15 minutes before you're ready to cook, turn your air fryer on to 400°F. This temperature is the sweet spot for chicken thighs—hot enough to create golden, crispy edges while staying low enough that the inside cooks through gently without drying out. Let it preheat fully. A fully preheated basket cooks more evenly. While the air fryer heats, transfer your reserved marinade (the half you didn't use for marinating) into a small saucepan. You'll cook this down into a glaze in just a moment.
Step 5: Remove Chicken from Marinade and Arrange Strategically
- Remove each chicken thigh from the marinade, shaking off excess (that excess liquid should drip back into the bowl—don't waste it). Arrange your thighs in a single layer in your air fryer basket. They should not touch or overlap. If your basket feels crowded, you'll need to cook in two batches. This spacing matters. Crowded baskets create steam instead of that crispy exterior we're hunting for. If your air fryer feels small, don't panic—just do batches. The recipe scales effortlessly.

Step 6: Cook with Strategic Turning for Even Caramelization
- Place your basket in the preheated air fryer and set the timer for 14 minutes total. At the 7-minute mark, pause the cooking, open the basket carefully, and flip each thigh over. This ensures even browning on both sides. Your kitchen will smell incredible around minute 10—that's the Maillard reaction creating caramelization. Resist the urge to check constantly. Let the heat work. When you open the basket at minute 7, look for golden-brown skin developing. The meat should feel firm to the touch but still give slightly when pressed.
Step 7: Verify Doneness with the Only Test That Matters
- At 14 minutes, check the thickest piece by inserting an instant-read thermometer into the center without touching bone. You're looking for 165°F (74°C) minimum. If any pieces are still below that, give them 2-3 more minutes. Undercooked chicken is a food safety risk—no shortcuts here. Once everything reads 165°F, carefully remove the basket. The chicken will be steaming and fragrant. Let it rest in the basket for 2 minutes—this allows carryover cooking and helps juices redistribute.
Step 8: Create Your Finishing Glaze with Precision Timing
- While the chicken rests, place that reserved marinade into your small saucepan over medium-low heat. You're not boiling—you're gently reducing for 1 to 2 minutes. The liquid will thicken slightly, become glossier, and darken slightly as the sugars concentrate. Stir occasionally and watch carefully. The glaze should coat the back of a spoon lightly. If it starts thickening too much, remove it from heat immediately. This glaze is about enhancing flavor, not making a thick syrup.

Step 9: Plate and Finish with Fresh Garnish
- Transfer your cooked chicken thighs to a serving platter or individual plates. Drizzle the warm glaze evenly over each piece—don't overdo it; a light coating is elegant and lets the chicken shine. Scatter your thinly sliced scallion greens over the top. That fresh green note brightens everything and adds textural contrast. Serve immediately while the glaze is still warm and the chicken edges are at their crispiest. This dish is best enjoyed fresh, though leftovers are absolutely delicious cold the next day.
Notes
Nutrition
FAQs
Can I marinate the chicken for longer than overnight?
Yes, but with limits. Raw chicken marinated longer than 24 hours begins to develop a mushy texture—the enzymes in ginger and garlic are literally breaking down the protein structure. After 12-24 hours, you’ve hit the sweet spot for flavor without texture issues. If you want to extend prep time, cook the chicken, then store it marinated in cooked form for up to 4 days.
What if my air fryer basket is very small and I can’t fit all 8 thighs?
No problem—cook in two batches. Marinate all 8 together, then air fry 4 at a time. The timing stays exactly the same (14 minutes at 400°F), and the second batch cooks while you’re finishing the first. Just keep the first batch warm in a low oven (200°F) while the second batch cooks. The glaze can be made once and used for both batches.
Is there a way to make this recipe lower in sodium?
Absolutely. Reduce soy sauce from ¼ cup to 3 tablespoons and add 1 tablespoon unsalted chicken broth to maintain liquid ratio. This cuts sodium by about 20-25% while preserving umami. You could also use a reduced-sodium soy sauce, though low-sodium versions are already quite minimal. The final sodium content would drop to around 400mg per serving, which is better for blood pressure management.
Can I prep the marinade in advance and just store it until I’m ready to add chicken?
Absolutely—this is smart meal-prep strategy. Mix your marinade up to 5 days ahead and store it in a glass jar in the refrigerator. The flavors actually meld and deepen over time. When you’re ready to marinate chicken, use half as directed and reserve the other half for your glaze. This is how I manage my week.
Why does my air fryer chicken sometimes come out dry?
Three reasons: overcooking (use a thermometer at 165°F, not guesswork), overcrowding (steaming instead of crisping), or starting with very lean thighs. Chicken thighs from larger birds tend to be fattier and more forgiving. If using smaller thighs, reduce cooking time by 1-2 minutes. The marinade helps retain moisture, so don’t skip that step. Also, let cooked chicken rest 2-3 minutes in the basket—this allows carryover cooking and juice redistribution.
More Recipes You’ll Love
- Air Fryer Wings – Same air fryer technique, different protein. These wings use a similar glaze concept and teach you how to scale this method across proteins.
- Bacon Wrapped Brussels – A vegetable-focused air fryer recipe that complements this chicken beautifully as a side dish and shows how the air fryer handles plant-based foods.
- Barbecue Chicken Thigh Recipe – Another celebration of chicken thighs using a completely different flavor profile, perfect for rotating weeknight dinners.
- This Homemade Air Recipe – Worth adding to your recipe collection.
- My Favorite Air Dish – Worth adding to your recipe collection.
- This Flavorful Chicken Dish – Worth adding to your recipe collection.
This recipe became my Tuesday-night secret weapon because it delivers restaurant-quality results without restaurant prices or the stress of complicated techniques. You have all the knowledge you need right now to create something genuinely delicious. The marinade teaches you how umami, acid, sweetness, and heat work together. The air fryer method shows you precision cooking without fuss. The variations keep you from ever getting bored.
Your friends will ask for this recipe. Your family will request it again. Your weeknight dinners just leveled up. That’s what happens when you combine nutritional science with real culinary passion. Now get in that kitchen and celebrate your flavorful adventure!