This post contains affiliate links. As an Amazon Associate I earn from qualifying purchases.
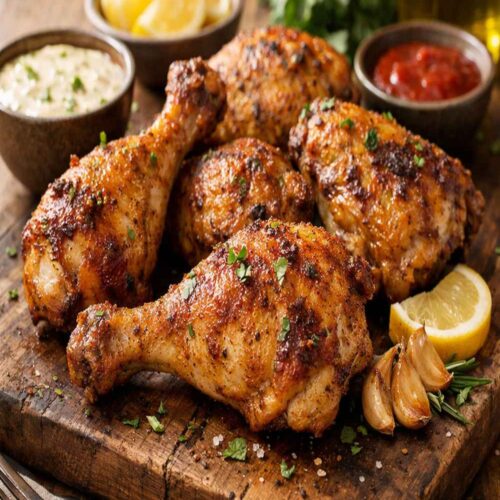
Let me be honest—this air fryer chicken recipe has become my secret weapon for weeknight dinners that taste like they came straight from a restaurant kitchen. The skin crisps up golden and shatters between your teeth, the meat stays impossibly juicy, and you’re done in under 30 minutes. Pair this with crispy baked potatoes or a fresh green salad, and you’ve got the kind of meal that makes everyone at your table happy. This is the recipe I keep coming back to when I need something reliable, flavorful, and nutritionally solid.
How I Fell in Love With Air Fryer Chicken
Three years ago, I was skeptical about air fryers. I’m a chef at heart—I grew up watching my grandmother crisp chicken skin in a cast iron skillet over high heat, and I thought nothing could replicate that magic. Then a client challenged me to rethink my approach, and I started experimenting.
One Tuesday night, I pulled a tray of chicken legs from my air fryer, and something shifted. The skin was crackling. The meat was tender. And I’d spent maybe ten minutes of actual hands-on time. I immediately called my dietitian brain into the conversation: this method uses minimal oil, locks in moisture, and delivers restaurant-quality results without the mess of traditional frying.
That night sparked something—a whole new way of thinking about how to blend my nutritional training with chef-driven technique. Now, this smoked paprika and brown sugar-crusted chicken is in my rotation at least twice a month. It’s become my proof that convenience and flavor don’t have to compete.
What is Air Fry Chicken Legs and Thighs?
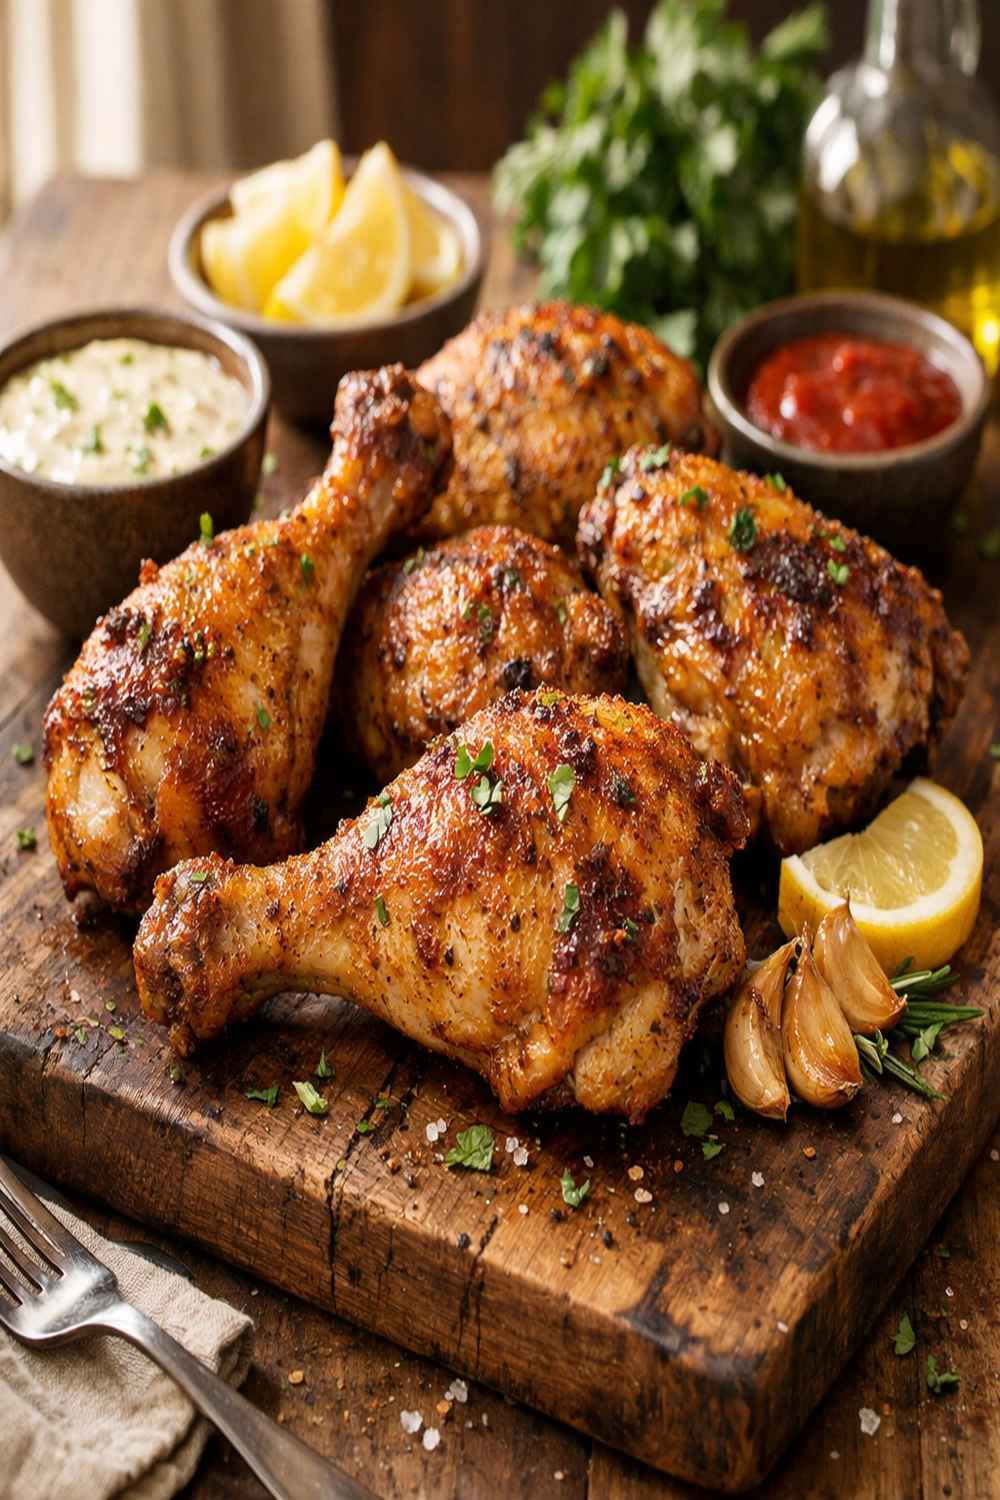
This is bone-in, skin-on chicken legs and drumsticks coated in a bold spice blend—smoked paprika, dry mustard, cayenne, and a hint of brown sugar—then air fried until the exterior is crispy and the interior stays juicy. The brown sugar isn’t about sweetness here; it’s about creating texture. It caramelizes slightly and works with the paprika to build a savory, sophisticated crust.
What makes this recipe special? The combination of smoked paprika (which brings depth) and mustard powder (which adds a subtle tang and helps the spices cling to the skin). Unlike breaded or battered fried chicken, this approach celebrates the natural chicken flavor while adding complexity. It’s a technique borrowed from traditional barbecue rubs, adapted for the precision and speed of air frying.
The result is chicken that tastes like someone spent hours slow-smoking it, but you’ve actually invested about 20 minutes of active cooking time. That’s the sweet spot where nutrition meets reality.
Why You’ll Love This Air Fryer Chicken Legs and Thighs Recipe
- Crispy skin with juicy meat inside – The air fryer circulates hot air, rendering the fat from the chicken skin while the bone insulation keeps the meat tender. This is the best of both worlds.
- Minimal oil required – Just one tablespoon for the whole batch. As a registered dietitian, I appreciate recipes that don’t require you to submerge food in oil to get restaurant-quality results. You’re looking at roughly 8-10 grams of fat per leg, most of it coming naturally from the skin.
- Quick and reliable cooking – No guessing, no babysitting. Eighteen minutes total gives you consistent results every single time.
- Customizable spice blend – This dry rub formula is your template. Swap the cayenne for smoked chipotle, add garlic powder, try berbere spice—the technique stays the same.
- Budget-friendly protein – Chicken legs and thighs are some of the most affordable cuts. You’re getting more flavor and nutrition per dollar than white meat, because dark meat contains more B vitamins and minerals.
- Makes excellent leftovers – Cold the next day, shredded into salads, or reheated gently in a 300°F oven. This recipe works across multiple meals.
The Ingredients
I’ve organized these ingredients to guide you through the process. The chicken is your canvas, and the spice blend is your painting medium. Everything here works in concert to build one cohesive flavor profile. Serves 4 people with about 2-3 pieces per person.
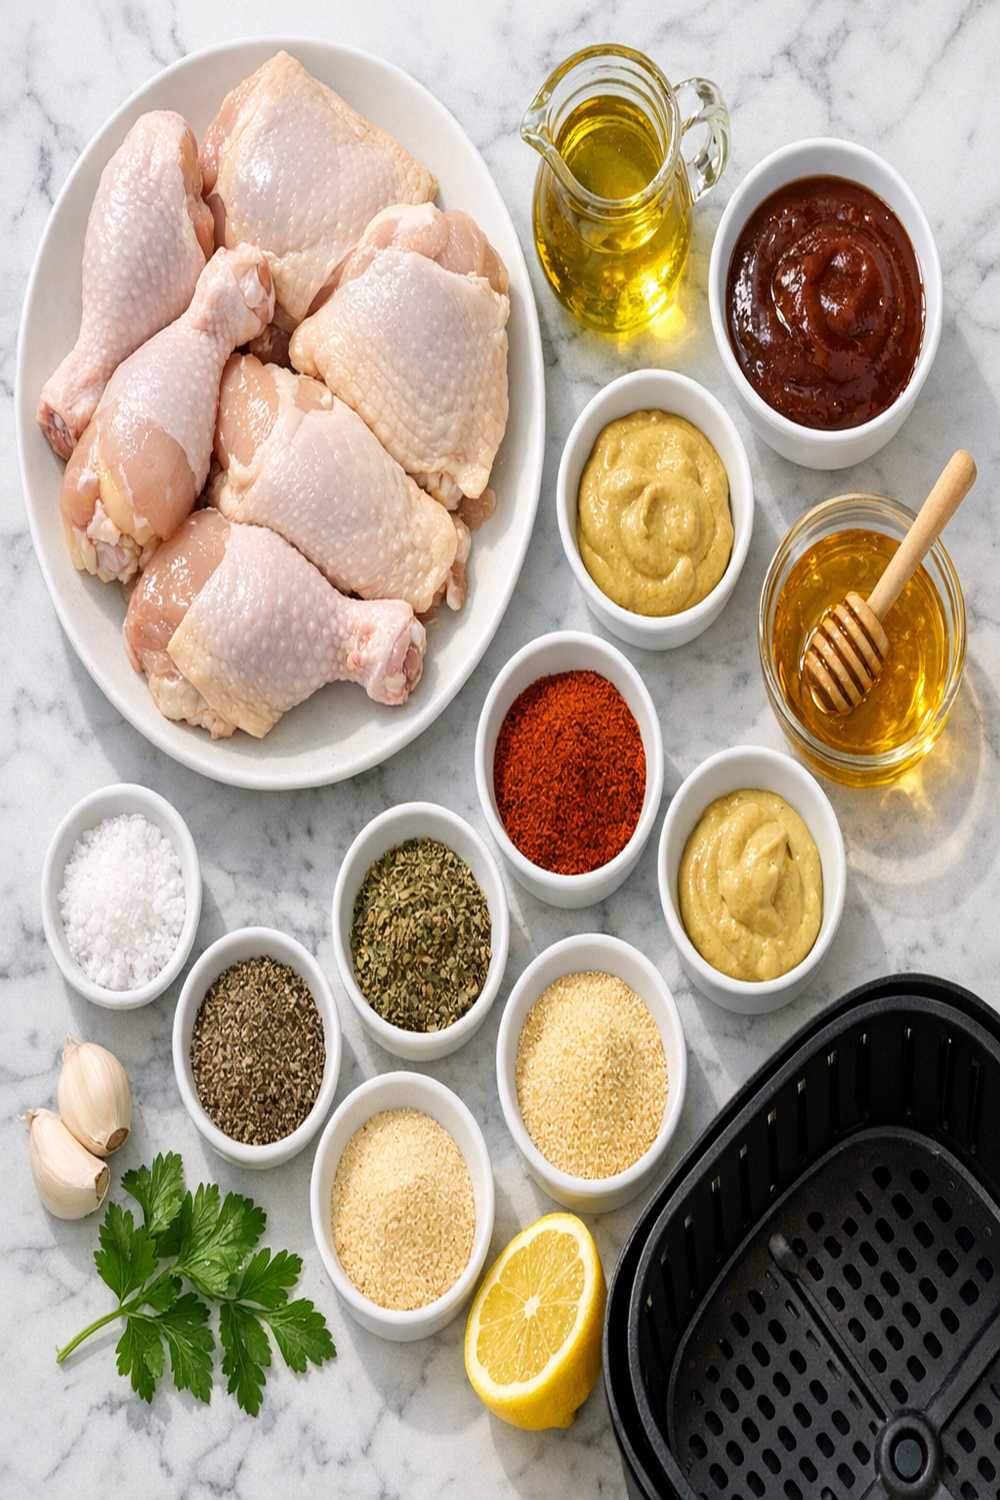
- ¼ teaspoon ground cayenne pepper (adjust up or down based on heat tolerance)
- ½ teaspoon ground black pepper (freshly ground if you have a grinder)
- 1 tablespoon dark brown sugar (not light brown—you want the molasses depth)
- 1 tablespoon extra-virgin olive oil (a quality oil matters here because it won’t overpower the chicken)
- 8 to 10 bone-in, skin-on chicken drumsticks and legs (about 2¼ pounds total—I prefer a mix of both thighs and drumsticks for variety)
- ½ teaspoon dry mustard powder (this ingredient is magic—it adds savory depth and helps the spices adhere to the skin)
- 1 teaspoon kosher salt (not table salt, which contains anti-caking agents and will feel gritty)
- 2 teaspoons smoked paprika (the backbone of this spice blend; it brings warmth and subtle smoke)
- 1 lemon or lime, cut into wedges (optional but recommended for serving)
- 2 tablespoons fresh cilantro or Italian flat-leaf parsley (finely chopped, for garnish and brightness)
How to Make Air Fryer Chicken Legs and Thighs?
This is a straightforward four-step process. The secret is taking time on Step 1—drying the chicken properly ensures you get that crispy, golden skin. Everything else flows naturally from there. Let’s build something delicious.
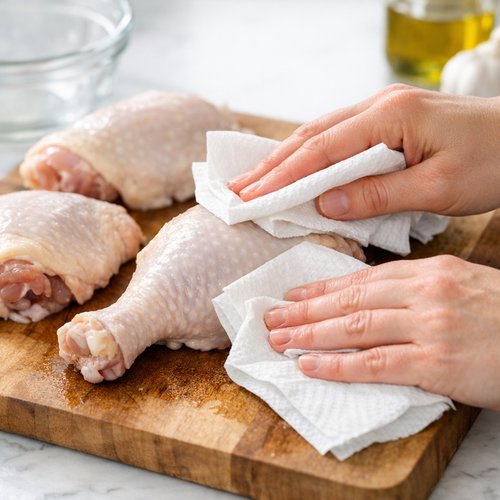
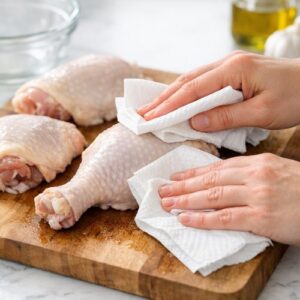
Step 1: Pat Your Chicken Completely Dry
Remove your chicken from the package and pat each piece thoroughly with paper towels—and I mean thoroughly. You want them as dry as possible. Moisture is the enemy of crispiness. I use about 5-6 paper towels for this job, pressing gently around the drumstick, thigh, and skin folds where water likes to hide.
Once they’re dry, place them in a large mixing bowl and drizzle with your olive oil. Use your hands to coat each piece lightly—you’re not slathering here, just a thin, even sheen. The oil acts as the binding agent for your spice rub and helps the exterior brown beautifully.
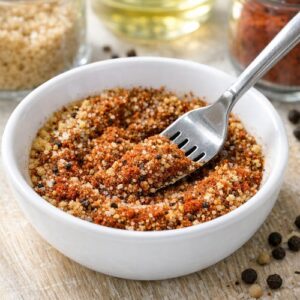
Step 2: Mix Your Spice Blend and Coat
In a small bowl, combine your brown sugar, smoked paprika, kosher salt, black pepper, mustard powder, and cayenne. Stir with a fork until everything is evenly distributed. You’ll notice the mixture will smell incredible—that’s the paprika and mustard coming through.
Now here’s my technique: sprinkle about two-thirds of the spice blend over your oiled chicken in the bowl. Using your hands or two forks, toss everything together for about 30 seconds. Then sprinkle the remaining spice blend on top and toss again. This two-stage approach ensures every single piece gets coated, and you don’t end up with spice clumps in the bottom of your bowl.
The chicken should look like it’s wearing a rustic, uneven crust. That’s exactly what you want.

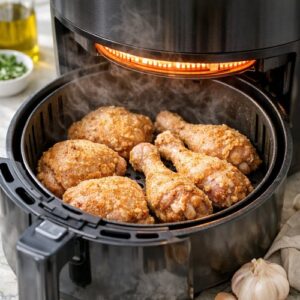
Step 3: Preheat and Arrange Your Air Fryer
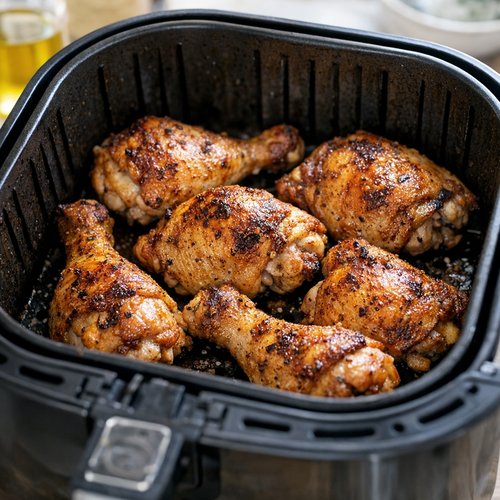
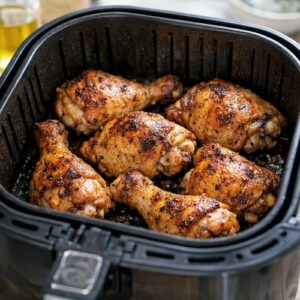
Preheat your air fryer to 400°F according to your manufacturer’s instructions. This usually takes 3-5 minutes. While it’s heating, arrange your coated chicken legs in a single layer in the basket. They should touch each other lightly but not be piled on top. If your air fryer basket is smaller, you may need to work in batches—don’t crowd the basket, or you’ll steam the chicken instead of crisping it.
Skin-side up is the position I prefer, but honestly, the air fryer’s circulating heat will crisp both sides regardless. Just make sure they’re not overlapping.

Step 4: Air Fry with a Flip Halfway Through
When your air fryer reaches temperature, carefully place your basket inside and set the timer for 10 minutes. You won’t touch anything during this time. Let the air circulation do its job.
After exactly 10 minutes, pull the basket out (be careful—it’s hot). Using tongs, flip each piece of chicken so the other side can crisp. Return the basket to the air fryer and cook for 8 more minutes. At this point, the exterior should be deeply golden and crispy, and the internal temperature should be at least 165°F when you insert a meat thermometer at the thickest part of a thigh without touching bone.
Here’s my insider tip: I actually pull mine out at 190°F internal temperature. This extra heat—about 25 degrees beyond the safety minimum—ensures the skin is shattering-crisp while the meat is still incredibly juicy. The residual heat won’t dry things out because of the bone’s insulation.
Transfer your chicken to a plate and let it rest for 5 minutes. This allows the juices to redistribute through the meat. Scatter your fresh cilantro or parsley over the top and serve hot, with lemon or lime wedges if you like.
Expert’s Nutritional Tip
As a registered dietitian, I want to highlight something important about dark meat chicken. While white meat gets all the attention, chicken thighs and drumsticks contain three times more zinc than breast meat, plus significantly more iron, selenium, and B vitamins. The fat content isn’t something to fear—most of it is beneath the skin, and you’re using minimal oil in this recipe. You’re looking at a complete protein with robust micronutrient density. One drumstick (about 75g) provides roughly 7g of protein, 150 calories, and zero carbohydrates, making this an excellent choice for balanced macronutrient goals.
Make-Ahead Guide
Up to 24 hours ahead: Prepare your spice blend in a small bowl, cover it with plastic wrap, and store it on your pantry shelf. Pat your chicken dry, place it in a container, cover it, and refrigerate. When you’re ready to cook, remove the chicken 15 minutes before cooking to bring it closer to room temperature (this ensures even cooking). Apply your oil and spice blend, then proceed with air frying.
Same-day prep (4-6 hours ahead): You can coat your chicken with the oil and spice blend up to 6 hours before cooking. Store it covered in the refrigerator. This actually allows the flavors to penetrate the chicken slightly, which deepens the seasoning.
After cooking: Cooked chicken keeps in the refrigerator for 3-4 days in an airtight container. Reheat gently at 300°F for about 10 minutes to restore crispiness, or enjoy it cold in salads. It also freezes beautifully for up to 3 months—wrap cooled pieces individually in plastic wrap before freezing.
Tips and Tricks
- Don’t skip the drying step – This is where most people lose crispiness. Wet chicken steams. Dry chicken crisps. Take an extra minute here.
- Use a meat thermometer – It removes all guesswork. Insert it horizontally into the thickest part of a thigh without touching bone. You’re aiming for at least 165°F for food safety, but 185-190°F gives you that restaurant-quality crispness while maintaining juiciness.
- Resist the urge to open the basket – Every time you open your air fryer during cooking, you release heat and disrupt the circulating air. Trust the process. Those 10 and 8-minute intervals are optimized.
- Customize your spice blend fearlessly – Try garlic powder (½ teaspoon), smoked chipotle powder instead of regular paprika, or add ¼ teaspoon of ground cumin for earthiness. This formula is your template, not your prison.
- Let it rest – Those 5 minutes after cooking allow carryover cooking to finish and juices to reabsorb. Don’t skip this.
- Batch cook for meal prep – Make a double batch on Sunday. Cooked chicken becomes protein for salads, grain bowls, or quick reheated dinners all week.
Common Mistakes to Avoid
- Overcrowding the basket – If pieces are touching and stacked, you’re steaming, not air frying. Work in batches if needed. Even cooking distribution is non-negotiable.
- Using wet chicken – This is the number-one culprit behind soggy, crispy-less results. Pat it dry, wait a beat, then pat again. Moisture is your enemy.
- Skipping the flip – While air fryers are pretty forgiving, flipping ensures even browning on both sides and builds complexity in the crust. Those 10 minutes and 8 minutes work together.
- Ignoring your specific air fryer’s temperature variance – Some models run hotter than others. Check your chicken’s internal temperature rather than relying on time alone. A $20 meat thermometer is the best investment you’ll make in your kitchen.
Can I Store Air Fryer Chicken Legs and Thighs?
Yes, and this is where this recipe shines for meal prep. Refrigerator: Store cooled chicken in an airtight container for 3-4 days. Reheat gently at 300°F for about 10 minutes to restore some crispiness, or eat cold—it’s delicious both ways.
Freezer: Cool the chicken completely, wrap individual pieces in plastic wrap, then place them in a freezer bag for up to 3 months. Thaw overnight in the refrigerator before reheating. You won’t lose much texture quality because the cooking method already delivered such complete doneness.
Room temperature: If you’re serving this at a picnic or casual gathering, it stays safe at room temperature for up to 2 hours. Cover it loosely to prevent drying.
Nutrition Information
Based on USDA data, one bone-in, skin-on chicken drumstick (approximately 75g) provides:
150 calories | 7g protein | 12g fat | 0g carbohydrates | 0g fiber
The spice blend adds negligible calories but significant flavor complexity and micronutrient density. As a registered dietitian, I’m pleased to note that dark meat chicken delivers important minerals: zinc supports immune function, selenium acts as an antioxidant, and B vitamins (especially B6 and B12) support energy metabolism.
For a complete meal, pair this with lean proteins like baked turkey if you’re looking for variety, or build out with vegetables and whole grains for balanced macronutrients across your plate.
What Can I Serve With Air Fryer Chicken Legs and Thighs?
This chicken plays beautifully with almost any side because the spice blend is bold but not aggressive. The smoked paprika and mustard have an earthy, sophisticated quality that complements both light and hearty sides. Here are my favorite combinations:
- Crispy baked potatoes – Baked potatoes wrapped in foil are the ultimate pairing. The starch and butter balance the spiced chicken beautifully. I like mine with Greek yogurt and chives.
- Simple green salad with lemon vinaigrette – The acidity cuts through the richness of the chicken skin. Arugula or mixed greens work equally well. Add a handful of nuts for crunch.
- Roasted vegetables – Broccoli, Brussels sprouts, or bell peppers roasted at 425°F for 12-15 minutes. The charred edges mirror the crispy chicken beautifully.
- Fresh rice or grain pilaf – Brown rice, farro, or quinoa with herbs keeps things light and lets the chicken remain the star. A squeeze of lemon over the grain is chef-level.
- Coleslaw – A simple cabbage slaw with rice vinegar and a touch of honey provides contrast and brightness. Crunchy, cool, refreshing.
- Corn on the cob – If you’re cooking in warmer months, corn with herb butter is nostalgic and delicious. Air fryer corn takes about 8 minutes at the same temperature.
Seasonal Variations
Spring: Add ½ teaspoon of lemon zest and ¼ teaspoon of dried tarragon to your spice blend. Serve with fresh asparagus and new potatoes. The tarragon brings an herbaceous brightness that feels lighter as the weather warms.
Summer: Use smoked chipotle powder instead of regular paprika for a subtle heat. Serve with grilled corn and a cucumber salad. This version pairs beautifully with cold beverages and outdoor entertaining.
Fall: Add ¼ teaspoon of ground ginger and ⅛ teaspoon of cinnamon to warm up the spice profile. Serve with roasted root vegetables (sweet potato, parsnip, beets). These warming spices connect the chicken to autumn’s flavors.
Winter: Increase the smoked paprika to 2½ teaspoons and add ¼ teaspoon of smoked black pepper. Serve with rich sides like creamed spinach or mushroom risotto. The deeper, smokier profile feels grounding and substantial during colder months.
Substitutes
- Smoked paprika swap: If you can’t find smoked paprika, use regular paprika (2 teaspoons) plus ¼ teaspoon of liquid smoke mixed into your oil before coating. You’ll lose some depth but maintain the general flavor profile.
- Mustard powder alternative: One teaspoon of Dijon mustard stirred into your oil works as a substitute, though it adds moisture. Reduce the oil slightly to compensate. Or try ½ teaspoon of ground horseradish for a different kind of savory kick.
- Brown sugar substitute: Honey (1 teaspoon), maple syrup, or even coconut sugar work here. The brown sugar creates caramelization, and any of these options will do the same. Coconut sugar has a lower glycemic index if that matters to you.
- Chicken leg and thigh swap: Chicken breasts work, but reduce cooking time to 12 minutes total (6 minutes per side) because they’re leaner. You won’t get quite the same juiciness, which is why I strongly recommend dark meat. Wings also work beautifully—reduce time to 14 minutes total (7 per side).
- Cayenne alternative: Black pepper (increase to ¾ teaspoon total), white pepper, or fresh cracked pepper delivers heat without the specific cayenne flavor. Smoked black pepper adds complexity.
- Fresh herb swap: Parsley, cilantro, chives, or dill all work for garnish. I particularly love fresh mint with this spice blend—unexpected but delicious.
Air Fry Chicken Legs And Thighs Recipe
Ingredients
- ¼ teaspoon ground cayenne pepper adjust up or down based on heat tolerance
- ½ teaspoon ground black pepper freshly ground if you have a grinder
- 1 tablespoon dark brown sugar (not light brown
- 1 tablespoon extra-virgin olive oil a quality oil matters here because it won't overpower the chicken
- 8 to 10 bone-in, skin-on chicken drumsticks and legs (about 2¼ pounds total
- ½ teaspoon dry mustard powder (this ingredient is magic
- 1 teaspoon kosher salt not table salt, which contains anti-caking agents and will feel gritty
- 2 teaspoon smoked paprika the backbone of this spice blend; it brings warmth and subtle smoke
- 1 lemon or lime, cut into wedges optional but recommended for serving
- 2 tablespoon fresh cilantro or Italian flat-leaf parsley finely chopped, for garnish and brightness
Instructions
Step 1: Pat Your Chicken Completely Dry
- Remove your chicken from the package and pat each piece thoroughly with paper towels—and I mean thoroughly. You want them as dry as possible. Moisture is the enemy of crispiness. I use about 5-6 paper towels for this job, pressing gently around the drumstick, thigh, and skin folds where water likes to hide. Once they're dry, place them in a large mixing bowl and drizzle with your olive oil. Use your hands to coat each piece lightly—you're not slathering here, just a thin, even sheen. The oil acts as the binding agent for your spice rub and helps the exterior brown beautifully.
Step 2: Mix Your Spice Blend and Coat
- In a small bowl, combine your brown sugar, smoked paprika, kosher salt, black pepper, mustard powder, and cayenne. Stir with a fork until everything is evenly distributed. You'll notice the mixture will smell incredible—that's the paprika and mustard coming through. Now here's my technique: sprinkle about two-thirds of the spice blend over your oiled chicken in the bowl. Using your hands or two forks, toss everything together for about 30 seconds. Then sprinkle the remaining spice blend on top and toss again. This two-stage approach ensures every single piece gets coated, and you don't end up with spice clumps in the bottom of your bowl. The chicken should look like it's wearing a rustic, uneven crust. That's exactly what you want.
Step 3: Preheat and Arrange Your Air Fryer
- Preheat your air fryer to 400°F according to your manufacturer's instructions. This usually takes 3-5 minutes. While it's heating, arrange your coated chicken legs in a single layer in the basket. They should touch each other lightly but not be piled on top. If your air fryer basket is smaller, you may need to work in batches—don't crowd the basket, or you'll steam the chicken instead of crisping it. Skin-side up is the position I prefer, but honestly, the air fryer's circulating heat will crisp both sides regardless. Just make sure they're not overlapping.
Step 4: Air Fry with a Flip Halfway Through
- When your air fryer reaches temperature, carefully place your basket inside and set the timer for 10 minutes. You won't touch anything during this time. Let the air circulation do its job. After exactly 10 minutes, pull the basket out (be careful—it's hot). Using tongs, flip each piece of chicken so the other side can crisp. Return the basket to the air fryer and cook for 8 more minutes. At this point, the exterior should be deeply golden and crispy, and the internal temperature should be at least 165°F when you insert a meat thermometer at the thickest part of a thigh without touching bone. Here's my insider tip: I actually pull mine out at 190°F internal temperature. This extra heat—about 25 degrees beyond the safety minimum—ensures the skin is shattering-crisp while the meat is still incredibly juicy. The residual heat won't dry things out because of the bone's insulation. Transfer your chicken to a plate and let it rest for 5 minutes. This allows the juices to redistribute through the meat. Scatter your fresh cilantro or parsley over the top and serve hot, with lemon or lime wedges if you like.
Notes
Nutrition
FAQs
Can I cook frozen chicken in the air fryer?
Technically yes, but I don’t recommend it for this recipe. Frozen chicken will take considerably longer (possibly 25-30 minutes), and you lose control over the exact crispiness level. More importantly, you can’t pat it dry, which is essential for the crust we’re building. Thaw your chicken in the refrigerator overnight, pat it dry 30 minutes before cooking, and you’ll get superior results. Food safety is maintained as long as you reach that 165°F internal temperature.
Why is my chicken skin not crispy?
This usually comes down to three factors: moisture (the number-one culprit—see Step 1 and reread that section), overcrowding the basket (air needs to circulate), or an air fryer that runs cooler than 400°F. Check your specific model’s temperature accuracy with an oven thermometer inside the basket. If it runs cool, increase the temperature by 10-15°F. Some models also have a “crisp” setting—use that if available.
Can I marinate the chicken beforehand?
You can, but it contradicts the drying requirement for crispiness. If you want to marinate, use a dry rub (like this one) rather than a wet marinade. Apply the dry rub up to 6 hours ahead and refrigerate. The flavors will deepen slightly. If you do use a wet marinade, pat the chicken extremely dry before coating—almost obsessively dry.
What if my air fryer basket is smaller and I can’t fit all the chicken?
Cook in batches. Keep the first batch warm on a plate in a 200°F oven while you cook the second batch. They’ll stay crispy, and you maintain even cooking quality. Overcrowding is a much bigger mistake than taking an extra 10 minutes to batch cook.
Is this recipe good for people watching carbs or following keto?
Absolutely. Zero carbohydrates, high protein, and good fats (mostly from the chicken skin). The brown sugar in the rub is minimal—about ⅛ teaspoon per piece—so the total carb count per serving is negligible. This is one of my go-to recipes when clients are managing blood sugar or following low-carb approaches. It delivers restaurant-quality satisfaction without compromise.
More Recipes You’ll Love
- Barbecue Chicken Thigh Recipe – A slow-cooked alternative if you want deeper, sweeter flavor development with that same dark meat excellence.
- Baked Eggs Sunny Side Up – For a different protein option that pairs beautifully with leftover chicken in breakfast bowls.
- this simple cake – If you’re looking for a lighter breakfast to balance rich dinner proteins throughout your week.
- This Homemade Air Recipe – Worth adding to your recipe collection.
- My Weeknight Chicken Recipe – Worth adding to your recipe collection.
- This Easy Air Recipe – Worth adding to your recipe collection.
There you have it—crispy, juicy, perfectly seasoned chicken that tastes like you spent hours in the kitchen but actually took about 20 minutes of active time. This is the recipe I come back to when I want to prove that convenience and flavor aren’t mutually exclusive, that nutrition and restaurant-quality results can coexist, and that the best cooking is the kind you’ll actually make again and again.
Your air fryer is about to become your secret weapon. Trust the process, pat your chicken dry, and let that smoked paprika and mustard do the heavy lifting. You’ve got this.
Celebrate your flavorful adventure!