This post contains affiliate links. As an Amazon Associate I earn from qualifying purchases.
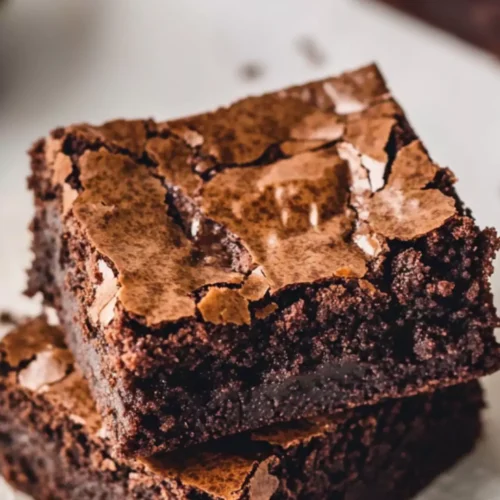
Sometimes, you just need dessert. A sweet treat that hugs your taste buds and brings a smile to your face. For me, that treat is none other than fudgy cocoa brownies. There’s nothing quite like biting into a brownie that’s soft in the center and perfectly crisp on the edges.
They pair beautifully with a scoop of vanilla ice cream or a dollop of whipped cream. You might even enjoy them with a refreshing glass of milk.

Before we dive into the chewy, chocolaty goodness, let me share why this specific recipe stands out. As a registered dietitian and food enthusiast, I take my baking seriously.
Over the years, I’ve tested countless brownie recipes, forever on a quest for the ultimate fudgy texture. Trust me when I say these brownies deliver. They come together easily, and with the right ingredients, every batch is a hit.
You will also like the following Dessert recipes!
- Best Old fashioned southern cornbread recipe
- How to make Popeyes Apple Pie
- Easy Cookies And Cream Cinnamon Rolls Recipe
What Are the Best Fudgy Cocoa Brownies?
Fudgy cocoa brownies are the delightful result of mixing rich cocoa powder with a few simple ingredients to create a dense, moist treat. They are known for their intense chocolate flavor, thanks to the cocoa and chocolate chips, and their fudgy interior that melts in your mouth.
These brownies are the ultimate comfort food that satisfies chocolate cravings, whether served warm or at room temperature.
The Ingredients
To whip up these incredible fudgy brownies, you’ll need the following ingredients:
- 2 large eggs – The foundation that binds everything.
- 1 large egg yolk – For extra richness and moisture.
- 1 ⅓ cups (265g) granulated sugar, divided – Just the right amount of sweetness.
- ¾ cup (170g) unsalted butter, softened – Adds a creamy texture.
- 2 tablespoons (28ml) vegetable or coconut oil – Enhances the fudginess.
- 1 cup (120g) all-purpose flour – Gives structure.
- ½ teaspoon baking powder – A little lift.
- ½ teaspoon fine sea salt – Balances sweetness.
- ½ cup (43g) unsweetened cocoa powder – The star ingredient.
- 1 teaspoon instant espresso powder (optional) – Deepens the chocolate flavor.
- 2 teaspoons pure vanilla extract (optional) – Adds a lovely aroma and flavor.
- ¾ cup (128g) semisweet chocolate chips – For those delightful gooey pockets.
- ¼ teaspoon ground cinnamon – A hint of warmth.

How to Make the Best Fudgy Cocoa Brownies?
Making these brownies is a simple process that yields phenomenal results. Grab your baking pan, and let’s get started!
Step-by-Step Directions
Step 1: Preheat Your Oven
Let’s kick things off by preheating your oven to 350°F (175°C). Greasing your pan ahead of time ensures easy removal of those delicious brownies later. I usually use a 9×9-inch square pan, but an 8×8 works just fine too.
Step 2: Mix the Wet Ingredients
In a large mixing bowl, combine the softened butter, vegetable or coconut oil, and granulated sugar. Mix them together until creamy. It should come together beautifully, almost like a little cloud of sweetness! Then, add in the eggs and egg yolk. Beat them until fully incorporated, ensuring you’re creating a luscious mixture.
Step 3: Add Flavor Enhancers
Now, here’s where the magic happens. Stir in the vanilla extract and optional espresso powder. The espresso powder is like a secret handshake for your chocolate. It’s not overpowering, but it helps those chocolate flavors shine brighter.
Step 4: Sift the Dry Ingredients
In a separate bowl, sift together the flour, cocoa powder, baking powder, salt, and cinnamon. This step isn’t just to avoid lumps; it’s about aerating the dry mix to create a light texture amidst the fudginess. Gradually add your sifted mix to the wet ingredients, folding it gently.
Step 5: Add Chocolate Chips
Once the batter looks fabulous, fold in the semisweet chocolate chips. You want to make sure they’re evenly distributed throughout the mix, giving every bite a gooey piece of chocolatey goodness.
Step 6: Bake
Pour the brownie batter into your prepared pan and smooth it out evenly. Pop it into the oven and let it bake for around 25-30 minutes. Your kitchen will soon smell like a chocolate factory. Keep an eye on it, as you want the edges firm and the center slightly soft.
Step 7: Cool and Serve
Once out of the oven, let the brownies cool in the pan for at least 15 minutes before transferring to a wire rack. This helps with cutting. You want those clean edges when slicing them into squares.
Notes
Here are some tips to ensure your brownies come out perfect every time:
- Check the Doneness: Use a toothpick to test; it should come out with a few moist crumbs, not wet batter.
- Avoid Overmixing: Gently fold in the dry ingredients to keep them tender.
- Cool Completely: Resist the urge to cut them warm; they hold together better when cooled.
- Experiment with Add-ins: Don’t shy away from adding nuts for crunch or other flavored chocolate chips.
- Double the Recipe: For parties or gatherings, double the ingredients and use a bigger pan for a larger batch.
Storage Tips
Keeping brownies fresh is easy. Store them in an airtight container at room temperature for up to 3 days.
For longer storage, putting them in the fridge allows them to last up to a week. You can also freeze them for about 2-3 months. Just make sure to wrap them tightly!

Serving Suggestions
These brownies shine on their own, but let’s get creative! Here are a few serving suggestions:
1. À la Mode
Serve warm with a scoop of vanilla ice cream on top. The creamy ice cream mingling with fudgy goodness is pure bliss!
2. With Whipped Cream
A dollop of freshly whipped cream adds an airy touch. It’s great for offsetting the richness.
3. Topped with Fresh Berries
Fresh strawberries, raspberries, or blueberries give a pop of color and tartness. It’s a delightful contrast!
4. Drizzled with Caramel Sauce
Drizzle some homemade or store-bought caramel sauce for a sweet twist that takes these to the next level.
5. With Peanut Butter
Swirling peanut butter on top of warm brownies is a game changer. Sweet and savory, this combo is pure indulgence.
What Other Substitutes Can I Use for the Best Fudgy Cocoa Brownies?
Got dietary restrictions or just running low on ingredients? Here are a few substitutions you can consider:
1. Coconut Oil Instead of Butter
For a dairy-free option, coconut oil works wonderfully. It’ll add a subtle tropical vibe!
2. Applesauce in Place of Eggs
If you’re vegan, replace the eggs with unsweetened applesauce for moisture and binding.
3. Almond Flour Instead of All-Purpose Flour
For a gluten-free version, almond flour can be used, but you may need to adjust the liquid slightly since almond flour is denser.
4. Dark Chocolate Instead of Cocoa
If you prefer the richness of dark chocolate, melt and mix it in instead of cocoa powder, adjusting the sugar accordingly.
5. Different Sweeteners
If you’re looking for fewer calories, try using a sugar substitute that measures like sugar, maintaining similar sweetness levels.
Best Fudgy Cocoa Brownies
Equipment
- Oven
Ingredients
- 2 large eggs
- 1 large egg yolk
- 1 ⅓ cups 265g granulated sugar, divided
- ¾ cup 170g unsalted butter, softened
- 2 tablespoons 28ml vegetable or coconut oil
- 1 cup 120g all-purpose flour
- ½ teaspoon baking powder
- ½ teaspoon fine sea salt
- ½ cup 43g unsweetened cocoa powder
- 1 teaspoon instant espresso powder optional, for a rich, coffee undertone; omit if you’re not a fan of coffee
- 2 teaspoons pure vanilla extract optional, but adds great depth of flavor
- ¾ cup 128g semisweet chocolate chips
- ¼ teaspoon ground cinnamon adds warmth and complexity to the chocolate flavor
Instructions
Step 1: Preheat Your Oven
- Let’s kick things off by preheating your oven to 350°F (175°C). Greasing your pan ahead of time ensures easy removal of those delicious brownies later. I usually use a 9×9-inch square pan, but an 8×8 works just fine too.
Step 2: Mix the Wet Ingredients
- In a large mixing bowl, combine the softened butter, vegetable or coconut oil, and granulated sugar. Mix them together until creamy. It should come together beautifully, almost like a little cloud of sweetness! Then, add in the eggs and egg yolk. Beat them until fully incorporated, ensuring you’re creating a luscious mixture.
Step 3: Add Flavor Enhancers
- Now, here’s where the magic happens. Stir in the vanilla extract and optional espresso powder. The espresso powder is like a secret handshake for your chocolate. It’s not overpowering, but it helps those chocolate flavors shine brighter.
Step 4: Sift the Dry Ingredients
- In a separate bowl, sift together the flour, cocoa powder, baking powder, salt, and cinnamon. This step isn’t just to avoid lumps; it’s about aerating the dry mix to create a light texture amidst the fudginess. Gradually add your sifted mix to the wet ingredients, folding it gently.
Step 5: Add Chocolate Chips
- Once the batter looks fabulous, fold in the semisweet chocolate chips. You want to make sure they’re evenly distributed throughout the mix, giving every bite a gooey piece of chocolatey goodness.
Step 6: Bake
- Pour the brownie batter into your prepared pan and smooth it out evenly. Pop it into the oven and let it bake for around 25-30 minutes. Your kitchen will soon smell like a chocolate factory. Keep an eye on it, as you want the edges firm and the center slightly soft.
Step 7: Cool and Serve
- Once out of the oven, let the brownies cool in the pan for at least 15 minutes before transferring to a wire rack. This helps with cutting. You want those clean edges when slicing them into squares.
Notes
- Check the Doneness: Use a toothpick to test; it should come out with a few moist crumbs, not wet batter.
- Avoid Overmixing: Gently fold in the dry ingredients to keep them tender.
- Cool Completely: Resist the urge to cut them warm; they hold together better when cooled.
- Experiment with Add-ins: Don’t shy away from adding nuts for crunch or other flavored chocolate chips.
- Double the Recipe: For parties or gatherings, double the ingredients and use a bigger pan for a larger batch.
Nutrition
Frequently Asked Questions
Q1: Are these brownies gluten-free?
A: No, but you can easily make them gluten-free by substituting all-purpose flour with a gluten-free blend like almond flour or a 1:1 gluten-free flour mix.
Q2: How can I make these brownies healthier?
A: You can replace some of the sugar with banana or applesauce, use whole wheat flour instead of all-purpose, or incorporate more nuts for added nutrition.
Q3: Can I add nuts to the brownies?
A: Absolutely! Chopped walnuts or pecans can be folded into the batter before baking for added texture and flavor.
Q4: How do I know when the brownies are done?
A: They’re done when the edges are set and a toothpick inserted in the center comes out with moist crumbs, not wet batter.
Q5: Can I make these brownies in advance?
A: Yes! You can make them ahead of time, and they last well when stored properly. Just wait until they cool completely before storing.
Conclusion
As I wrap up this sweet journey into the world of fudgy cocoa brownies, I hope you’ll be inspired to whip up a batch! They’re simple, rich, and downright delicious. Whether for a special occasion or just a quiet evening at home, these brownies will surely elevate the moment.
They are more than just a dessert; they’re a treat that brings joy, comfort, and maybe even a little nostalgia. Let’s get baking! Dive into this delightful recipe, and enjoy every chocolatey bite.