This post contains affiliate links. As an Amazon Associate I earn from qualifying purchases.
I’m obsessed with arugula toast. It’s the kind of dish that feels fancy enough for brunch but comes together faster than your morning coffee. The peppery bite of fresh greens, the crunch of toasted almonds, and creamy hummus on crusty bread? That’s my love language on a plate. This recipe pairs beautifully with baked eggs sunny side up for a complete protein-packed breakfast that’ll keep you full until lunch.
How I Fell in Love with This Simple Toast
I remember standing in a tiny café in Manhattan’s East Village about five years ago, completely overwhelmed by clinical dietetics coursework. My mentor—a chef-instructor I was studying under—slid this arugula toast across the counter without saying a word. It had charred bread, wilted greens glistening with olive oil, and something I couldn’t quite identify that made it taste restaurant-quality.
I asked her the secret. She laughed and said, “Kimberly, you’re a registered dietitian now. You know greens are nutrient-dense. But you’re also training as a chef. Learn to cook them with intention—not just throw them raw on a plate.” That moment changed how I approached food entirely.
This recipe is that lesson distilled. It proves you don’t need fancy ingredients or complicated techniques to create something that tastes like it came from a restaurant kitchen. You just need good-quality components, proper heat, and respect for what you’re cooking.

What Is Arugula Toast?
Arugula toast is a modern brunch staple that combines the best of Italian and Mediterranean traditions. It’s technically an open-faced sandwich or crostini-style preparation featuring toasted bread as the base, topped with warm, gently wilted peppery greens mixed with aromatic garlic and crunchy almonds.
The beauty of this dish lies in its simplicity and versatility. Arugula—also called rocket in some countries—has a distinctive peppery flavor that intensifies slightly when gently heated. When you warm the greens with garlic-infused oil and almonds, you’re creating multiple layers of flavor and texture that elevate humble ingredients into something craveable.
It’s become a canvas for my nutrition philosophy: whole foods, minimal processing, maximum flavor. No fancy equipment needed. No intimidating techniques. Just respect for ingredient quality and proper execution.
Why You’ll Love This Arugula Toast Recipe
- Ready in under 10 minutes – This is genuine weeknight-dinner speed without sacrificing quality. From bare kitchen to plated toast takes less time than a typical lunch break.
- Packed with plant-based nutrition – Arugula delivers glucosinolates and isothiocyanates (compounds with anti-inflammatory properties), almonds provide heart-healthy fats and magnesium, and hummus adds fiber and plant-based protein. This isn’t just breakfast—it’s functional nutrition.
- One-skillet preparation – Everything happens in one pan. That means minimal cleanup and maximum stress relief at 7 AM when you haven’t had caffeine yet.
- Naturally gluten-free adaptable – Swap your bread choice and this works for any dietary approach. I’ve made it work with gluten-free sourdough, sprouted bread, even leftover sweet potato slices.
- Completely customizable seasoning – I’ll show you five different flavor directions you can take this depending on your mood, pantry, and what proteins you’re pairing it with.
- Budget-friendly elegance – Premium-tasting food doesn’t require premium pricing. Quality bread, arugula, and almonds won’t break your weekly grocery budget but taste like they cost triple.
The Ingredients
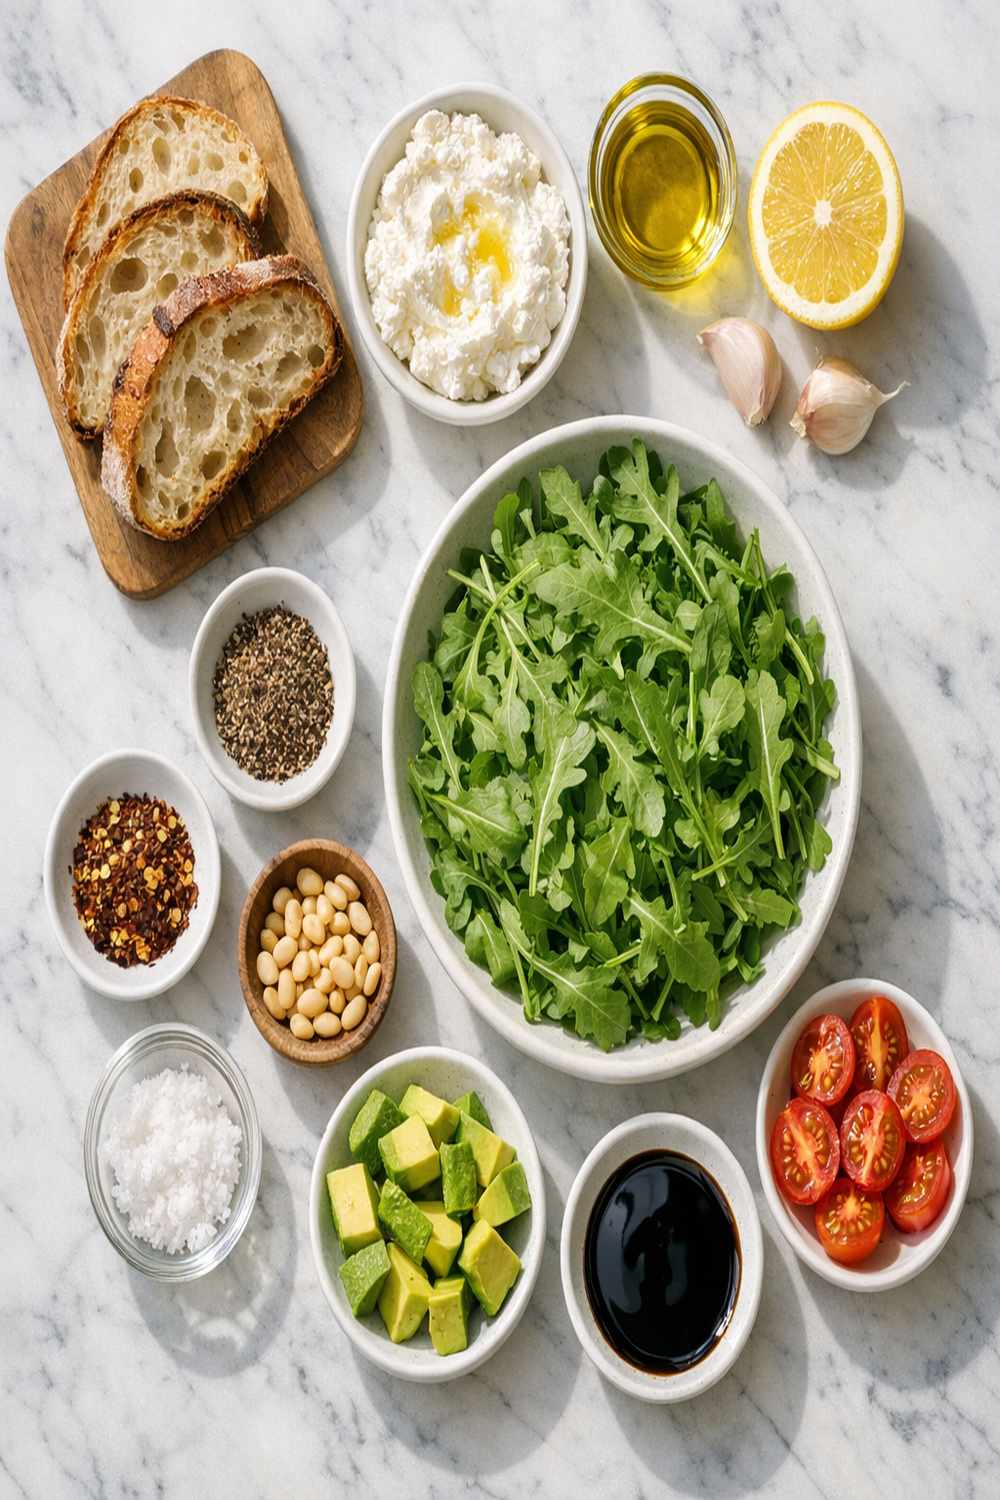
I’ve structured these ingredients strategically. The bread is your foundation—don’t skip quality here. The hummus provides creaminess and protein, while the arugula-almond-garlic combination is where all the flavor magic happens. Everything else is seasoning and finishing touches that deserve equal respect.
- 3 to 4 garlic cloves (minced finely, or use a microplane zester for distribution)
- ½ fresh lemon (juiced right before serving)
- Freshly cracked black pepper (about ⅛ teaspoon, or to preference)
- Sea salt or kosher salt (to taste, about ¼ to ½ teaspoon)
- 4 tablespoons hummus (store-bought or homemade, at room temperature)
- 3 tablespoons sliced raw almonds (or roughly chopped for more texture variation)
- 5 ounces baby arugula leaves (loosely packed, or about 4 cups)
- 4 thick slices artisanal bread (from a rustic, crusty loaf with good structural integrity)
- Optional: ¼ teaspoon red pepper flakes (for heat if desired)
- 1 generous glug extra-virgin olive oil (approximately 2 tablespoons, cold-pressed preferred)
Yield: Makes 4 servings (1 toast per person). Perfect for solo breakfast or serving guests. Easily doubles for larger gatherings.
How to Make Arugula Toast?
The technique here is intentional. We’re not just assembling ingredients—we’re building flavor through proper sequencing and heat management. Each step serves a purpose in creating that restaurant-quality result.
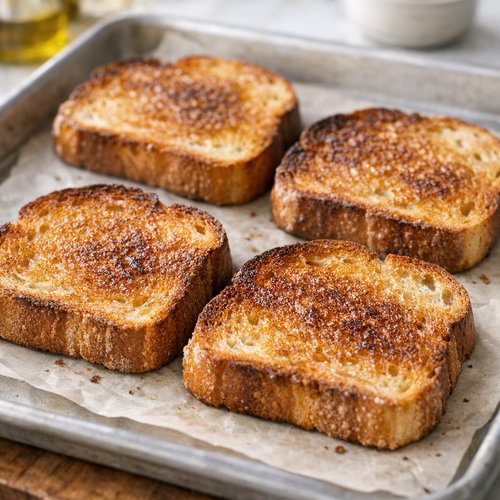
Step 1: Toast Your Bread to Crispy-Golden Perfection
Start by getting your oven or toaster to work. Arrange your four thick slices on a baking sheet or pop them into a toaster. You want medium-dark browning that creates a crispy exterior while maintaining a slightly chewy interior. This typically takes 3 to 4 minutes in a standard toaster or 5 minutes in a 400°F oven.
Here’s my professional trick: don’t use a regular toaster if possible. A toaster oven gives you more control over color development and prevents thin slices from burning before they crisp properly. The bread should sound crispy when you tap it and have visible golden-brown color on both the top and bottom surfaces.
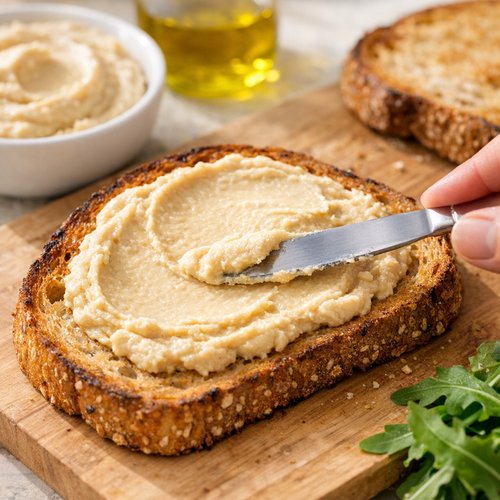
Step 2: Spread Hummus on the Toasted Bread
While your bread is still warm (this helps the hummus spread more smoothly), take each slice and generously spread 1 tablespoon of hummus across one side. Use the back of a spoon to create an even layer that covers most of the surface. The warmth of the toast slightly softens the hummus, making it more spreadable.
Pro tip from my culinary training: room-temperature hummus spreads infinitely better than cold hummus. Take yours out of the fridge 10 to 15 minutes before you start cooking. This small step prevents tearing the delicate toast.
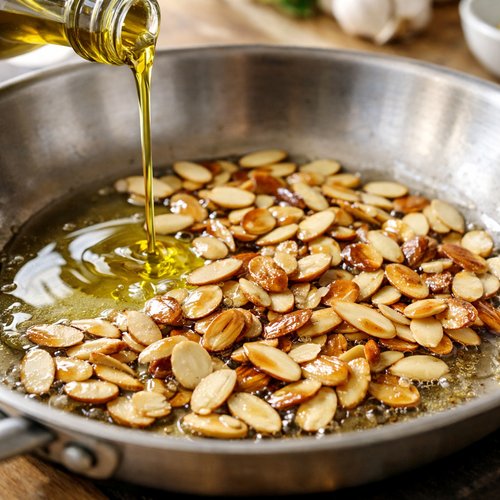
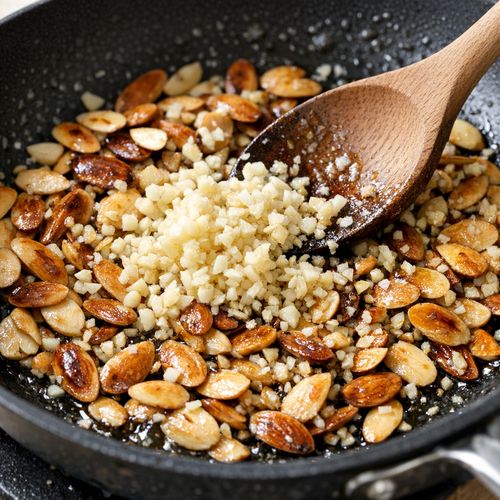
Step 3: Heat Your Oil and Toast the Almonds
Pour your olive oil into a large skillet (10 to 12 inches works best) and set the heat to medium. You’re not looking for hot oil—just warm enough that you can smell the warmth without smoke. Add your sliced or chopped almonds and listen for them to start crackling slightly.
Stir continuously for about 45 seconds to 1 minute. The almonds should become fragrant—you’ll smell that toasted nut aroma that signals they’re releasing their natural oils. They should take on a slightly deeper color but remain golden, not brown. This toasting step is non-negotiable. It transforms raw almonds from flat and plain to rich and craveable.
Step 4: Add Garlic and Let It Bloom
Add your minced garlic to the toasted almonds and immediately stir everything together. The residual heat will begin cooking the garlic almost instantly. You’ll smell that distinctive pungent garlic aroma begin to mellow and transform into something sweeter and more savory. This typically happens in about 30 to 45 seconds.
This is crucial: don’t let the garlic burn. Burned garlic tastes bitter and acrid—it’ll ruin your entire dish. If you ever smell charred garlic, immediately remove the pan from heat and proceed to the next step. The residual heat will continue cooking without darkening it further.
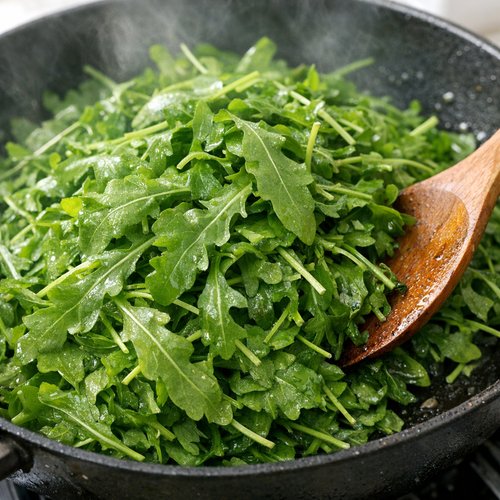
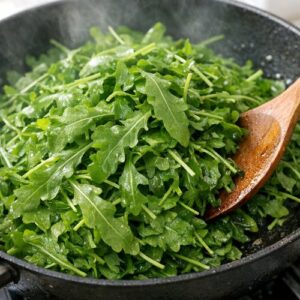
Step 5: Wilt the Arugula with Purpose
Add your entire bundle of baby arugula leaves to the skillet. It’ll look like too much—you’ll be second-guessing yourself. That’s normal. Stir gently, using your spoon or spatula to coat the arugula with the garlic-almond oil mixture.
You’re looking for the leaves to begin softening and reducing in volume. This takes approximately 1 to 2 minutes. The leaves should transform from bright green and crispy to a deeper, slightly translucent green with a tender bite. Stir occasionally to ensure even cooking. You want gentle wilting, not aggressive cooking that reduces the arugula to mush.
When the arugula has wilted and there’s no visible raw crunch left, we move to finishing.
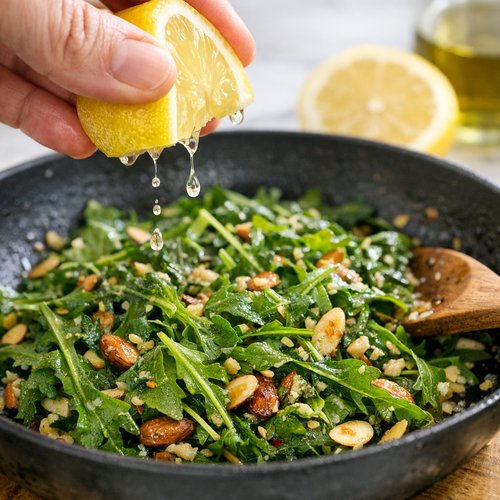
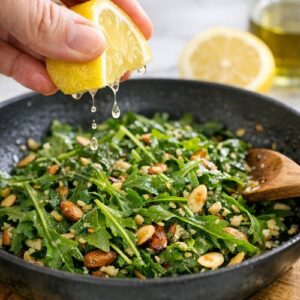
Step 6: Finish with Lemon and Season Properly
Remove the skillet from heat. Immediately squeeze your lemon juice directly over the warm arugula-almond mixture. The acidity will brighten everything—cutting through the richness of the oil and adding a sharp, fresh note that makes the entire dish sing.
Add your sea salt and cracked black pepper. Start with ¼ teaspoon salt and taste as you go. Remember that umami compounds in garlic and the natural peppery quality of arugula already provide significant flavor, so you don’t need aggressive seasoning. The goal is balance, not dominance.
If you enjoy heat, this is when ¼ teaspoon red pepper flakes adds a subtle kick that complements the peppery arugula without overwhelming it.
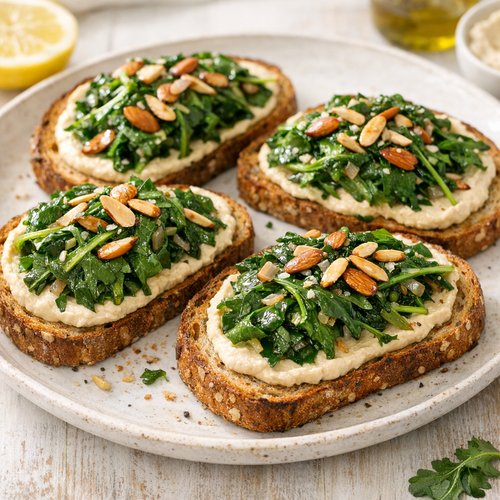
Step 7: Top Your Toast and Serve Immediately
Divide the warm arugula-almond mixture evenly among your four hummus-spread toasts. Use a slotted spoon to transfer the greens and almonds, allowing excess oil to stay in the pan (though a drizzle of that oil on top of the toast is absolutely welcomed).
Serve immediately while everything is still warm. The contrast between crispy toast, creamy hummus, and warm wilted greens is what makes this dish special. It should take no more than 1 minute from plating to eating.
Expert’s Nutritional Tip
Here’s what my background in registered dietetics taught me: the compounds in raw arugula called glucosinolates are powerful anti-inflammatory agents. But gentle heating—exactly what we do in this recipe—actually increases bioavailability of certain nutrients while preserving others. We’re not destroying the nutrition; we’re optimizing it. The fat from olive oil and almonds ensures fat-soluble vitamins like vitamin K (abundant in arugula) are properly absorbed. This is why cooking greens with fat isn’t “less healthy”—it’s strategic nutrition.
Tips and Tricks
- Bread selection is everything – Use a loaf with structure and crust. Soft, squishy bread will absorb the hummus and become soggy within seconds. Look for artisanal or bakery bread with visible crust. Sourdough works beautifully here.
- Temperature management prevents burnt garlic – Keep your heat at medium, not medium-high. This isn’t a race. Low and steady heat gives you the window you need to toast almonds and cook garlic without disaster.
- Buy pre-sliced almonds to save time – I’m all about efficient cooking. Pre-sliced almonds toast faster than whole ones and distribute more evenly. This cuts your active cooking time by about 30 seconds.
- Arugula volume shrinks dramatically – That massive handful of greens reduces to about a third of its original volume once wilted. Don’t panic and add more halfway through cooking.
- Lemon juice should be fresh-squeezed – Bottled lemon juice has a slightly metallic quality that softens the bright note this dish needs. Spend 10 seconds with a fresh lemon. Your taste buds will thank you.
- Hummus temperature matters – Cold hummus from the fridge will slightly cool your warm toast. Remove it 15 minutes before cooking and your entire eating experience improves.
- Make the almond-garlic oil ahead – On busy mornings, toast almonds and prepare minced garlic the night before. Store them in separate containers and you can have this dish ready in 5 minutes the next day.
Make-Ahead Guide
I design recipes around real life, and real life often means planning ahead. Here’s how to work this into your meal prep routine:
Prep Components (3 to 4 days ahead): Slice your almonds and store in an airtight container at room temperature. Mince your garlic and store in a glass container with a tight lid in the refrigerator. Wash and dry your arugula thoroughly, then store in a breathable container (not sealed plastic, which causes wilting) for up to 3 days.
Toast the bread fresh: Don’t toast bread ahead—it loses its crispness and becomes stale. This step takes literally 3 minutes. It’s worth doing fresh morning-of.
Hummus preparation: Remove hummus from the refrigerator when you start toasting bread. This timing ensures it’s room temperature and spreadable by the time toast is ready.
Complete assembly: The entire warming and wilting process takes 3 to 4 minutes maximum. Do this right before eating for best results. This isn’t a dish that improves when assembled 30 minutes early.
Common Mistakes to Avoid
- Using low-quality bread – This isn’t the place to use that soft sandwich bread from the grocery store bakery section. Invest in real artisanal bread with actual crust and structure. The difference is profound.
- Burning the garlic by using too-high heat – Medium heat feels slow when you’re hungry. Resist the urge to crank it up. Burned garlic ruins everything. Period.
- Adding arugula to oil that’s too hot – If your oil is actively smoking or your almonds are dark brown, your cooking vessel is too hot. Let it cool for 15 seconds before adding greens. This prevents them from becoming papery and bitter.
- Not squeezing lemon juice fresh – Bottled juice is a shortcut that undermines the entire dish. The fresh acid from a lemon is essential to the final brightness and flavor balance.
Seasonal Variations
Spring version: Replace half the arugula with tender spring peas and add fresh mint. The peas add sweetness that balances the peppery arugula perfectly.
Summer version: Add halved cherry tomatoes during the last 30 seconds of cooking and finish with fresh basil. The warmth brings out tomato sweetness without cooking them to mushiness.
Fall version: Toast pumpkin seeds instead of almonds and add crispy sage leaves that you’ve toasted separately. The earthiness is stunning.
Winter version: Use heartier greens like kale or a mix with arugula, add roasted butternut squash cubes, and finish with toasted pine nuts. This becomes more substantial and warming.
Can I Store Arugula Toast?
Short answer: not really, and that’s actually fine. Arugula toast is genuinely best eaten immediately. The crispy-soft bread contrast disappears within 15 to 20 minutes as the warm greens and hummus soften the toast to sogginess.
However, you can store individual components separately: Cooked arugula-almond mixture keeps in an airtight container in the refrigerator for up to 3 days. Bread keeps at room temperature for 1 to 2 days (store in a bread bag or paper bag, never plastic). Hummus keeps for 4 to 5 days in the refrigerator in a sealed container.
My honest approach: This isn’t meal-prep food. It’s fresh-to-order food designed for immediate consumption. I’d rather you cook it fresh each time than store a sad, soggy leftover toast. The 7-minute investment is worth the superior eating experience.
Nutrition Information
Based on USDA FoodData Central nutritional analysis per serving (1 toast):
Calories: approximately 280 | Protein: 9 grams | Fat: 16 grams (mostly unsaturated) | Carbohydrates: 28 grams | Fiber: 4 grams | Sodium: 340 milligrams
This is genuinely balanced nutrition. The 4 grams of fiber supports digestive health and satiety. The 9 grams of protein from hummus and almonds helps stabilize blood sugar. The unsaturated fats from olive oil and almonds support heart health and nutrient absorption. The arugula provides micronutrients including vitamins K and C with virtually no caloric cost.
As a registered dietitian, I appreciate that you’re getting roughly 15% of your daily fiber needs in a single toast. That matters for long-term health. This isn’t empty calories; this is nutrient-dense food that happens to taste like you’re treating yourself.
What Can I Serve With Arugula Toast?
This dish is naturally breakfast or lunch-centered, but it plays beautifully with other components. If you want to expand it into a more complete meal, here are my favorite pairings:
- Baked or fried eggs – A runny egg yolk adds richness and more protein. Try it alongside baked eggs for a warm, comforting complete breakfast.
- Crispy protein – Prosciutto, pancetta, or smoked salmon adds salty, savory richness. About 1 ounce per toast is perfect. If you’re into air-fryer cooking, air fry steak bites make an unexpectedly gorgeous addition.
- Fresh fruit – Sliced strawberries or quarters of fresh figs provide natural sweetness that contrasts beautifully with the peppery arugula. This makes the entire plate feel balanced.
- Roasted tomato soup – A small side of roasted tomato basil soup transforms this into a completely satisfying lunch that feels like you’re dining out.
- Aged cheese – Shaved Parmigiano-Reggiano or crumbled aged goat cheese adds umami depth. About ¼ ounce per toast is sufficient.
- Crispy chickpeas – Toss roasted chickpeas with spice and serve alongside for additional texture and plant-based protein.
Substitutes
- Different nuts for almonds – Walnuts, pine nuts, or sunflower seeds all work beautifully. Adjust toasting time slightly based on nut size. Walnuts take about 90 seconds; smaller seeds like sunflower take 30 to 45 seconds.
- Alternative spreads for hummus – Greek yogurt (adds tanginess), ricotta (adds creaminess), or even mashed white beans work. You need something creamy and protein-rich as your base layer.
- Different greens for arugula – Spinach (milder, less peppery), watercress (equally peppery), or tender kale (more substantial). Leafy greens that wilt in 1 to 2 minutes work best. Avoid super hearty greens like collards that need longer cooking.
- Bread alternatives – Gluten-free bread, sprouted grain bread, or even thick-sliced sweet potato (briefly roasted) if you’re avoiding grains entirely. The principle remains the same: you need a sturdy base.
- Flavoring alternatives instead of lemon – Red wine vinegar, balsamic vinegar, or fresh lime juice all provide the brightness lemon offers. Vinegars are slightly sharper; use about ½ teaspoon instead of ½ lemon’s worth of juice.
- Oil substitutes – Avocado oil or grapeseed oil work if you don’t have quality olive oil. Avoid strongly flavored oils like sesame or walnut unless you want those flavors to dominate.

Arugula Toast Recipe
Ingredients
- 3 to 4 garlic cloves minced finely, or use a microplane zester for distribution
- ½ fresh lemon juiced right before serving
- Freshly cracked black pepper about ⅛ teaspoon, or to preference
- Sea salt or kosher salt to taste, about ¼ to ½ teaspoon
- 4 tablespoon hummus store-bought or homemade, at room temperature
- 3 tablespoon sliced raw almonds or roughly chopped for more texture variation
- 5 ounce baby arugula leaves loosely packed, or about 4 cups
- 4 thick slices artisanal bread from a rustic, crusty loaf with good structural integrity
- Optional: ¼ teaspoon red pepper flakes for heat if desired
- 1 generous glug extra-virgin olive oil approximately 2 tablespoons, cold-pressed preferred
Instructions
Step 1: Toast Your Bread to Crispy-Golden Perfection
- Start by getting your oven or toaster to work. Arrange your four thick slices on a baking sheet or pop them into a toaster. You want medium-dark browning that creates a crispy exterior while maintaining a slightly chewy interior. This typically takes 3 to 4 minutes in a standard toaster or 5 minutes in a 400°F oven. Here's my professional trick: don't use a regular toaster if possible. A toaster oven gives you more control over color development and prevents thin slices from burning before they crisp properly. The bread should sound crispy when you tap it and have visible golden-brown color on both the top and bottom surfaces.

Step 2: Spread Hummus on the Toasted Bread
- While your bread is still warm (this helps the hummus spread more smoothly), take each slice and generously spread 1 tablespoon of hummus across one side. Use the back of a spoon to create an even layer that covers most of the surface. The warmth of the toast slightly softens the hummus, making it more spreadable. Pro tip from my culinary training: room-temperature hummus spreads infinitely better than cold hummus. Take yours out of the fridge 10 to 15 minutes before you start cooking. This small step prevents tearing the delicate toast.

Step 3: Heat Your Oil and Toast the Almonds
- Pour your olive oil into a large skillet (10 to 12 inches works best) and set the heat to medium. You're not looking for hot oil—just warm enough that you can smell the warmth without smoke. Add your sliced or chopped almonds and listen for them to start crackling slightly. Stir continuously for about 45 seconds to 1 minute. The almonds should become fragrant—you'll smell that toasted nut aroma that signals they're releasing their natural oils. They should take on a slightly deeper color but remain golden, not brown. This toasting step is non-negotiable. It transforms raw almonds from flat and plain to rich and craveable.

Step 4: Add Garlic and Let It Bloom
- Add your minced garlic to the toasted almonds and immediately stir everything together. The residual heat will begin cooking the garlic almost instantly. You'll smell that distinctive pungent garlic aroma begin to mellow and transform into something sweeter and more savory. This typically happens in about 30 to 45 seconds. This is crucial: don't let the garlic burn. Burned garlic tastes bitter and acrid—it'll ruin your entire dish. If you ever smell charred garlic, immediately remove the pan from heat and proceed to the next step. The residual heat will continue cooking without darkening it further.

Step 5: Wilt the Arugula with Purpose
- Add your entire bundle of baby arugula leaves to the skillet. It'll look like too much—you'll be second-guessing yourself. That's normal. Stir gently, using your spoon or spatula to coat the arugula with the garlic-almond oil mixture. You're looking for the leaves to begin softening and reducing in volume. This takes approximately 1 to 2 minutes. The leaves should transform from bright green and crispy to a deeper, slightly translucent green with a tender bite. Stir occasionally to ensure even cooking. You want gentle wilting, not aggressive cooking that reduces the arugula to mush. When the arugula has wilted and there's no visible raw crunch left, we move to finishing.
Step 6: Finish with Lemon and Season Properly
- Remove the skillet from heat. Immediately squeeze your lemon juice directly over the warm arugula-almond mixture. The acidity will brighten everything—cutting through the richness of the oil and adding a sharp, fresh note that makes the entire dish sing. Add your sea salt and cracked black pepper. Start with ¼ teaspoon salt and taste as you go. Remember that umami compounds in garlic and the natural peppery quality of arugula already provide significant flavor, so you don't need aggressive seasoning. The goal is balance, not dominance. If you enjoy heat, this is when ¼ teaspoon red pepper flakes adds a subtle kick that complements the peppery arugula without overwhelming it.
Step 7: Top Your Toast and Serve Immediately
- Divide the warm arugula-almond mixture evenly among your four hummus-spread toasts. Use a slotted spoon to transfer the greens and almonds, allowing excess oil to stay in the pan (though a drizzle of that oil on top of the toast is absolutely welcomed). Serve immediately while everything is still warm. The contrast between crispy toast, creamy hummus, and warm wilted greens is what makes this dish special. It should take no more than 1 minute from plating to eating.

Notes
FAQs
Can I make this recipe vegan?
Absolutely yes, and you don’t need to change a single ingredient. Hummus is naturally vegan (assuming your brand doesn’t include any animal products—read the label). Arugula, almonds, olive oil, lemon, and bread are all plant-based. This recipe was accidentally vegan from the start. I’ve served it to vegan friends without modification and they’ve asked for the recipe.
What if I can’t find baby arugula?
Mature arugula works fine—it’ll just be slightly more peppery and bitter. You might need 4 to 5 ounces slightly more since mature leaves are less densely packed. The cooking time remains the same, around 1 to 2 minutes. The final texture will be slightly more tender since mature leaves wilt more completely than baby leaves.
Can I prepare the warm arugula-almond mixture ahead and reheat it?
You can, technically, but I wouldn’t recommend it. Reheating dulls the brightness of the lemon and makes the arugula lose its appeal. The dish depends on the contrast between warm greens and crispy toast—reheating softens everything uniformly. Better approach: prep almonds and garlic ahead, then cook greens fresh.
What’s the best bread to use for this recipe?
Look for an artisanal crusty bread with real structure—sourdough, ciabatta, or a rustic country loaf. The bread needs enough crust to stay crispy despite the moisture from hummus and warm greens. Soft grocery store bread will turn to mush within 2 minutes. Your bakery counter is your friend here.
Is this recipe filling enough for a complete meal?
One toast is a light meal or substantial snack—roughly 280 calories with 9 grams of protein and 4 grams of fiber. For most people, it’s most satisfying as part of a larger breakfast (add an egg, some fruit, and coffee) or as a lunch component with soup or a salad. If you’re eating this as your only food, you might want two toasts plus a piece of fruit or yogurt.
More Recipes You’ll Love
- Easy Roasted Tomato Basil Soup – A perfect companion to serve alongside arugula toast for a complete lunch
- Baked Eggs Sunny Side Up – Adds protein richness to your arugula toast breakfast spread
- Air Fry Chicken Legs And Thighs Recipe – A protein option to build your toast into a more substantial dinner-for-breakfast
This arugula toast recipe is proof that restaurant-quality food doesn’t require restaurant-level complexity. You just need quality ingredients, proper technique, and respect for what you’re cooking. I made this dish for myself the morning I finished my dietetics internship—sitting in my tiny New York kitchen, no fancy equipment, no pretense—and it tasted like victory. That’s the magic I want you to experience every single time you make it. Start celebrating your flavorful adventures, and I promise this toast will be the beginning of something delicious in your cooking journey. Happy cooking!