This post contains affiliate links. As an Amazon Associate I earn from qualifying purchases.
I’ll never forget the first time my grandmother pulled a tray of glistening, mahogany-colored chicken thighs from her oven in the Bronx. I was maybe eight years old, and the aroma—this intoxicating blend of paprika, caramelized barbecue sauce, and rendered chicken fat—completely changed how I understood flavor.
Years later, when I was studying nutrition science in culinary school, I realized what made those thighs so irresistible wasn’t just tradition. It was the Maillard reaction: that magical browning process where proteins and sugars collide under heat to create hundreds of new flavor compounds. That’s when I knew chicken thighs weren’t just comfort food—they were edible chemistry.
This recipe takes that nostalgic memory and pairs it with professional technique and nutritional intelligence. I’ve reverse-engineered the best backyard barbecue approach using oven-to-broiler methodology that guarantees perfectly caramelized skin, juicy, fall-off-the-bone meat, and zero guesswork.
Whether you’re feeding a crowd or prepping weeknight dinners, this method delivers restaurant-quality results every single time. And yes, it works on the grill too—I’ll show you how.
The Food Science Behind Perfect Grilled BBQ Chicken Thighs
As a registered dietitian and chef, I approach every recipe through two lenses: nutritional value and technique. Chicken thighs are scientifically superior to breasts for this exact application. Why? The higher fat content—about 12 grams per thigh versus 2 grams in a breast—acts as a natural heat conductor and moisture reservoir. This fat renders during cooking, basting the meat from within and preventing the dryness that plagues leaner cuts.
The bone-in, skin-on format isn’t nostalgic theater. It’s functional anatomy. The bone transmits heat unevenly, creating temperature gradients that actually prevent overcooking the surrounding meat. The skin becomes a protective barrier that traps steam, keeping meat tender while the exterior crisps into textural heaven.
This recipe uses a low-and-slow initial bake followed by a high-heat broil finish—a technique I adapted from professional rotisserie operations. It’s how restaurants guarantee consistency: controlled environment for even cooking, then intense radiant heat for caramelization.
The Science Behind Temperature Control and Protein Doneness
Here’s what most home cooks misunderstand: barbecue sauce is liquid sugar. It will burn at 400℉ if applied too early. That’s why professional kitchens apply glaze in stages—a technique called “basting protocol.” We start with a light brush, bake until the protein reaches about 155℉ internally, then add the final glaze layer. This two-phase approach gives you caramelization without charring.
The broiler finish is pure Maillard magic. That final 2-3 minute blast at 500°F+ creates the crusty, glossy exterior that makes people reach for seconds. The glaze becomes a lacquered shell because the residual moisture in the sauce evaporates while the sugars collapse into a thin, brittle candy layer. This requires 165℉ internal temperature—non-negotiable for food safety with poultry.
Why This Recipe Is Nutritionally Superior
Chicken thighs contain micronutrients that breasts simply don’t deliver at comparable levels. The darker meat is richer in iron, zinc, B vitamins, and selenium—minerals that support immune function, metabolic efficiency, and antioxidant defense. According to USDA nutritional databases, a 3-ounce serving of chicken thigh provides 2.7 mg of zinc (compared to 1.1 mg in breast meat) and 0.48 mg of iron (versus 0.18 mg in breast).
The skin, which many recipes discard, is where the real nutrition story happens. It’s primarily collagen—a protein that supports joint health, skin elasticity, and gut integrity. When rendered during cooking, collagen breaks down into gelatin, which aids digestion and provides amino acids like glycine and proline that your body uses for collagen synthesis. The fat in rendered skin isn’t enemy territory; it’s a vehicle for fat-soluble vitamins (A, D, E, K) that your body can’t absorb without dietary fat.
- Selenium (15-20 mcg per thigh) – Supports thyroid hormone metabolism and activates selenoproteins that protect cells from oxidative damage
- Niacin (6-8 mg per thigh) – Essential for ATP energy production; helps convert dietary carbohydrates and fats into usable cellular fuel
- Choline (75-90 mg per thigh) – Precursor to acetylcholine (crucial for brain function and memory); supports liver methylation pathways
- Collagen-derived amino acids – Glycine and proline strengthen connective tissue and improve gut barrier function
Ingredient Deep Dive
Every ingredient in this recipe has a specific functional job. There’s no filler here—everything serves texture, flavor, or preservation purposes.
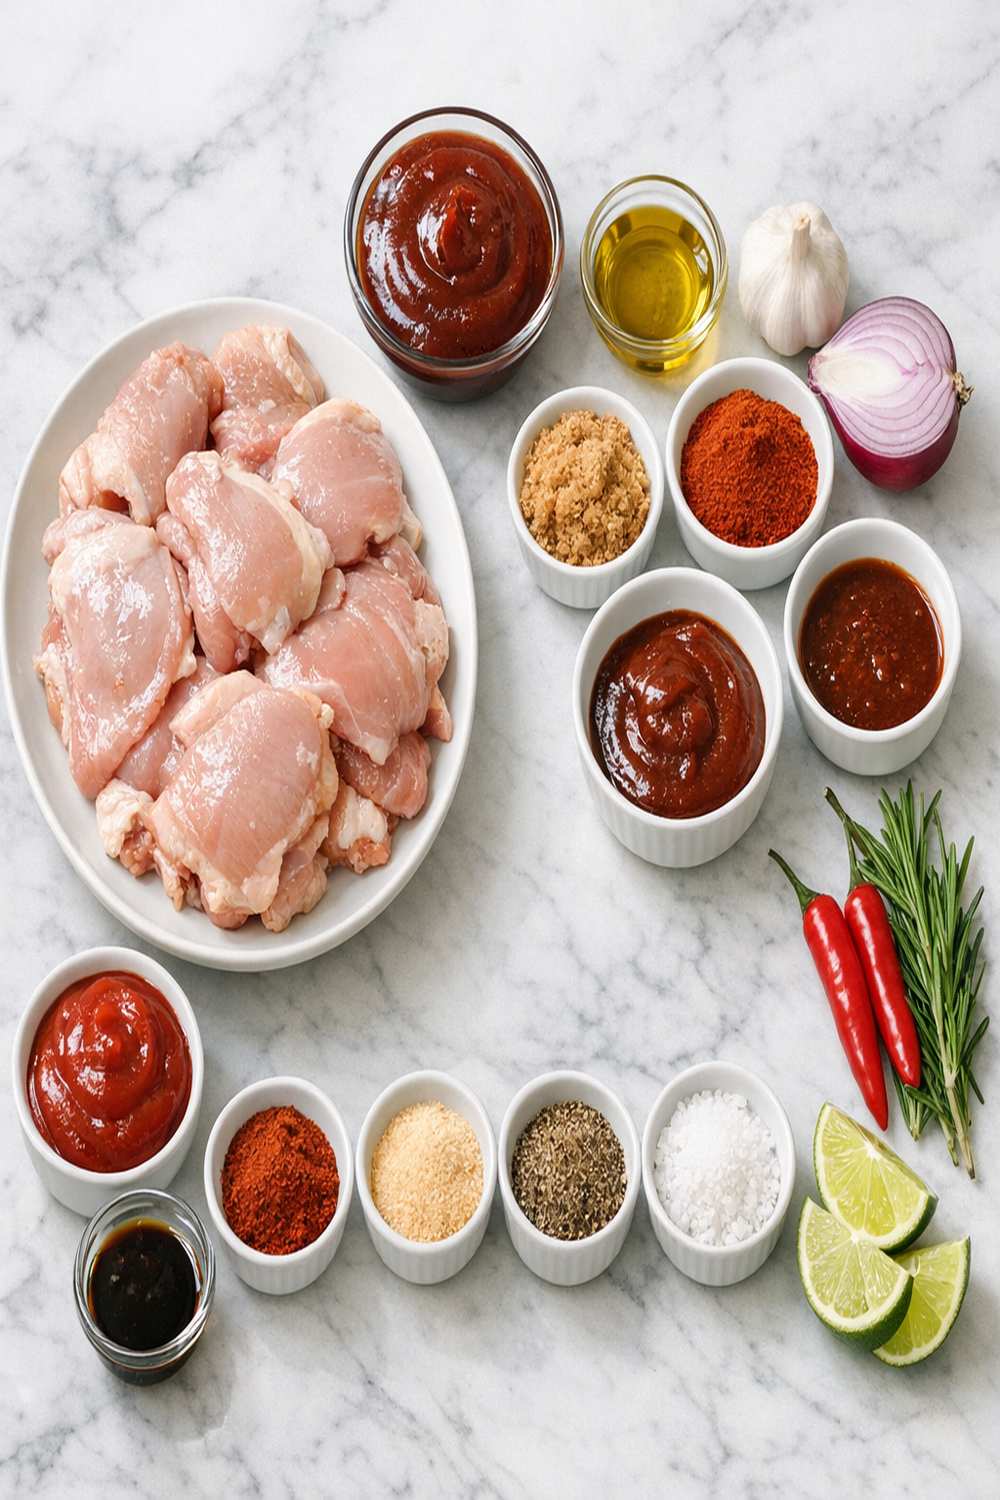
- ¾ cup barbecue sauce, plus additional for serving (the sugar in sauce requires staged application to prevent burning; choose brands with minimal high-fructose corn syrup)
- 2 teaspoons paprika (the spice itself contains capsanthin, a carotenoid with anti-inflammatory properties; adds color and subtle sweetness)
- 2 teaspoons kosher salt (larger crystals dissolve slower, allowing salt to penetrate protein and enhance moisture retention through a process called osmosis)
- 1 teaspoon onion powder (unlike fresh onions, powder doesn’t release moisture that would prevent browning)
- ½ teaspoon black pepper (freshly cracked is superior; piperine aids fat digestion)
- 8 bone-in, skin-on chicken thighs (approximately 3 pounds total; the bone conducts heat evenly while skin protects meat from drying)
- 1½ teaspoons garlic powder (ground garlic has higher umami concentration than fresh; creates savory baseline flavor)
- 2 tablespoons neutral oil like avocado oil (raises smoke point above 400℉, preventing oxidative damage during cooking)
The Technique: How to Make Perfect BBQ Thighs Properly
This isn’t complicated, but precision matters. I’m giving you the exact professional method that guarantees results whether you’re cooking for two or twelve. The key is understanding the why behind each step—that’s what separates restaurant results from mediocre backyard barbecue.
Step 1: Prepare Your Workspace and Preheat Strategically
Set your oven to 400℉ and let it reach full temperature for at least 15 minutes. This matters because a properly preheated oven transfers heat immediately to the chicken, initiating the Maillard reaction right away. If you skip preheating, you’ll get pale, steamed skin instead of caramelized mahogany. Line a large rimmed baking sheet with parchment paper or nonstick foil, then spray lightly with cooking spray. This prevents the sauce from sticking while allowing air circulation underneath for even cooking.

Step 2: Build Your Spice Blend With Intention
In a small bowl, combine 2 teaspoons paprika, 2 teaspoons kosher salt, 1½ teaspoons garlic powder, 1 teaspoon onion powder, and ½ teaspoon black pepper. Don’t skip measuring—I know it’s tempting, but salt concentration directly affects protein hydration. Too little and your meat stays dry. Too much and you’ll get a cured texture. This ratio delivers savory depth without overwhelming the chicken’s natural flavor. The paprika adds more than color; its subtle sweetness complements barbecue sauce’s tang without competing.

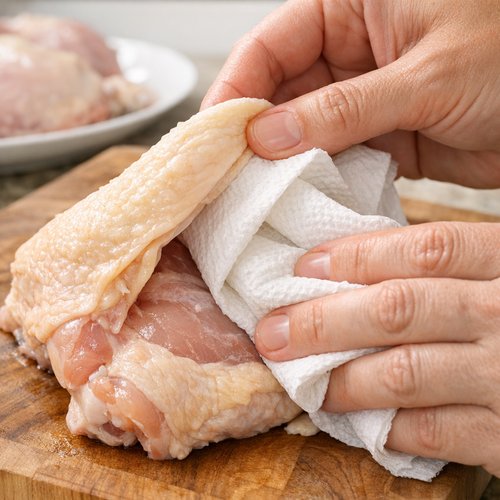
Step 3: Dry Your Chicken Thoroughly
Pat each thigh completely dry with paper towels—even the undersides and between the skin and meat. This is non-negotiable. Any surface moisture turns to steam, which blocks browning. You’re aiming for a completely dry exterior. This step takes 2-3 minutes per batch, but it’s the difference between steamed chicken and caramelized perfection.
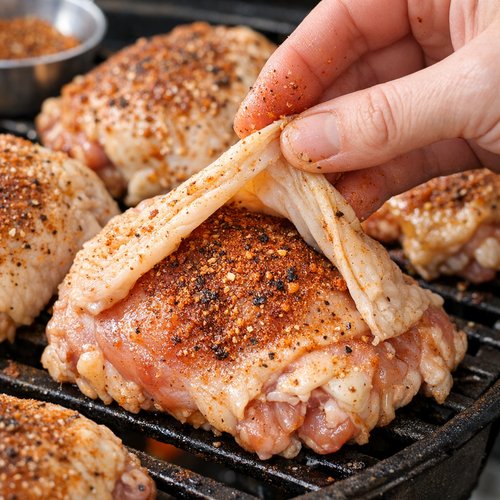
Step 4: Season Under and Over the Skin
Rub your spice blend generously all over each thigh, but here’s the professional move: gently lift the skin on each thigh and rub some seasoning directly onto the meat underneath. This two-layer approach seasons throughout the cooking process, not just the surface. The seasoning nearest the meat slowly migrates inward through osmotic pressure, creating flavor in every bite.
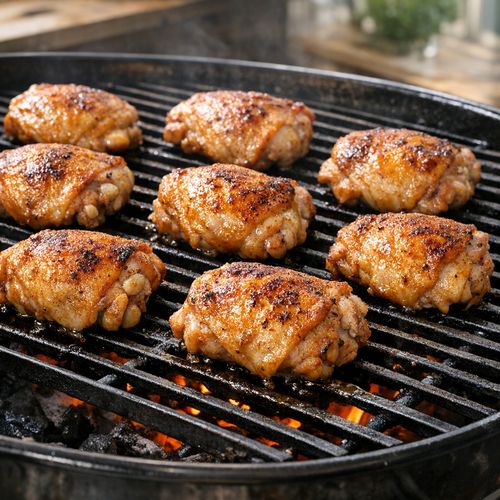
Step 5: Arrange and First Bake Phase
Lay all chicken thighs skin-side up on your prepared baking sheet, spacing them about 2 inches apart. This isn’t just presentation—skin-side up allows the fat to render downward, self-basting the meat. Bake for 20 minutes at 400℉. At this point, the internal temperature should read around 155-160℉. The goal isn’t doneness yet; it’s even heat distribution and initial protein setting.
Step 6: First Glaze Application
Remove the tray from the oven. Pour ¾ cup of your barbecue sauce into a separate small bowl (never dip a brush back into serving sauce—cross-contamination risk). Using a clean brush, apply a thin, even layer of sauce to both sides of each thigh, finishing with skin-side up. That thin layer is crucial. Too much sauce too early burns before the chicken finishes cooking. This measured approach lets sauce caramelize slowly rather than char.

Step 7: Second Bake Phase
Return to the 400℉ oven for another 20 minutes. The sauce will begin to set and brown. The internal temperature should now reach 162-164℉. You’re nearly done—this second phase lets the glaze deepen in color while the meat continues cooking through. Don’t open the oven door more than necessary; each opening drops internal temperature by 15-20℉.
Step 8: Final Glaze and Broiler Finish
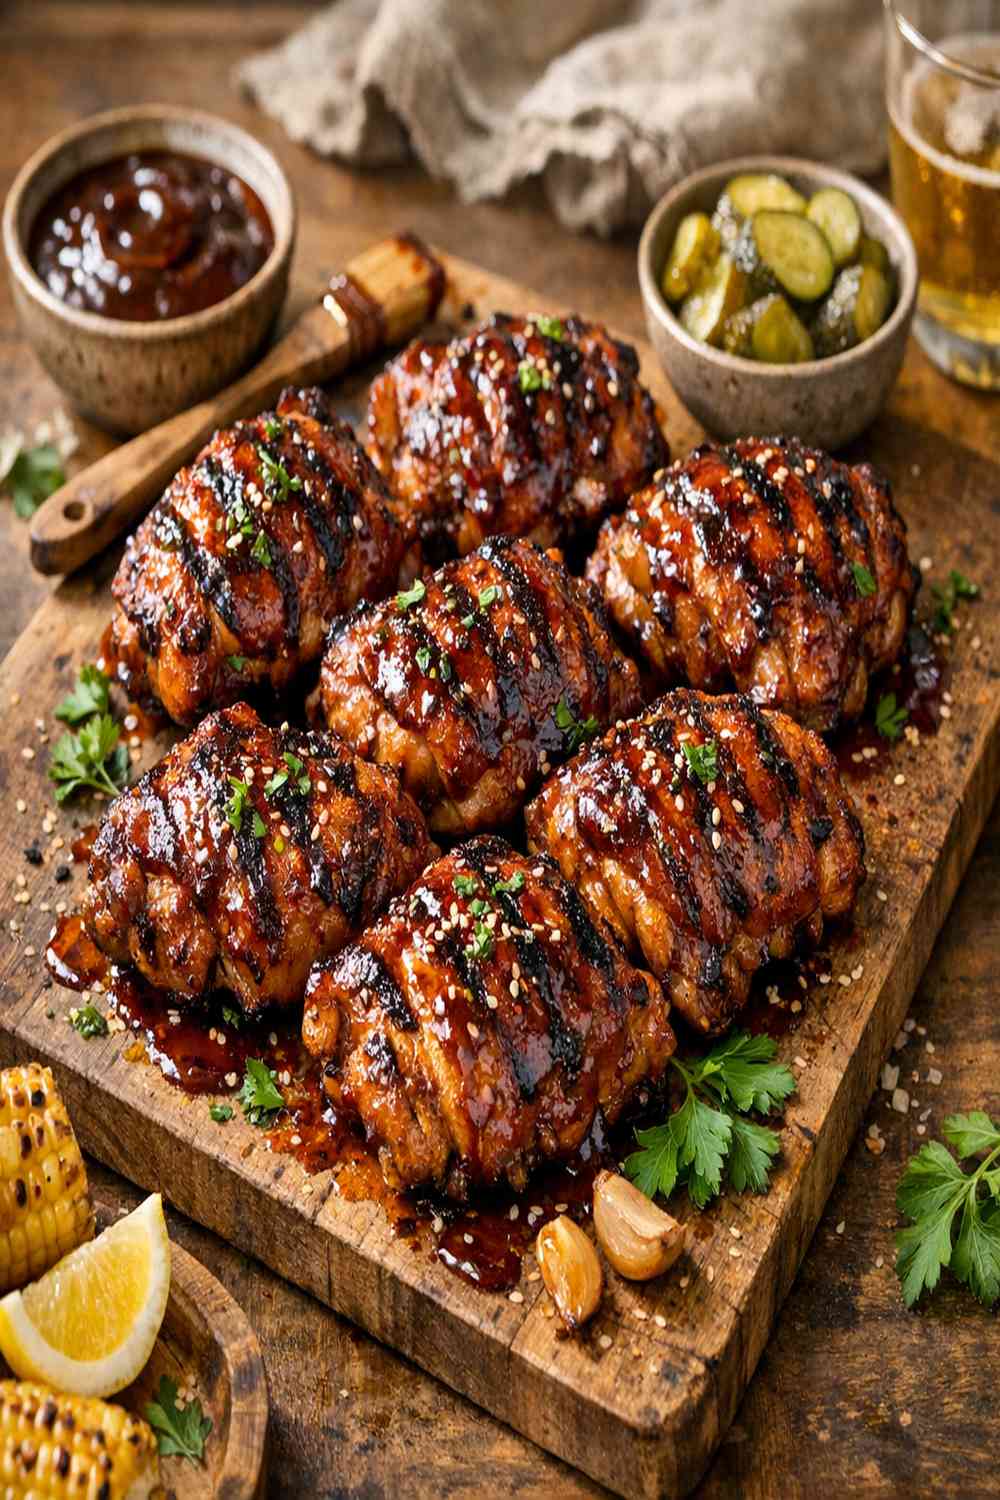
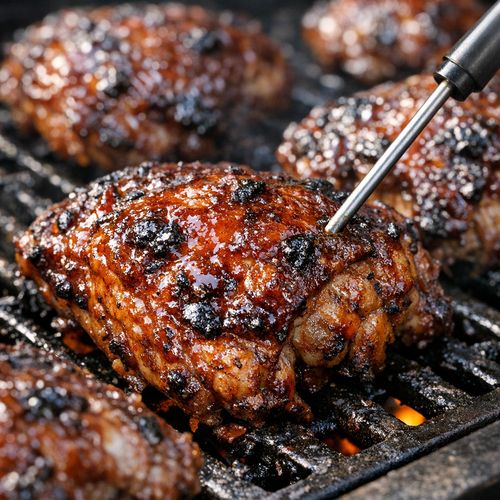
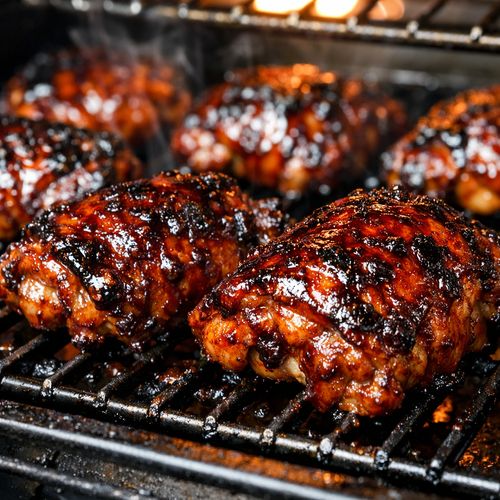
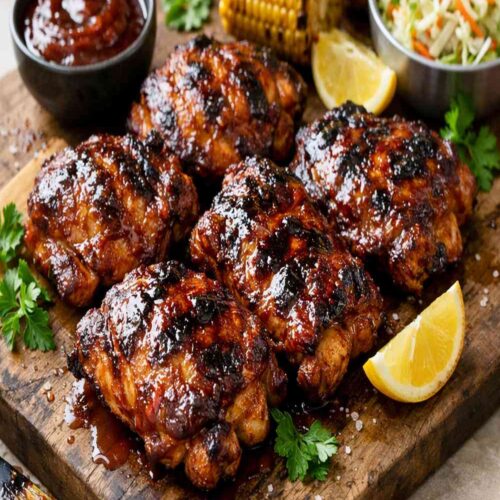
Remove the tray once more. Using that same clean brush, apply one final thin coat of reserved sauce to each thigh, skin-side up only. Now activate your broiler and set the oven to high (usually 500-550℉). Broil the chicken 2-3 minutes, watching constantly through the oven window. You’re looking for the glaze to darken to a deep mahogany and begin to bubble slightly. This high-heat finish is where the Maillard reaction truly explodes—hundreds of new flavor compounds form in seconds.
Step 9: Check Temperature and Rest
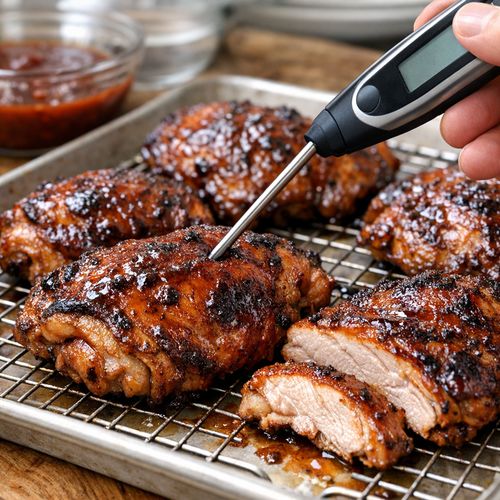
Use an instant-read meat thermometer inserted into the thickest part of a thigh without touching bone. You need 165℉ for food safety. If you’re not there yet, broil another 1-2 minutes, but watch constantly—the difference between perfect and burnt is literally 30 seconds under a broiler.
Once the temperature hits 165℉, remove from the oven and let the chicken rest for 5-10 minutes on the baking sheet. Resting allows carryover cooking to finish gently while muscle fibers relax, reabsorbing juices. Cut into the meat too early and those juices run out onto your plate instead of staying in the meat where they belong. You’ve earned this last bit of patience—don’t skip it.
Professional Tips From the Kitchen
- Use a meat thermometer, not time. Chicken thigh thickness varies. An instant-read thermometer inserted into the thickest part (without touching bone) is your only reliable indicator. I use Thermoworks; it pays for itself in perfectly cooked chicken. Cooking “until it feels firm” is guesswork that leads to either dry meat or food safety violations.
- Let sauce layers cure slightly between applications. The glaze between the first and second bake phase should feel tacky—almost sticky—before you apply the final layer. This prevents layers from sliding around and ensures each glaze component melds into the previous one, creating that professional lacquered finish.
- Choose your barbecue sauce intentionally. Sugar content varies wildly. Sauces with less than 4 grams of sugar per 2-tablespoon serving brown more evenly without burning. I prefer brands with actual molasses rather than high-fructose corn syrup—the molasses adds depth while browning more predictably. If your sauce has more than 6 grams sugar per serving, thin it slightly with apple cider vinegar (1 tablespoon per ½ cup sauce); the acid slows caramelization and prevents burning.
- Pat chicken dry immediately before seasoning. Don’t season in advance and let sit—moisture will re-emerge from the chicken as it sits at room temperature, creating a damp surface that won’t caramelize. Season within 5 minutes of cooking for best results.
- Rotate your baking sheet halfway through broiling. Broiler heating elements aren’t perfectly even. If your chicken browns unevenly, rotate the tray 180 degrees at the 1.5-minute mark to ensure even caramelization across all pieces.
Ingredient Substitutions and Their Impact
- Barbecue sauce (store-bought) → homemade barbecue sauce: Homemade lets you control sugar, sodium, and acid levels. A basic ratio is ¾ cup ketchup, ¼ cup apple cider vinegar, 2 tablespoons molasses, 1 tablespoon Worcestershire, 1 teaspoon smoked paprika. Homemade usually has less sugar, so it browns faster—reduce broiler time by 30 seconds. Flavor deepens significantly; acid content improves browning without burning.
- Paprika → smoked paprika: Adds subtle smoke complexity that mimics grilled flavor. Use the same amount. Smoked paprika is slightly more assertive, so reduce other savory spices by ¼ teaspoon if you’re sensitive to smoke flavor. Texture and nutrition remain identical; only flavor deepens.
- Kosher salt → sea salt: Use 1.5 teaspoons instead of 2 teaspoons—sea salt crystals are denser and saltier by volume. Both work identically from a food science perspective; kosher salt just has larger, airier crystals. Nutrition is equivalent.
- Garlic powder → fresh minced garlic: Use 3 cloves minced finely. Fresh garlic releases moisture, preventing optimal skin browning. Mix minced garlic directly into your barbecue sauce instead of the dry rub to maintain crisping conditions. Flavor becomes more pungent; slightly less savory depth than powder because some umami compounds are lost when using fresh rather than dehydrated.
- Onion powder → fresh minced onion: Same moisture problem as garlic. If using fresh, dice very finely and mix into sauce instead of dry rub. Texture becomes slightly softer; flavor more pronounced but less concentrated.
Dietary Adaptations
Gluten-Free: This recipe is naturally gluten-free. The only potential concern is barbecue sauce—many commercial brands contain gluten as a thickening agent. Check your label or use certified gluten-free sauce. Most brands from major manufacturers offer gluten-free options. The spice blend contains zero gluten; proceed as written.
Low-Sodium: Replace kosher salt with half the amount (1 teaspoon total). Your initial seasoning layer will taste less intense, but the sauce provides sodium. For additional flavor without salt, increase paprika to 1 tablespoon and add ½ teaspoon cayenne pepper. The heat and smoke compensate for reduced salt’s savory impact. Nutrition profile changes minimally except sodium reduction.
Low-Sugar (Keto/Diabetic-Friendly): Use a sugar-free barbecue sauce (brands like G Hughes or Primal Kitchen use erythritol). The sauce won’t brown identically—sugar creates the glossy caramelization that looks professional. To mimic this appearance, brush the cooked chicken with a mixture of 1 tablespoon Dijon mustard plus 1 tablespoon melted butter mixed with ½ teaspoon smoked paprika. Broil for 1 minute to set. Flavor changes noticeably (less sweet, more tangy), but the technique works. Macronutrients shift dramatically: carbs drop from 8-10g to <1g per thigh.
Dairy-Free: This recipe contains no dairy. The cooking spray used for the baking sheet is the only potential concern—verify it’s dairy-free. Most brands are. No modifications needed; nutrition remains identical.
Can I Store Grilled BBQ Chicken Thighs?
Refrigerated Storage: Place cooled chicken in an airtight container with the glaze on. Chicken thighs keep beautifully for 3-4 days refrigerated because the higher fat content resists drying better than breasts. The glaze actually helps—it creates a moisture barrier on the exterior. Reheat gently: oven at 325℉ for 8-10 minutes covered with foil, or microwave at 50% power for 2-3 minutes per piece. Low-and-slow reheating prevents the glaze from separating.
Freezer Storage: Cool completely, then arrange thighs in a single layer on a parchment-lined baking sheet. Freeze uncovered for 2 hours until firm, then transfer to a freezer bag or airtight container. This prevents them from freezing into one solid block. Properly frozen chicken keeps for 3-4 months with minimal quality loss. The collagen in the skin and bone actually acts as a cryoprotectant, protecting cellular structure during freezing and thawing. Thaw in the refrigerator overnight, then reheat as directed above.
Make-Ahead Guide: You can prepare this through the first bake phase up to 8 hours ahead. Season the chicken, arrange it on the baking sheet, cover tightly with plastic wrap, and refrigerate. When ready to serve, remove from the fridge 15 minutes before cooking, then proceed with the first glaze and second bake phase. Cold chicken takes slightly longer—add 5 extra minutes to each phase. This method is perfect for entertaining since you’re not stuck at the oven right before guests arrive.
Expert’s Nutritional Tip: Why Thighs Beat Breasts for Mineral Density
As a registered dietitian, I rarely recommend one protein over another—context matters. But if you’re eating poultry three-plus times weekly (which many of my clients do), thighs become a nutritional strategy, not just a flavor preference. The dark meat in thighs comes from slow-twitch muscle fibers, which store oxygen-binding myoglobin.
That myoglobin is iron-rich. Over a week of eating thighs instead of breasts, you absorb an extra 7-10 mg of bioavailable iron—roughly equivalent to a serving of spinach, but from a source your body recognizes more readily (heme iron versus plant-based non-heme iron).
The zinc difference is equally significant for immune function and testosterone metabolism in men. If cost is a concern—and I know it is in New York—chicken thighs are often $2-3 per pound cheaper than breasts. You’re getting superior nutrition at a lower price point. That’s not a compromise; that’s leverage.
Nutrition Information
Per serving (1 thigh with sauce): Calories: 285 | Protein: 28g | Fat: 14g | Carbohydrates: 8g | Fiber: 0g | Net Carbs: 8g | Sodium: 520mg
These values are based on USDA nutritional data for bone-in, skin-on chicken thigh (raw weight 150g) plus 1.5 tablespoons average barbecue sauce. The protein-to-calorie ratio (approximately 39% of calories from protein) makes this an efficient muscle-building meal.
The fat content provides satiety signals that help with portion control and nutrient absorption. If you’re tracking macros for athletic performance or body composition, one thigh provides roughly 30% of daily protein requirements while staying under 300 calories—impressive density for a whole-food source.
One thigh with skin and bone delivers approximately 50% of daily selenium requirements and 25% of daily niacin requirements. The rendered chicken fat contains fat-soluble vitamins A, D, and K2 that your body stores in liver and adipose tissue for long-term use. This isn’t empty calories; it’s nutritional infrastructure.
What Can I Serve With BBQ Chicken Thighs?
Flavor pairing isn’t random—it’s chemistry. Barbecue sauce is sweet, smoky, and tangy (high acid). You want sides that either complement these qualities through contrast or echo them through harmony.
I often serve these with Bacon Wrapped Brussels because the bitter, sulfurous compounds in roasted Brussels sprouts create a textural and flavor contrast that resets your palate between bites of rich, sweet-glazed chicken.
The rendered bacon fat on the Brussels sprouts echoes the rendered chicken skin—they’re flavor companions even though they’re different dishes. Acid in the barbecue sauce also cuts through the richness of both proteins, preventing palate fatigue over multiple bites.
- Creamy coleslaw (mayo-based, not vinegar-based) – The fat in mayonnaise coats your mouth, providing textural contrast to the sauce’s stickiness. The sharp tang of cabbage directly echoes the vinegar in barbecue sauce, creating harmony without redundancy. Nutritionally, raw cabbage provides fiber and raw glucosinolates (cancer-fighting compounds that degrade when cooked), complementing the protein-rich thigh.
- Cornbread or polenta – Corn’s natural sweetness amplifies barbecue sauce’s sweetness in a controlled way. The starch absorbs rendered juices, preventing them from running across your plate. This pairing is traditional for a reason: corn and tomato (barbecue sauce’s base) are flavor partners in Southern cuisine. Nutritionally, cornbread adds thiamine (B1) and magnesium, minerals that support energy metabolism alongside the protein.
- Grilled peaches or stone fruit – Surprising but scientifically sound. Peach sugars caramelize when grilled, creating compounds that mirror the Maillard reaction products in your chicken’s skin. Peach acidity provides brightness. The combination feels luxe without being complicated. Fiber in fruit aids digestive transit alongside the rich fat and protein.
- Jalapeño cornbread or spicy coleslaw – Capsaicin (the compound that makes peppers hot) triggers pain receptors, causing your mouth to secrete more saliva. This boosts perception of flavor and helps process fatty foods. Spice cuts through richness while adding another flavor dimension. This pairing is particularly good if you’re serving this to a crowd—heat keeps people reaching for more without needing to add more sauce or protein.
- Cooling slaw with lime and cilantro – Citric acid and cilantro create a fresh, palate-cleansing effect that contrasts perfectly with barbecue’s earthiness. The cooling effect (both temperature and flavor profile) prevents the meal from feeling heavy, even though you’re eating rich thigh meat with glaze.
Common Mistakes to Avoid
Mistake 1: Applying sauce too early in the cooking process. If you brush barbecue sauce on raw chicken before it enters the oven, the sugars will caramelize unevenly and often burn before the meat reaches temperature. The sauce is a finishing touch, not an initial marinade. I learned this the hard way—my first attempts at “Asian-style” glazes in culinary school were charred disasters until my instructor explained that sauce timing is technique, not recipe. Lesson: always wait for initial protein setting (155℉ internal temperature) before introducing sugar.
Mistake 2: Overcrowding the baking sheet. If chicken thighs are touching or closer than 2 inches apart, steam gets trapped between them. Steam prevents skin from crisping. You’ll end up with pale, rubbery skin instead of the caramelized mahogany you’re after. Use two baking sheets if necessary. Your oven can handle it; just rotate them halfway through cooking. Airflow is non-negotiable for crisping.
Mistake 3: Skipping the rest period. This one makes me cringe every time I see it. Cutting into chicken immediately after cooking forces all those juices out onto the plate. The meat itself becomes drier with each passing minute that you delay eating it. Those 5-10 minutes of resting are when the muscle fibers relax and reabsorb the liquid. It’s the difference between juicy chicken and stringy chicken. Your patience during rest directly impacts eating experience.
Mistake 4: Using wet hands or wet utensils during seasoning. Any moisture on your hands when you rub spices onto the chicken creates a paste instead of a dry rub. That paste won’t adhere properly and will wash away during the initial baking phase. Pat your chicken completely dry, keep your hands dry, and work quickly. The spices should cling to the dry surface like they’re meant to be there.
Seasonal Variations
Spring version: Replace half the barbecue sauce with a glaze made from ⅓ cup barbecue sauce mixed with 2 tablespoons Dijon mustard and 1 tablespoon fresh lemon juice. Add ½ teaspoon fresh thyme to your spice rub. Serve with grilled asparagus or fresh pea salad. The mustard and lemon brighten the sauce without making it taste light—it’s still rich, just fresher. Thyme adds herbaceous notes that feel seasonal without overpowering chicken.
Summer version: Keep the sauce classic, but brush finished thighs with a compound butter made from 2 tablespoons softened butter mixed with 1 tablespoon fresh basil, minced, plus zest of one lime. The butter melts into the glaze, creating a silky, herb-infused crust. Serve alongside corn on the cob (both come off the grill with similar caramelization). This version is lighter in feel while maintaining richness—the fresh herbs prevent heaviness even in heat.
Fall version: Mix your barbecue sauce with 1 tablespoon pumpkin purée and ½ teaspoon pumpkin pie spice (cinnamon, nutmeg, clove blend). The pumpkin adds subtle sweetness and body without changing the sauce’s consistency. Serve with roasted root vegetables (butternut squash, parsnips, brussels sprouts). This version tastes nostalgic—it appeals to fall entertaining crowds and feels special without requiring different technique.
Winter version: Create a maple-bourbon version by mixing ¾ cup barbecue sauce with 2 tablespoons pure maple syrup and 1 tablespoon bourbon (optional, but it adds depth). Add ¼ teaspoon smoked paprika and ½ teaspoon cayenne to your spice rub. Serve with braised root vegetables or creamy polenta. The bourbon and maple create a warming flavor profile, while the spice adds welcome heat. This version feels like holiday dinner when properly plated.
Bbq Thighs On Grill Recipe
Ingredients
- ¾ cup barbecue sauce, plus additional for serving the sugar in sauce requires staged application to prevent burning; choose brands with minimal high-fructose corn syrup
- 2 teaspoon paprika the spice itself contains capsanthin, a carotenoid with anti-inflammatory properties; adds color and subtle sweetness
- 2 teaspoon kosher salt larger crystals dissolve slower, allowing salt to penetrate protein and enhance moisture retention through a process called osmosis
- 1 teaspoon onion powder unlike fresh onions, powder doesn’t release moisture that would prevent browning
- ½ teaspoon black pepper freshly cracked is superior; piperine aids fat digestion
- 8 bone-in, skin-on chicken thighs approximately 3 pounds total; the bone conducts heat evenly while skin protects meat from drying
- 1½ teaspoon garlic powder ground garlic has higher umami concentration than fresh; creates savory baseline flavor
- 2 tablespoon neutral oil like avocado oil raises smoke point above 400℉, preventing oxidative damage during cooking
Instructions
Step 1: Prepare Your Workspace and Preheat Strategically
- Set your oven to 400℉ and let it reach full temperature for at least 15 minutes. This matters because a properly preheated oven transfers heat immediately to the chicken, initiating the Maillard reaction right away. If you skip preheating, you’ll get pale, steamed skin instead of caramelized mahogany. Line a large rimmed baking sheet with parchment paper or nonstick foil, then spray lightly with cooking spray. This prevents the sauce from sticking while allowing air circulation underneath for even cooking.
Step 2: Build Your Spice Blend With Intention
- In a small bowl, combine 2 teaspoons paprika, 2 teaspoons kosher salt, 1½ teaspoons garlic powder, 1 teaspoon onion powder, and ½ teaspoon black pepper. Don’t skip measuring—I know it’s tempting, but salt concentration directly affects protein hydration. Too little and your meat stays dry. Too much and you’ll get a cured texture. This ratio delivers savory depth without overwhelming the chicken’s natural flavor. The paprika adds more than color; its subtle sweetness complements barbecue sauce’s tang without competing.
Step 3: Dry Your Chicken Thoroughly
- Pat each thigh completely dry with paper towels—even the undersides and between the skin and meat. This is non-negotiable. Any surface moisture turns to steam, which blocks browning. You’re aiming for a completely dry exterior. This step takes 2-3 minutes per batch, but it’s the difference between steamed chicken and caramelized perfection.
Step 4: Season Under and Over the Skin
- Rub your spice blend generously all over each thigh, but here’s the professional move: gently lift the skin on each thigh and rub some seasoning directly onto the meat underneath. This two-layer approach seasons throughout the cooking process, not just the surface. The seasoning nearest the meat slowly migrates inward through osmotic pressure, creating flavor in every bite.
Step 5: Arrange and First Bake Phase
- Lay all chicken thighs skin-side up on your prepared baking sheet, spacing them about 2 inches apart. This isn’t just presentation—skin-side up allows the fat to render downward, self-basting the meat. Bake for 20 minutes at 400℉. At this point, the internal temperature should read around 155-160℉. The goal isn’t doneness yet; it’s even heat distribution and initial protein setting.
Step 6: First Glaze Application
- Remove the tray from the oven. Pour ¾ cup of your barbecue sauce into a separate small bowl (never dip a brush back into serving sauce—cross-contamination risk). Using a clean brush, apply a thin, even layer of sauce to both sides of each thigh, finishing with skin-side up. That thin layer is crucial. Too much sauce too early burns before the chicken finishes cooking. This measured approach lets sauce caramelize slowly rather than char.
Step 7: Second Bake Phase
- Return to the 400℉ oven for another 20 minutes. The sauce will begin to set and brown. The internal temperature should now reach 162-164℉. You’re nearly done—this second phase lets the glaze deepen in color while the meat continues cooking through. Don’t open the oven door more than necessary; each opening drops internal temperature by 15-20℉.
Step 8: Final Glaze and Broiler Finish
- Remove the tray once more. Using that same clean brush, apply one final thin coat of reserved sauce to each thigh, skin-side up only. Now activate your broiler and set the oven to high (usually 500-550℉). Broil the chicken 2-3 minutes, watching constantly through the oven window. You’re looking for the glaze to darken to a deep mahogany and begin to bubble slightly. This high-heat finish is where the Maillard reaction truly explodes—hundreds of new flavor compounds form in seconds.
Step 9: Check Temperature and Rest
- Use an instant-read meat thermometer inserted into the thickest part of a thigh without touching bone. You need 165℉ for food safety. If you’re not there yet, broil another 1-2 minutes, but watch constantly—the difference between perfect and burnt is literally 30 seconds under a broiler. Once the temperature hits 165℉, remove from the oven and let the chicken rest for 5-10 minutes on the baking sheet. Resting allows carryover cooking to finish gently while muscle fibers relax, reabsorbing juices. Cut into the meat too early and those juices run out onto your plate instead of staying in the meat where they belong. You’ve earned this last bit of patience—don’t skip it.
Notes
Nutrition
FAQs
Can I make this recipe on an actual grill instead of in the oven?
Absolutely, but the technique changes slightly. Preheat your gas grill to medium heat (around 375-400℉) or build a medium-hot charcoal fire. Season your thighs identically. Place skin-side up on the grill grates and cover with the grill lid. Grill for 15-18 minutes until internal temperature reaches 155℉, checking every 5 minutes by lifting the lid briefly. If you see flare-ups (flames from rendered fat), move the thighs to a cooler zone. Once you reach 155℉, brush with your first glaze layer (same as oven method), re-cover, and grill another 15-18 minutes until you hit 162-164℉. For the final glaze, apply sauce, then move thighs to the hottest part of the grill (direct high heat) for 2-3 minutes, watching constantly for charring. The timing is longer on a grill because it’s harder to maintain precise temperature than in an oven, but the science is identical. If your grill is particularly hot, reduce each phase by 2-3 minutes. Use that meat thermometer—it’s your guarantee against guessing.
What’s the difference between bone-in and boneless thighs for this recipe?
Significant difference. Bone conducts heat differently than meat, creating gentle temperature gradients that prevent overcooking the meat closest to the bone while ensuring the edges reach safe temperature. Boneless thighs cook more uniformly but dry out faster because the bone’s thermal buffering effect is absent. If using boneless thighs, reduce your first bake phase to 15 minutes (they’ll reach 155℉ faster) and check temperature at the 13-minute mark. The glaze application technique remains identical, but boneless thighs are more forgiving—they won’t dry out as easily if you accidentally overcook slightly. Bone-in has superior flavor and texture, which is why I specify it, but boneless works if that’s what your market has.
Can I prep the seasoning and sauce mixture ahead of time, like the morning of?
Yes, but with caveats. Mix your spice blend (paprika, salt, garlic powder, onion powder, pepper) in an airtight container up to a week ahead. Keep it sealed in a cool, dark place—light degrades spice potency, particularly paprika’s carotenoid content. For barbecue sauce, store your glaze mixture in an airtight container for up to 3 days if homemade, or use commercial sauce directly from the bottle (follow expiration dates). Don’t mix sauce with spices ahead of time; the salt will extract liquid from the sauce, creating an inconsistent texture. Season your chicken no more than 15 minutes before cooking—earlier and moisture re-emerges on the surface. This timing constraint is why make-ahead options work best when you prep through the first bake phase but finish the final glaze on cooking day.