This post contains affiliate links. As an Amazon Associate I earn from qualifying purchases.
I’m obsessed with no-bake treats that actually taste like dessert—not some sad health food masquerading as indulgence. These almond butter rice cake bars hit that sweet spot between nutritious and decadent. They pair beautifully with your morning coffee, and I love serving them alongside Banana Whey Shake for a balanced breakfast situation. Trust me, these bars are about to become your secret weapon for stress-free entertaining.
Why I’m Obsessed With No-Bake Almond Butter Bars
My first encounter with these bars happened during a crazy busy week at the clinic. I had back-to-back nutrition consultations, and I needed something I could prep on Sunday that would survive my chaotic schedule. No oven, minimal dishes, maximum flavor. I threw together rice cakes, almond butter, and chocolate in my tiny apartment kitchen, and honestly? My coworkers were convinced I’d ordered them from some fancy Brooklyn patisserie.
That moment taught me something crucial as both a dietitian and a chef: simplicity and quality ingredients are the real magic. These bars prove you don’t need fancy equipment or complicated techniques to create something genuinely delicious.
What Are No-Bake Almond Butter Rice Cake Bars?
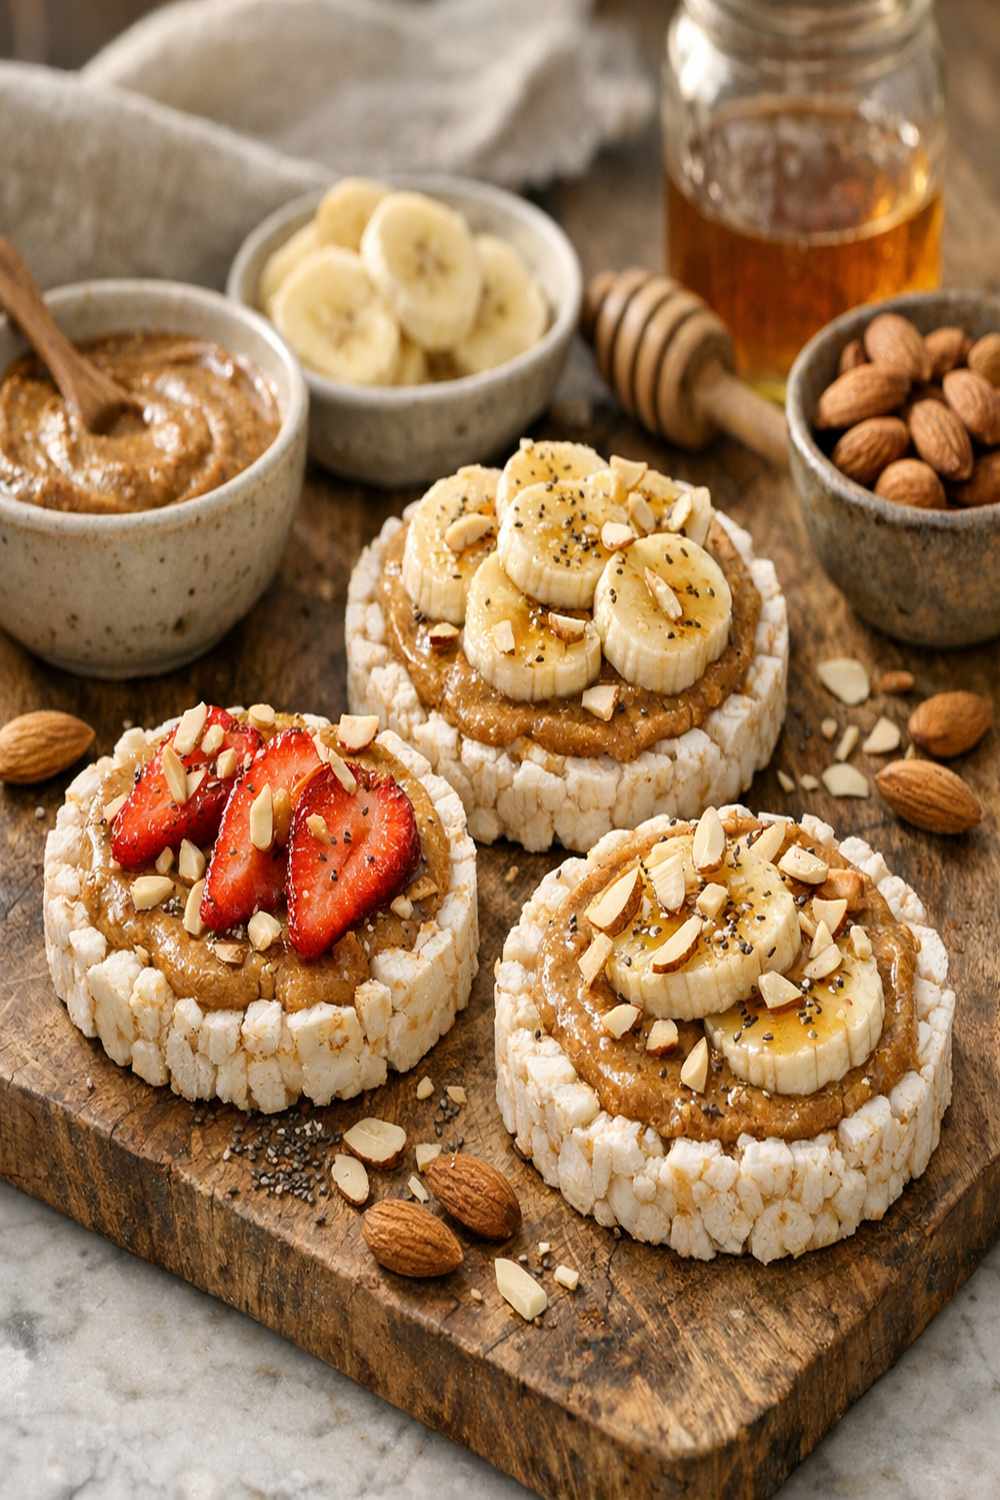
These bars are a modern twist on classic puffed rice treats. Instead of relying on marshmallows and butter, I’m using nutrient-dense rice cakes as the base, binding them with creamy almond butter and a touch of honey. The whole situation gets topped with a silky chocolate layer and finished with a sprinkle of coarse sea salt—because sweet-and-salty is basically the perfect flavor equation.
The genius here is that rice cakes are light, crispy, and absolutely neutral. They absorb all that gorgeous almond butter flavor while keeping things from feeling heavy. Add the dark chocolate topping, and you’ve got a dessert that feels indulgent without the post-dessert guilt.
Why You’ll Love This Almond Butter Rice Cake Bar Recipe
- Zero baking required – No oven means no heat in your kitchen, no timing stress, and nobody accidentally burning something. Perfect for summer or anyone intimidated by baking.
- Ready in 30 minutes – Active prep time is maybe 10 minutes. The rest is just freezer time. You can literally make these between breakfast and lunch.
- Make-ahead friendly for real – These freeze beautifully for up to three weeks. Perfect for meal prep, unexpected guests, or when you need to bring something to a gathering.
- Natural sweetness – Honey provides the sweetness without refined white sugar. As a dietitian, I appreciate that we’re using whole food sweeteners that your body actually recognizes.
- Restaurant-quality presentation – The salt-chocolate combination looks restaurant-grade, but it’s embarrassingly easy. Your friends will ask for the recipe.
- Endlessly customizable – Swap almond butter for cashew or peanut butter. Use dark, milk, or white chocolate. Add vanilla, espresso powder, or cinnamon. The base works with basically everything.
- Naturally gluten-free and dairy-free options – Rice cakes are naturally gluten-free, and you can easily use dairy-free chocolate if needed. One recipe, multiple dietary accommodations.
The Ingredients
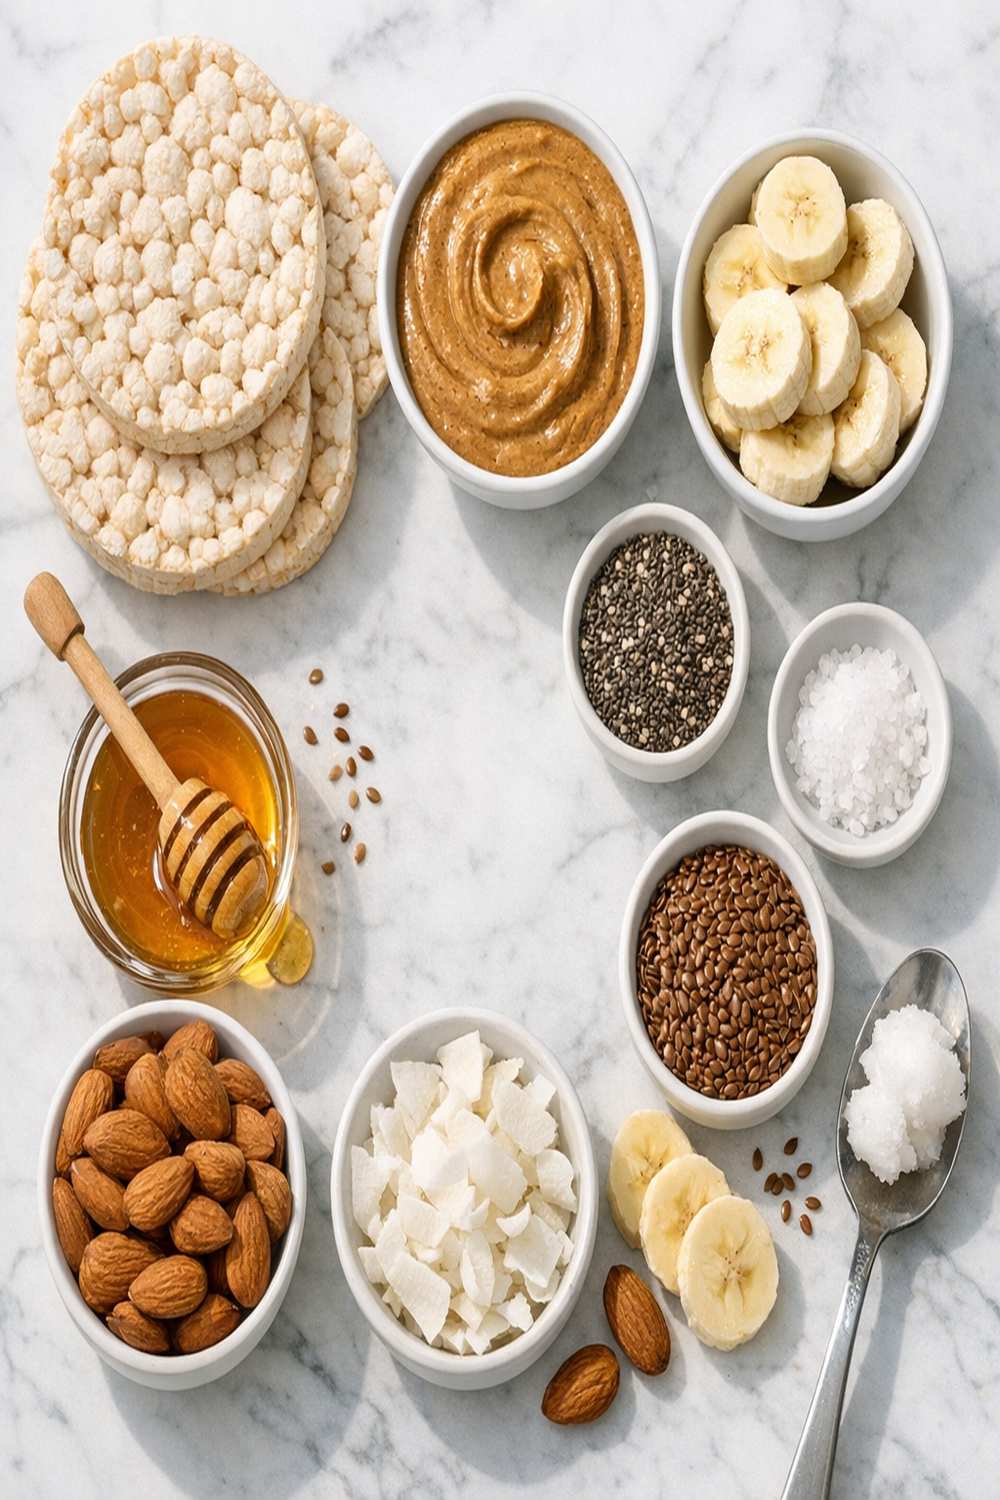
I love how few ingredients this recipe needs. Quality over quantity—that’s my approach in both the kitchen and the nutrition clinic. Every single ingredient earns its spot here. Makes 16 bars.
- 4 lightly salted rice cakes (the foundation of everything)
- ¼ teaspoon sea salt (enhances the sweetness and balances flavors)
- ½ cup honey (raw or organic, for deeper flavor and micronutrients)
- 2 teaspoons coconut oil (keeps the chocolate smooth and glossy)
- Coarse sea salt for topping (finishing salt, not table salt)
- 1 teaspoon vanilla extract (optional but adds incredible depth)
- ¾ cup semi-sweet chocolate chips (or dark chocolate for less sweetness)
- ¾ cup creamy all-natural almond butter (or cashew butter for a milder taste)
How to Make Almond Butter Rice Cake Bars?
This process is genuinely foolproof. Even if you’ve never made no-bake treats before, you’ve got this. I’m breaking it down into digestible steps so there are zero surprises.
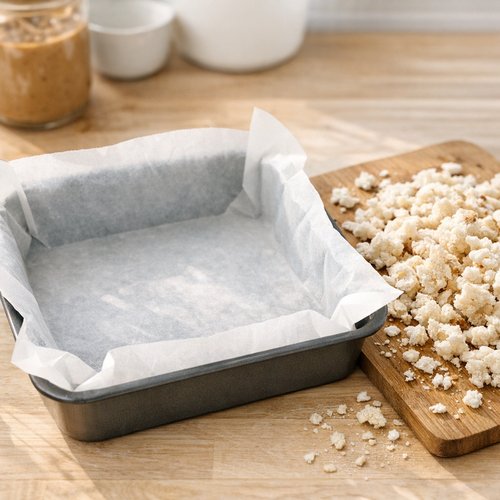
Step 1: Prep Your Pan and Crumble the Rice Cakes
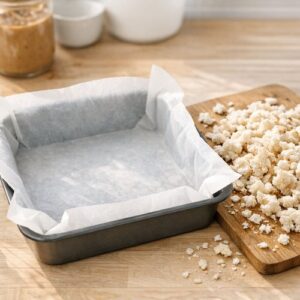
Line a standard 9×9-inch baking pan with parchment paper, letting some hang over the edges for easy removal later. This is your secret weapon for mess-free extraction. Now grab your four rice cakes and place them in a large mixing bowl. Using your hands, crumble them into uniform, bite-sized pieces—we’re aiming for no pieces larger than a pea. This takes maybe two minutes. The consistency matters because uneven chunks create texture problems when you press everything down.
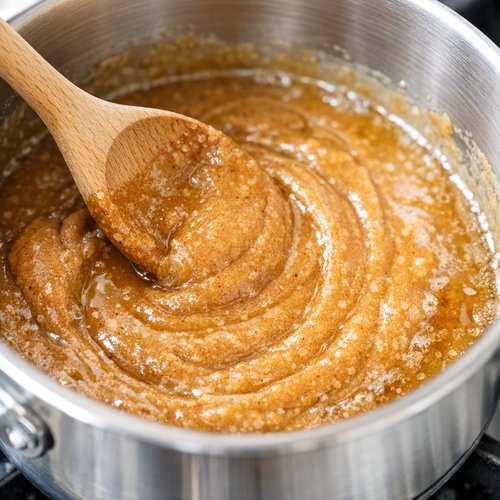
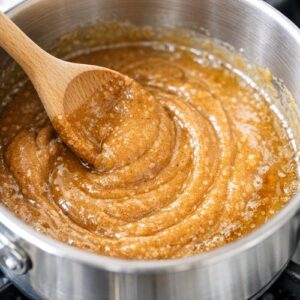
Step 2: Melt the Almond Butter Base
Pour your almond butter and honey into a medium saucepan and set your heat to medium-low. This is crucial—never use high heat here. Stir constantly for about 5-7 minutes until everything becomes glossy and flows like silk. You’ll notice the mixture transforms from thick and clumpy to smooth and pourable. When it looks like melted caramel, you’re golden. Add that ¼ teaspoon of sea salt right now—it’ll dissolve into the warm mixture and distribute evenly.
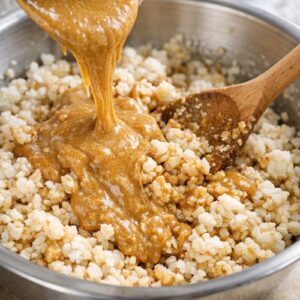
Step 3: Combine Rice Cakes With the Almond Mixture
Pour that warm, silky almond butter mixture over your crumbled rice cakes. Using a sturdy spatula or wooden spoon, stir everything together until every single rice cake piece is coated. This takes about two minutes of mixing. You want it to look glossy and cohesive, not dry or patchy. The warm honey-almond coating should cling to every crumb.

Step 4: Press Into the Pan
Transfer that glorious mixture into your parchment-lined pan. Now comes the satisfaction moment—use your spatula to press everything down firmly and evenly. I like to use the bottom of a measuring cup to get a really even surface. Press harder than you think you need to. Firm pressure creates that satisfying crunch when you bite into the finished bar. You’ll see the mixture compact down significantly. That’s exactly what you want.

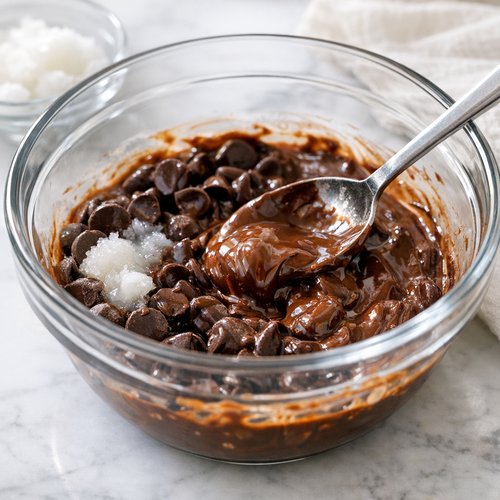
Step 5: Melt the Chocolate Topping
Add your chocolate chips and coconut oil to a microwave-safe bowl. Microwave on high in 20-second increments, stirring thoroughly after each burst. This method prevents seizing and ensures silky, glossy chocolate. You’ll likely need 3-4 rounds total. Stop as soon as you see just a few small chunks remaining—residual heat will finish the job. Over-microwaving creates grainy, broken chocolate that won’t set properly.
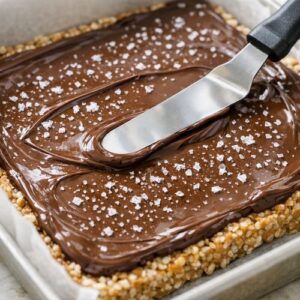
Step 6: Spread the Chocolate and Add Salt
Pour that melted chocolate over your pressed almond butter layer. Using an offset spatula or the back of a spoon, spread it into one smooth, even layer. Work quickly because chocolate sets fast. Immediately sprinkle your coarse sea salt over the entire surface while the chocolate is still warm and slightly tacky. The salt crystals will stick perfectly and create that restaurant-quality presentation.

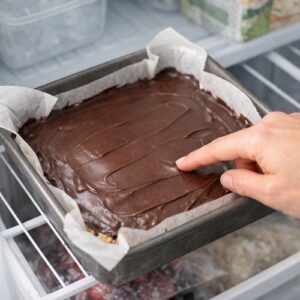
Step 7: Freeze and Set
Transfer the pan to your freezer and let it sit for at least 15-20 minutes. The chocolate needs to solidify completely. You can gently poke it with your finger—when it no longer feels soft, you’re ready to cut. I usually let mine sit for 25-30 minutes because I like a really solid chocolate shell. Don’t rush this step or your bars will fall apart when you slice them.

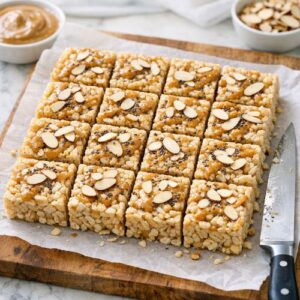
Step 8: Cut Into Squares and Serve
Use the parchment overhang to lift the entire slab out of the pan. Place it on a cutting board and slice into 16 equal squares (4 cuts one direction, 4 the other). For clean edges, wipe your knife with a warm, damp towel between cuts. This prevents chocolate from smudging and keeps everything looking pristine. Serve immediately or store in an airtight container.

Tips and Tricks
- Choose natural almond butter – Skip the brands with added sugars and oils. Real almond butter should have one ingredient: almonds. It might have a thin oil layer on top, which is perfect—that’s pure almond fat.
- Don’t skip the coconut oil – Two teaspoons makes the difference between glossy, spreadable chocolate and thick, dull chocolate that’s hard to work with. It’s not about nutrition; it’s about texture and presentation.
- Room temperature matters – Make these when your kitchen is relatively cool. If it’s sweltering, your finished bars might get soft when you remove them from the freezer. In summer, I keep them in the fridge instead.
- Toast your rice cakes first for extra depth – Place them in a dry skillet over medium heat for 1-2 minutes per side to add nutty flavor. Totally optional, but it’s a chef-level move.
- Use finishing salt, not table salt – Finishing salt like Maldon has larger crystals and way more flavor impact. Table salt feels gritty and tastes metallic by comparison.
- Make a chocolate drizzle for extra pizzazz – Melt a tiny bit extra chocolate with a ½ teaspoon more coconut oil and drizzle it over the solid chocolate layer before it fully sets. It looks fancy.
Expert’s Nutritional Tip
Here’s what excites me as a registered dietitian: almond butter is packed with monounsaturated fats and vitamin E, two nutrients most people don’t get enough of. One tablespoon contains about 3 grams of protein and 3 grams of fiber. When you pair that with rice cakes’ gentle carbohydrates, you’re creating a snack that actually stabilizes blood sugar instead of spiking it. That means no 3 PM energy crash. The dark chocolate topping? It contributes polyphenols and antioxidants when you use quality chocolate with at least 60% cocoa. This isn’t just dessert; it’s a legitimately nutritious treat. I feel genuinely good serving these to clients and family.
Make-Ahead Guide
Prep the components ahead: You can crumble your rice cakes and store them in an airtight container for up to three days. Keep your almond butter and honey separate and ready to go. This means actual assembly takes less than five minutes when you need the finished product.
Make the full pan on Sunday: These bars are my ultimate meal prep item. Make an entire batch on Sunday evening and store in the refrigerator. They’ll keep beautifully for five days, staying perfectly crispy. Perfect for grabbing before work or when you need an afternoon pick-me-up.
Freeze individual bars: Once frozen solid, remove from the pan and wrap each bar individually in plastic wrap, then place them all in a freezer-safe container. They’ll last up to three weeks in the freezer. Thaw at room temperature for 15 minutes before eating, or eat them frozen—honestly, they’re delicious either way.
Pro restaurant move: Arrange finished bars on a parchment-lined sheet pan before wrapping. This prevents them from sticking together when frozen and makes plating for guests effortless.
Can I Store Almond Butter Rice Cake Bars?
Absolutely, and they actually get better with time as flavors meld together. At room temperature, these stay fresh for about three days in an airtight container, though the chocolate might soften depending on your kitchen temperature. I recommend refrigerating instead—they’ll stay perfectly crispy for up to five days in an airtight container. For longer storage, wrap each bar individually in plastic wrap and freeze them. Frozen bars last three weeks easily. Thaw at room temperature for 15 minutes before serving, or enjoy them straight from the freezer for an ice-cream-like texture.
Nutrition Information
Each of the 16 bars contains approximately 180 calories, 10 grams of fat (mostly the healthy monounsaturated kind from almonds), 19 grams of carbohydrates, 2 grams of fiber, and 3 grams of protein. The USDA Nutrient Database confirms that almonds provide substantial amounts of vitamin E and magnesium, both nutrients that support heart health and muscle function. The honey adds trace minerals like zinc and manganese, plus natural enzymes that aid digestion. Dark chocolate varieties (60% cocoa and above) contribute flavonoids with antioxidant properties. One bar makes a satisfying afternoon snack that actually stabilizes energy rather than causing crashes.
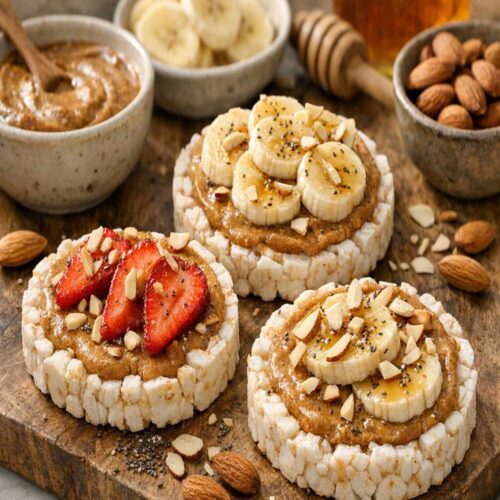
What Can I Serve With Almond Butter Rice Cake Bars?
These bars are seriously versatile. Serve them with morning coffee as a sophisticated breakfast dessert, or pack them for afternoon snacks. They pair beautifully with Banana Protein Shake For Weight Loss for a complete protein-and-carb situation. I also love serving them at the end of dinner parties because they’re elegant, require zero plates, and won’t make guests feel overstuffed.
- With hot beverages – These shine alongside espresso, hot chocolate, or herbal tea. The salt-chocolate-coffee combination is genuinely magical.
- As an energy bite before workouts – The carbs from rice cakes plus healthy fats from almond butter make these ideal pre-exercise fuel. One bar gives you sustained energy without heaviness.
- Paired with fresh fruit – Serve alongside raspberries, strawberries, or apple slices for brightness and freshness that cuts through the richness.
- With nut-free alternatives for guests – Make a batch with sunflower seed butter instead to accommodate tree nut allergies at gatherings.
Substitutes
- Nut butters – Cashew butter creates a milder, slightly sweeter flavor. Peanut butter works beautifully and is usually more budget-friendly. Sunflower seed butter is perfect for nut-free situations and has a subtle earthiness.
- Sweeteners – Maple syrup, agave nectar, or brown rice syrup can replace honey at equal measurements. Each brings slightly different flavor notes, but they work identically.
- Chocolate varieties – Dark chocolate (70% cocoa) creates less sweetness and more sophistication. Milk chocolate is sweeter and more approachable for chocolate purists. White chocolate is completely different but works beautifully with vanilla extract.
- Finishing salts – Himalayan pink salt, fleur de sel, or even smoked salt create different flavor dimensions. Experiment and find your favorite.
- Rice cake base – Puffed quinoa or puffed millet work beautifully and add slightly more nutrition. I’ve even used crushed granola for a more textured base.
Common Mistakes to Avoid
- Overheating the almond butter mixture – High heat causes separation and graininess. Medium-low heat creates that silky, glossy texture. Take your time here; rushing ruins everything.
- Pressing too lightly – Bars that fall apart when you bite them usually weren’t pressed firmly enough. Use real pressure and compact everything down. You want it solid.
- Microwaving chocolate on high for too long – This causes seizing and breaks the chocolate. Use 20-second bursts with thorough stirring. Patience creates silky chocolate; rushing creates grit.
- Skipping the freezer time – Cutting before chocolate is fully set creates messy bars with chocolate smears. Those 15-20 minutes are non-negotiable for perfect presentation.
Seasonal Variations
Spring and Summer: Add a tablespoon of lemon zest to the almond butter mixture for brightness. Top with a drizzle of white chocolate instead of dark for a lighter feel. The citrus-chocolate combination is incredibly refreshing.
Fall and Winter: Stir ½ teaspoon of cinnamon and ¼ teaspoon of ground ginger into the almond butter mixture. These warm spices feel cozy and seasonal. Finish with dark chocolate for extra richness.
Year-round advanced option: Add 1 teaspoon of vanilla extract to the almond butter base, or ½ teaspoon of espresso powder mixed into the melted chocolate. These additions deepen complexity without overwhelming the flavors.
Almond Butter Rice Cakes Recipe
Ingredients
- 4 lightly salted rice cakes the foundation of everything
- ¼ teaspoon sea salt enhances the sweetness and balances flavors
- ½ cup honey raw or organic, for deeper flavor and micronutrients
- 2 teaspoon coconut oil keeps the chocolate smooth and glossy
- Coarse sea salt for topping finishing salt, not table salt
- 1 teaspoon vanilla extract optional but adds incredible depth
- ¾ cup semi-sweet chocolate chips or dark chocolate for less sweetness
- ¾ cup creamy all-natural almond butter or cashew butter for a milder taste
Instructions
Step 1: Prep Your Pan and Crumble the Rice Cakes
- Line a standard 9x9-inch baking pan with parchment paper, letting some hang over the edges for easy removal later. This is your secret weapon for mess-free extraction. Now grab your four rice cakes and place them in a large mixing bowl. Using your hands, crumble them into uniform, bite-sized pieces—we're aiming for no pieces larger than a pea. This takes maybe two minutes. The consistency matters because uneven chunks create texture problems when you press everything down.
Step 2: Melt the Almond Butter Base
- Pour your almond butter and honey into a medium saucepan and set your heat to medium-low. This is crucial—never use high heat here. Stir constantly for about 5-7 minutes until everything becomes glossy and flows like silk. You'll notice the mixture transforms from thick and clumpy to smooth and pourable. When it looks like melted caramel, you're golden. Add that ¼ teaspoon of sea salt right now—it'll dissolve into the warm mixture and distribute evenly.
Step 3: Combine Rice Cakes With the Almond Mixture
- Pour that warm, silky almond butter mixture over your crumbled rice cakes. Using a sturdy spatula or wooden spoon, stir everything together until every single rice cake piece is coated. This takes about two minutes of mixing. You want it to look glossy and cohesive, not dry or patchy. The warm honey-almond coating should cling to every crumb.
Step 4: Press Into the Pan
- Transfer that glorious mixture into your parchment-lined pan. Now comes the satisfaction moment—use your spatula to press everything down firmly and evenly. I like to use the bottom of a measuring cup to get a really even surface. Press harder than you think you need to. Firm pressure creates that satisfying crunch when you bite into the finished bar. You'll see the mixture compact down significantly. That's exactly what you want.

Step 5: Melt the Chocolate Topping
- Add your chocolate chips and coconut oil to a microwave-safe bowl. Microwave on high in 20-second increments, stirring thoroughly after each burst. This method prevents seizing and ensures silky, glossy chocolate. You'll likely need 3-4 rounds total. Stop as soon as you see just a few small chunks remaining—residual heat will finish the job. Over-microwaving creates grainy, broken chocolate that won't set properly.

Step 6: Spread the Chocolate and Add Salt
- Pour that melted chocolate over your pressed almond butter layer. Using an offset spatula or the back of a spoon, spread it into one smooth, even layer. Work quickly because chocolate sets fast. Immediately sprinkle your coarse sea salt over the entire surface while the chocolate is still warm and slightly tacky. The salt crystals will stick perfectly and create that restaurant-quality presentation.
Step 7: Freeze and Set
- Transfer the pan to your freezer and let it sit for at least 15-20 minutes. The chocolate needs to solidify completely. You can gently poke it with your finger—when it no longer feels soft, you're ready to cut. I usually let mine sit for 25-30 minutes because I like a really solid chocolate shell. Don't rush this step or your bars will fall apart when you slice them.
Step 8: Cut Into Squares and Serve
- Use the parchment overhang to lift the entire slab out of the pan. Place it on a cutting board and slice into 16 equal squares (4 cuts one direction, 4 the other). For clean edges, wipe your knife with a warm, damp towel between cuts. This prevents chocolate from smudging and keeps everything looking pristine. Serve immediately or store in an airtight container.
Notes
Nutrition
FAQs
Can I use natural almond butter that separates?
Absolutely. If your almond butter has that layer of oil on top, stir it back in before measuring. Some people drain the oil to reduce calories, but honestly? That’s where the flavor lives. Keep it. If the separated version seems too thin, just scoop from the bottom where the solids settle and use that slightly thicker portion.
What if my chocolate seized while melting?
Add coconut oil, one teaspoon at a time, and stir gently. Sometimes a tiny amount of heat exposure helps. If it’s completely grainy and broken, unfortunately you’ll need to start fresh. Seized chocolate can’t be recovered for a smooth topping. This is why the 20-second microwave method is non-negotiable.
Do these bars need to stay frozen, or can I keep them at room temperature?
They can absolutely sit at room temperature in an airtight container, especially if your kitchen stays relatively cool. The chocolate might soften slightly, but they’ll still taste incredible. Refrigeration keeps them crispier longer. I usually keep a batch in the fridge and grab them as needed.
Can I make these without coconut oil?
Technically yes, but the chocolate won’t spread as easily or set as smoothly. Coconut oil reduces the chocolate’s viscosity without affecting flavor. If you absolutely can’t use it, try equal parts butter or even a tiny bit of vegetable oil. The result will be slightly different, but still delicious.
Are these safe for people with nut allergies?
Not if you use almond or peanut butter. Substitute with sunflower seed butter for a nut-free version that works identically. Make sure your rice cakes and chocolate don’t have nut-based ingredients listed. Always check labels carefully if you’re serving someone with severe allergies.
More Recipes You’ll Love
- Air Fry Banana And Peanut Butter Recipe – A warm, crispy take on the classic combination using your air fryer
- this simple cake – Portable breakfast bakes that feel like pancakes but are easier to meal prep
- Air Fry Steak Bites Recipe – A savory option to balance your sweet snack rotation
There you have it—your new favorite no-bake treat that’s equal parts indulgent and nutritious. These almond butter rice cake bars prove that restaurant-quality desserts don’t require complicated techniques or fancy equipment. They require quality ingredients, respect for the process, and patience during freezing. Make a batch this week, stash them in your freezer, and thank yourself later when you need an afternoon pick-me-up or a last-minute treat to bring somewhere. Happy baking (or rather, happy not-baking!). Let’s celebrate your flavorful adventure!