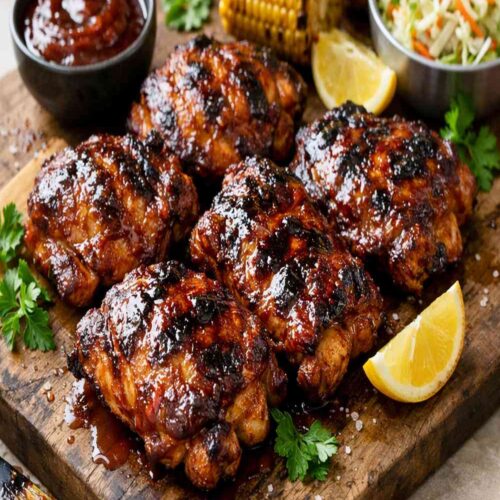
Bbq Thighs On Grill Recipe
I'll never forget the first time my grandmother pulled a tray of glistening, mahogany-colored chicken thighs from her oven in the Bronx. I was maybe eight years old, and the aroma—this intoxicating blend of paprika, caramelized barbecue sauce, and rendered chicken fat—completely changed how I understood flavor. Years later, when I was studying nutrition science in culinary school, I realized what made those thighs so irresistible wasn't just tradition. It was the Maillard reaction: that magical browning process where proteins and sugars collide under heat to create hundreds of new flavor compounds. That's when I knew chicken thighs weren't just comfort food—they were edible chemistry.
Ingredients
- ¾ cup barbecue sauce, plus additional for serving the sugar in sauce requires staged application to prevent burning; choose brands with minimal high-fructose corn syrup
- 2 teaspoon paprika the spice itself contains capsanthin, a carotenoid with anti-inflammatory properties; adds color and subtle sweetness
- 2 teaspoon kosher salt larger crystals dissolve slower, allowing salt to penetrate protein and enhance moisture retention through a process called osmosis
- 1 teaspoon onion powder unlike fresh onions, powder doesn't release moisture that would prevent browning
- ½ teaspoon black pepper freshly cracked is superior; piperine aids fat digestion
- 8 bone-in, skin-on chicken thighs approximately 3 pounds total; the bone conducts heat evenly while skin protects meat from drying
- 1½ teaspoon garlic powder ground garlic has higher umami concentration than fresh; creates savory baseline flavor
- 2 tablespoon neutral oil like avocado oil raises smoke point above 400℉, preventing oxidative damage during cooking
Instructions
Step 1: Prepare Your Workspace and Preheat Strategically
- Set your oven to 400℉ and let it reach full temperature for at least 15 minutes. This matters because a properly preheated oven transfers heat immediately to the chicken, initiating the Maillard reaction right away. If you skip preheating, you'll get pale, steamed skin instead of caramelized mahogany. Line a large rimmed baking sheet with parchment paper or nonstick foil, then spray lightly with cooking spray. This prevents the sauce from sticking while allowing air circulation underneath for even cooking.
Step 2: Build Your Spice Blend With Intention
- In a small bowl, combine 2 teaspoons paprika, 2 teaspoons kosher salt, 1½ teaspoons garlic powder, 1 teaspoon onion powder, and ½ teaspoon black pepper. Don't skip measuring—I know it's tempting, but salt concentration directly affects protein hydration. Too little and your meat stays dry. Too much and you'll get a cured texture. This ratio delivers savory depth without overwhelming the chicken's natural flavor. The paprika adds more than color; its subtle sweetness complements barbecue sauce's tang without competing.
Step 3: Dry Your Chicken Thoroughly
- Pat each thigh completely dry with paper towels—even the undersides and between the skin and meat. This is non-negotiable. Any surface moisture turns to steam, which blocks browning. You're aiming for a completely dry exterior. This step takes 2-3 minutes per batch, but it's the difference between steamed chicken and caramelized perfection.
Step 4: Season Under and Over the Skin
- Rub your spice blend generously all over each thigh, but here's the professional move: gently lift the skin on each thigh and rub some seasoning directly onto the meat underneath. This two-layer approach seasons throughout the cooking process, not just the surface. The seasoning nearest the meat slowly migrates inward through osmotic pressure, creating flavor in every bite.
Step 5: Arrange and First Bake Phase
- Lay all chicken thighs skin-side up on your prepared baking sheet, spacing them about 2 inches apart. This isn't just presentation—skin-side up allows the fat to render downward, self-basting the meat. Bake for 20 minutes at 400℉. At this point, the internal temperature should read around 155-160℉. The goal isn't doneness yet; it's even heat distribution and initial protein setting.
Step 6: First Glaze Application
- Remove the tray from the oven. Pour ¾ cup of your barbecue sauce into a separate small bowl (never dip a brush back into serving sauce—cross-contamination risk). Using a clean brush, apply a thin, even layer of sauce to both sides of each thigh, finishing with skin-side up. That thin layer is crucial. Too much sauce too early burns before the chicken finishes cooking. This measured approach lets sauce caramelize slowly rather than char.
Step 7: Second Bake Phase
- Return to the 400℉ oven for another 20 minutes. The sauce will begin to set and brown. The internal temperature should now reach 162-164℉. You're nearly done—this second phase lets the glaze deepen in color while the meat continues cooking through. Don't open the oven door more than necessary; each opening drops internal temperature by 15-20℉.
Step 8: Final Glaze and Broiler Finish
- Remove the tray once more. Using that same clean brush, apply one final thin coat of reserved sauce to each thigh, skin-side up only. Now activate your broiler and set the oven to high (usually 500-550℉). Broil the chicken 2-3 minutes, watching constantly through the oven window. You're looking for the glaze to darken to a deep mahogany and begin to bubble slightly. This high-heat finish is where the Maillard reaction truly explodes—hundreds of new flavor compounds form in seconds.
Step 9: Check Temperature and Rest
- Use an instant-read meat thermometer inserted into the thickest part of a thigh without touching bone. You need 165℉ for food safety. If you're not there yet, broil another 1-2 minutes, but watch constantly—the difference between perfect and burnt is literally 30 seconds under a broiler. Once the temperature hits 165℉, remove from the oven and let the chicken rest for 5-10 minutes on the baking sheet. Resting allows carryover cooking to finish gently while muscle fibers relax, reabsorbing juices. Cut into the meat too early and those juices run out onto your plate instead of staying in the meat where they belong. You've earned this last bit of patience—don't skip it.
Notes
- Use a meat thermometer, not time. Chicken thigh thickness varies. An instant-read thermometer inserted into the thickest part (without touching bone) is your only reliable indicator. I use Thermoworks; it pays for itself in perfectly cooked chicken. Cooking "until it feels firm" is guesswork that leads to either dry meat or food safety violations.
- Let sauce layers cure slightly between applications. The glaze between the first and second bake phase should feel tacky—almost sticky—before you apply the final layer. This prevents layers from sliding around and ensures each glaze component melds into the previous one, creating that professional lacquered finish.
- Choose your barbecue sauce intentionally. Sugar content varies wildly. Sauces with less than 4 grams of sugar per 2-tablespoon serving brown more evenly without burning. I prefer brands with actual molasses rather than high-fructose corn syrup—the molasses adds depth while browning more predictably. If your sauce has more than 6 grams sugar per serving, thin it slightly with apple cider vinegar (1 tablespoon per ½ cup sauce); the acid slows caramelization and prevents burning.
- Pat chicken dry immediately before seasoning. Don't season in advance and let sit—moisture will re-emerge from the chicken as it sits at room temperature, creating a damp surface that won't caramelize. Season within 5 minutes of cooking for best results.
- Rotate your baking sheet halfway through broiling. Broiler heating elements aren't perfectly even. If your chicken browns unevenly, rotate the tray 180 degrees at the 1.5-minute mark to ensure even caramelization across all pieces.
Nutrition
Calories: 336kcalCarbohydrates: 2gProtein: 25gFat: 25gSaturated Fat: 7gCholesterol: 148mgSodium: 894mgFiber: 1gSugar: 1g
Tried this recipe?Let us know how it was!