Before we dive into this delightful quick cinnamon rolls recipe, let’s talk about what complements them beautifully. Picture this: a steaming cup of freshly brewed coffee, rich and bold, perfectly contrasting the sweet and gooey cinnamon rolls. Or perhaps a glass of creamy milk, which always works well with baked goods.
If you’re feeling adventurous, try a dollop of whipped cream or a drizzle of maple syrup over your warm rolls. For those looking to add a dash of freshness, a side of fruit salad filled with juicy berries can balance the sweetness splendidly. Imagine biting into a cinnamon roll while savoring the tang of a tart blackberry – it’s a delightful experience, one that elevates your breakfast or snack time!

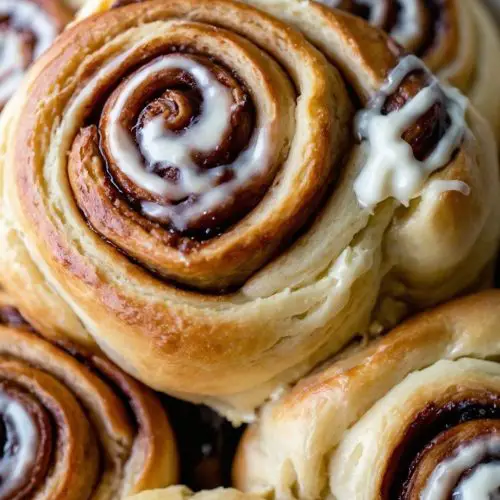
I’m excited to share one of my absolute favorite recipes: quick 45-minute cinnamon rolls. That’s right! No more waiting around for hours while dough rises and bakes. I first discovered this recipe during a brunch gathering where time was scarce, and the urge for something sweet was powerful. Let me tell you, these cinnamon rolls were not just a hit; they stole the show. Warm, doughy, and drizzled with a sweet glaze, they bring a warm, inviting touch to any table.
Baking can often feel like a chore. But with this quick recipe, you’ll be surprised at just how easy and satisfying it is to make fresh cinnamon rolls at home, especially when you feel the call of the sweet. You won’t just get to enjoy the aroma wafting through your kitchen; you’ll also get to impress your loved ones.
So, let’s get to it!
What Are Quick 45-Minute Cinnamon Rolls?
Quick 45-minute cinnamon rolls are just that—delicious, fluffy rolls that can be made and enjoyed in under an hour. The dough comes together swiftly thanks to instant dry yeast, and the warm ingredients help it rise quickly.
This recipe bypasses the long waiting times typical of bakeries and allows you to enjoy homemade cinnamon rolls without much hassle. Think of it as your tasty shortcut to happiness.
Why This Recipe Works
This recipe combines simple science with mouthwatering ingredients. The use of instant yeast reduces the rise time significantly. You don’t have to worry about kneading for too long or letting the dough rest for hours.
The warmth from the milk and the careful mixing of ingredients create a perfect dough texture. Plus, the combination of brown sugar and cinnamon for the filling gives the rolls that rich, comforting flavor we all crave. It all comes together seamlessly!
You will also like the following Breakfast recipes!
- Best Avocado Toast with Eggs
- Your Keto-Friendly Banana Chaffles Recipe
- Copycat Healthy Banana Oatmeal Muffins
What You’ll Need to Make This Dish
To whip up these delightful treats, gather the following ingredients:
Dough:
- 1 packet instant dry yeast (2 and 1/4 teaspoons)
- 1/4 cup whole milk
- 2 tablespoons unsalted butter, softened
- 1 large egg
- 1/2 teaspoon pure vanilla extract
- 3/4 teaspoon sea salt
- 1/4 cup granulated sugar
- 1/2 cup warm water
- 2 and 3/4 cups all-purpose flour
Filling:
- 1/2 cup packed light brown sugar
- 1/4 cup salted butter, at room temperature
- 2 tablespoons ground cinnamon
- 1/8 teaspoon ground nutmeg
- 1/4 cup heavy cream (for drizzling before baking)
Glaze:
- 4 ounces cream cheese, softened
- 2–3 tablespoons whole milk
- 1 cup confectioners’ sugar
- 1 teaspoon pure vanilla extract

How to Make Quick 45-Minute Cinnamon Rolls?
Making these cinnamon rolls is as straightforward as a sunny day. The hardest part might just be waiting for them to cool down enough before taking that first bite. Ready? Let’s get into the fun part!
Step 1: Prepare the Dough
In a large mixing bowl, dissolve the instant yeast in warm water. Add the warm milk, softened butter, and granulated sugar. Once mixed, toss in the egg and vanilla extract. Stir well until combined, then sprinkle in the sea salt. Gradually add the flour, mixing until a sticky dough forms.
Step 2: Knead the Dough
Turn the dough out onto a floured surface. Knead gently for about 5 minutes until it’s smooth and elastic. If the dough feels too sticky, sprinkle a little more flour as needed. It should be somewhat tacky but not overly sticky.
Step 3: Roll Out the Dough
Once kneaded, flatten the dough into a rectangle about 1/4-inch thickness using a rolling pin. This doesn’t have to be perfect. Aim for a successful rectangle that will showcase that lovely filling.
Step 4: Prepare the Filling
Spread the room-temperature butter over the rolled dough. Mix together the brown sugar, cinnamon, and nutmeg in a small bowl. Sprinkle this heavenly mixture evenly over the buttered dough, leaving a small border around the edges.
Step 5: Roll Up the Dough
Starting from one edge, carefully roll the dough tightly into a log. Slice the log into 1-inch rolls. You should get about 12 rolls, which will bake up beautifully; make sure to place them cut-side up in a greased baking dish.
Step 6: Pre-Bake Rise
Cover the dish with a clean kitchen towel and let the rolls rise for about 10 minutes in a warm place. This will give them a little lift just before baking.
Step 7: Drizzle and Bake
Preheat your oven to 375°F (190°C). Drizzle the heavy cream evenly over the rolls. This prevents them from drying out and gives a rich taste. Pop them in the oven and bake for 18-20 minutes, or until the tops are golden brown.
Step 8: Make the Glaze
While the rolls are baking, mix the softened cream cheese, milk, confectioners’ sugar, and vanilla in a bowl. Whisk until smooth and creamy. Adjust the milk for the desired consistency.
Step 9: Glaze and Serve
Once your rolls are golden and ready, take them out and let them cool for about 10 minutes. Drizzle that delightful glaze over the top, and get ready to indulge.
Tips for Success
- Use Fresh Ingredients: Ensure your yeast is fresh for the best rise.
- Proper Measurement: Weigh your flour for the most accurate results instead of using a measuring cup.
- Temperature Matters: Ingredients, especially the milk and butter, should be warm but not hot to the touch.
- Experiment with Fillings: Feel free to add nuts or dried fruit for a different flavor profile.
- Don’t Skip the Glaze: A drizzle of glaze takes these rolls to the next level; it’s worth it!
How to Store Leftovers?
Store any leftover cinnamon rolls in an airtight container at room temperature for up to three days. If you want to keep them longer, wrap them tightly in plastic wrap and freeze them for up to three months. Reheat in the microwave or oven when you’re ready to enjoy them again.
Nutrition Information
Each roll contains approximately:
- Calories: 240
- Total fat: 9g
- Saturated fat: 5g
- Carbohydrates: 35g
- Sugar: 12g
- Protein: 3g

How Would I Recommend Serving Quick 45-Minute Cinnamon Rolls?
- With Coffee: Enjoy these rolls fresh with a hot cup of coffee. The pairing is simply unbeatable!
- Warm Milk: Try serving them with a side of warm milk; it’s comforting and enjoyable.
- Fresh Fruit: Pair them with seasonal fruits like strawberries or raspberries to add freshness and balance.
- Ice Cream: An adventurous pairing, but try a scoop of vanilla ice cream on top of a warm roll for an indulgent treat.
What Alternatives Can You Use for the Ingredients if Not Available?
- Milk: Use almond milk or oat milk for a dairy-free option. They work well without compromising flavor.
- Butter: Coconut oil can be a suitable alternative if you’re looking to make these rolls dairy-free.
- Brown Sugar: You can use coconut sugar or even regular granulated sugar in a pinch for the filling.
- Cream Cheese: Greek yogurt works as a great substitute for the glaze if you’re looking for a healthier twist.
Quick 45-Minute Cinnamon Rolls
Equipment
- Oven
Ingredients
Dough:
- 1 packet instant dry yeast 2 and 1/4 teaspoons
- 1/4 cup whole milk
- 2 tablespoons unsalted butter softened
- 1 large egg
- 1/2 teaspoon pure vanilla extract
- 3/4 teaspoon sea salt
- 1/4 cup granulated sugar
- 1/2 cup warm water
- 2 and 3/4 cups all-purpose flour
- Filling:
- 1/2 cup packed light brown sugar
- 1/4 cup salted butter at room temperature
- 2 tablespoons ground cinnamon
- 1/8 teaspoon ground nutmeg
- 1/4 cup heavy cream for drizzling before baking
Glaze:
- 4 ounces cream cheese softened
- 2 –3 tablespoons whole milk
- 1 cup confectioners’ sugar
- 1 teaspoon pure vanilla extract
Instructions
Step 1: Prepare the Dough
- In a large mixing bowl, dissolve the instant yeast in warm water. Add the warm milk, softened butter, and granulated sugar. Once mixed, toss in the egg and vanilla extract. Stir well until combined, then sprinkle in the sea salt. Gradually add the flour, mixing until a sticky dough forms.
Step 2: Knead the Dough
- Turn the dough out onto a floured surface. Knead gently for about 5 minutes until it’s smooth and elastic. If the dough feels too sticky, sprinkle a little more flour as needed. It should be somewhat tacky but not overly sticky.
Step 3: Roll Out the Dough
- Once kneaded, flatten the dough into a rectangle about 1/4-inch thickness using a rolling pin. This doesn’t have to be perfect. Aim for a successful rectangle that will showcase that lovely filling.
Step 4: Prepare the Filling
- Spread the room-temperature butter over the rolled dough. Mix together the brown sugar, cinnamon, and nutmeg in a small bowl. Sprinkle this heavenly mixture evenly over the buttered dough, leaving a small border around the edges.
Step 5: Roll Up the Dough
- Starting from one edge, carefully roll the dough tightly into a log. Slice the log into 1-inch rolls. You should get about 12 rolls, which will bake up beautifully; make sure to place them cut-side up in a greased baking dish.
Step 6: Pre-Bake Rise
- Cover the dish with a clean kitchen towel and let the rolls rise for about 10 minutes in a warm place. This will give them a little lift just before baking.
Step 7: Drizzle and Bake
- Preheat your oven to 375°F (190°C). Drizzle the heavy cream evenly over the rolls. This prevents them from drying out and gives a rich taste. Pop them in the oven and bake for 18-20 minutes, or until the tops are golden brown.
Step 8: Make the Glaze
- While the rolls are baking, mix the softened cream cheese, milk, confectioners’ sugar, and vanilla in a bowl. Whisk until smooth and creamy. Adjust the milk for the desired consistency.
Step 9: Glaze and Serve
- Once your rolls are golden and ready, take them out and let them cool for about 10 minutes. Drizzle that delightful glaze over the top, and get ready to indulge.
Notes
- Use Fresh Ingredients: Ensure your yeast is fresh for the best rise.
- Proper Measurement: Weigh your flour for the most accurate results instead of using a measuring cup.
- Temperature Matters: Ingredients, especially the milk and butter, should be warm but not hot to the touch.
- Experiment with Fillings: Feel free to add nuts or dried fruit for a different flavor profile.
- Don’t Skip the Glaze: A drizzle of glaze takes these rolls to the next level; it’s worth it!
Nutrition
Frequently Asked Questions
1. Can I use active dry yeast instead of instant yeast?
Absolutely! Just remember to activate the yeast in warm water first before mixing it with the other ingredients.
2. How can I make these rolls healthier?
Consider replacing half of the all-purpose flour with whole wheat flour and reducing the sugar in the filling.
3. Can I double this recipe?
Definitely! If you double the recipe, just use two pans to bake the rolls. Make sure to adjust the baking time slightly if needed.
4. Can I make these ahead of time?
You can prepare the rolls and place them in the refrigerator before the last rise. Just let them come to room temperature before baking.
5. What if I don’t have a mixer?
No problem! You can easily mix the dough by hand. It may take a bit longer, but it’s totally doable.
6. Can I use gluten-free flour?
Yes, substitute with your favorite gluten-free blend. Just ensure it includes xanthan gum for proper texture
Conclusion
The joy of biting into a warm, freshly made cinnamon roll is simply heartwarming. This recipe not only saves time but also packs flavor into each fluffy bite. You’ll find it hard to believe these delightful rolls come together so quickly!
So, whether for a weekend brunch or a sweet afternoon treat, these quick cinnamon rolls are bound to please at any gathering. Trust me, once you try this recipe, you may never go back to store-bought again. Happy baking, my friends!