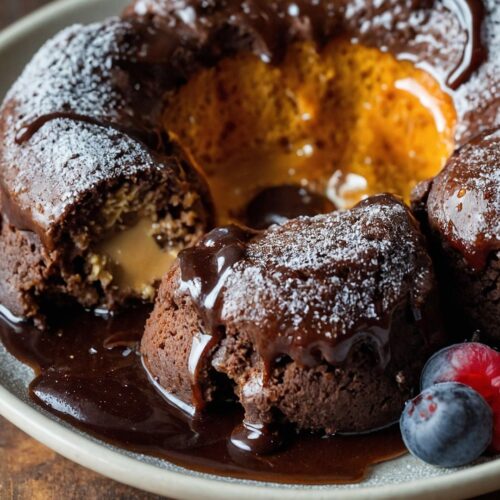
When I first laid eyes on a molten lava cake, I was spellbound. Imagine a dessert that looks like a simple chocolate cake, but when you slice into it, the rich, gooey chocolate flows out—pure bliss! Now, let me tell you that nothing pairs better with a warm molten lava cake than a scoop of creamy vanilla ice cream. The contrast of temperatures and textures creates a moment of pure indulgence. Picture this: a freshly baked cake, its center oozing with chocolate magic, served alongside a cool, velvety ball of ice cream. That’s the kind of dessert pairing that haunts your dreams.
Now, I want to take you on a journey—through the creation of this decadent dish, packed with stories, tips, and insights gained from my very own culinary escapades. So, grab your apron and let’s dive into the world of molten lava cakes!

What is Molten Lava Cake?
Molten lava cake is a delightful dessert that brings joy to chocolate lovers everywhere. It’s a small cake featuring a liquid chocolate center. The outer layer is baked until set, while the inside remains warm and runny. This cake has become a hallmark of fine dining due to its dramatic presentation and irresistible flavor. Legend has it that this dessert was invented by chef Jean-Georges Vongerichten in the early 1980s. It’s no surprise that this confectionery treasure has captivated the hearts of many.
You will also like the following Dessert recipes!
- How to make Healthy Gluten Free Banana Bread
- Air Fryer Chocolate Chip Cookies
- Pumpkin Spice Cake Pops Truffles
The Ingredients
Let’s break down the components of these delightful cakes. To keep things simple, I’ve compiled a list of essential ingredients for the perfect molten lava cake:
- 1/2 cup (60g) powdered sugar: This sweetener makes our cakes have that perfect lightness.
- 1/2 cup (8 tablespoons; 113g) unsalted butter: Essential for richness and moisture.
- 2 large eggs, at room temperature: Eggs bind everything together and provide the required structure.
- 6 ounces (170g) premium semi-sweet chocolate: This is the star of the show! It’s where all the chocolate goodness lies.
- 1/4 cup (31g) all-purpose flour: It adds just enough structure to the cake.
- 1 teaspoon pure vanilla extract: This adds depth and enhances flavor.
- 2 large egg yolks, separated: The yolks give that lovely decadence.
- 1/8 teaspoon fine sea salt: A pinch of salt increases sweetness.

How to Make Molten Lava Cakes?
Before we step into the specifics, let’s set the stage. Preparing molten lava cakes may sound intimidating, but trust me; it is a straightforward process. The beauty lies in its simplicity and speed. You’ll have these cakes rising to the occasion in no time.
Step-by-Step Directions
Step 1: Prepare the Oven and Ramekins
First off, preheat your oven to 425°F (220°C). This is crucial because a hot oven is needed for that quick rising action. While that’s warming up, grab your ramekins and grease them with a bit of butter. You want to ensure that the cakes come out effortlessly. Dust them with cocoa powder, shaking off any excess. This little trick helps prevent sticking and adds a touch of richness to the surface.
Step 2: Melt Butter and Chocolate
Next, in a heatproof bowl, combine the butter and chocolate. I find the microwave the easiest method for this. Pop it in the microwave for about 30 seconds, then stir. Heat in additional 15-second intervals if needed until melted and smooth. Be patient—burnt chocolate is a tragedy we want to avoid!
Step 3: Mix Dry Ingredients
In a separate bowl, sift the all-purpose flour, powdered sugar, and salt. Sifting is important because it aerates the mixture, leading to a lighter cake. It takes just a minute and is well worth the effort.
Step 4: Combine Wet Ingredients
In another bowl, whisk together the eggs, egg yolks, and vanilla until light and fluffy. This should take about 3-4 minutes. The eggs need to be airy to help the cakes rise nicely.
Step 5: Bring It All Together
Now, pour the melted chocolate and butter mixture into the egg mixture. Then gently fold in the dry ingredients. You want to combine everything just until you see no flour—this prevents overmixing, keeping your cakes tender.
Step 6: Fill Ramekins
Pour the batter into the prepared ramekins, filling each about 3/4 full. Keep a little bit of space on the top because these cakes will puff up a bit in the oven.
Step 7: Bake Them
Place the ramekins on a baking sheet and slide them into the oven. Bake for 12-14 minutes. The edges should be firm, and the center should wiggle slightly when you gently shake the baking sheet. This timing is key—overbaking will cause the molten center to set!
Step 8: Let Them Rest
Once you take them out of the oven, let the cakes sit for about 1 minute. This allows the structure to stabilize before you flip them out. Patience is a virtue here!
Step 9: Plate and Serve
Carefully run a knife around the edge of each ramekin. Then invert it onto a plate. Give it a gentle tap on the bottom of the ramekin, and voilà! The cake should slide right out.
Serve immediately—preferably with a scoop of vanilla ice cream on top!
Notes
Here are some additional tips to ensure your molten lava cake success:
- Use High-Quality Chocolate: Your cake’s flavor hinges on the chocolate! Go for brands with high cocoa content (70% or higher).
- Room Temperature Ingredients: Ensure your eggs and butter are at room temperature for even mixing.
- Watch the Baking Time: Not all ovens are the same. Start checking at 10 minutes for the perfect molten center.
- Experiment with Flavors: Add espresso powder or orange zest for a hint of something special.
- Gelatin Option: For a firmer center, add a small amount of gelatin to the batter.
Storage Tips
If you have leftover molten lava cakes (an unlikely scenario!), store them in the refrigerator for up to two days. Seal them in an airtight container to retain moisture. For longer storage, freeze them before baking. Thaw in the fridge overnight before baking, and remember to adjust baking time when using frozen cakes.
Nutrition Information
Here’s a brief breakdown of the nutrition facts for one serving of molten lava cake:

(Note: This is an approximation and will vary based on specific ingredients used.)
Serving Suggestions
Here are five ways to elevate your molten lava cake experience:
- Bold and Beautiful Berries: Fresh strawberries or raspberries add a pop of color and a hint of tartness that perfectly balances the sweetness of the cake.
- Chocolate Ganache Drizzle: Add a rich homemade ganache on top for a double dose of chocolate. It takes an extra minute but is so worth it!
- Nuts About It: Sprinkle some toasted hazelnuts or almonds on top for a delightful crunch that contrasts with the soft cake.
- Minty Freshness: Fresh mint leaves garnish not only adds color but also a refreshing note that lifts the dessert.
- Coconut Whipped Cream: Substitute dairy whipped cream with whipped coconut cream for a vegan twist. This adds a tropical flavor that complements the chocolate beautifully.

What Other Substitutes Can I Use in Molten Lava Cakes?
- Dark Chocolate: Swap semi-sweet chocolate for a higher cocoa percentage for a more intense flavor. Just be mindful of the sugar content in the recipe.
- Coconut Oil: Replace butter with melted coconut oil for a dairy-free option. It can change the texture slightly, but you’ll get a lovely subtle coconut flavor.
- Aquafaba: If you’re looking for an egg substitute, aquafaba (the liquid from canned chickpeas) can work wonders. Use 3 tablespoons of aquafaba for each egg you replace.
- Almond Flour: For a gluten-free twist, substitute all-purpose flour with almond flour. This will create a nuttier flavor and a richer texture, but reduce the quantity to 1/8 cup.
- Maple Syrup: For a sweetener bonus, you can experiment with using maple syrup instead of powdered sugar. The flavor will shift slightly towards caramel-like, but the end result will still be delicious!
Molten Lava Cakes Recipe
Equipment
- Non-stick cooking spray
- muffin pan
Ingredients
- 1/2 cup 60g powdered sugar
- 1/2 cup 8 tablespoons; 113g unsalted butter
- 2 large eggs at room temperature
- 6 ounces 170g premium semi-sweet chocolate
- 1/4 cup 31g all-purpose flour
- 1 teaspoon pure vanilla extract
- 2 large egg yolks
- 1/8 teaspoon fine sea salt
Instructions
Step 1: Prepare the Oven and Ramekins
- First off, preheat your oven to 425°F (220°C). This is crucial because a hot oven is needed for that quick rising action. While that’s warming up, grab your ramekins and grease them with a bit of butter. You want to ensure that the cakes come out effortlessly. Dust them with cocoa powder, shaking off any excess. This little trick helps prevent sticking and adds a touch of richness to the surface.
Step 2: Melt Butter and Chocolate
- Next, in a heatproof bowl, combine the butter and chocolate. I find the microwave the easiest method for this. Pop it in the microwave for about 30 seconds, then stir. Heat in additional 15-second intervals if needed until melted and smooth. Be patient—burnt chocolate is a tragedy we want to avoid!
Step 3: Mix Dry Ingredients
- In a separate bowl, sift the all-purpose flour, powdered sugar, and salt. Sifting is important because it aerates the mixture, leading to a lighter cake. It takes just a minute and is well worth the effort.
Step 4: Combine Wet Ingredients
- In another bowl, whisk together the eggs, egg yolks, and vanilla until light and fluffy. This should take about 3-4 minutes. The eggs need to be airy to help the cakes rise nicely.
Step 5: Bring It All Together
- Now, pour the melted chocolate and butter mixture into the egg mixture. Then gently fold in the dry ingredients. You want to combine everything just until you see no flour—this prevents overmixing, keeping your cakes tender.
Step 6: Fill Ramekins
- Pour the batter into the prepared ramekins, filling each about 3/4 full. Keep a little bit of space on the top because these cakes will puff up a bit in the oven.
Step 7: Bake Them
- Place the ramekins on a baking sheet and slide them into the oven. Bake for 12-14 minutes. The edges should be firm, and the center should wiggle slightly when you gently shake the baking sheet. This timing is key—overbaking will cause the molten center to set!
Step 8: Let Them Rest
- Once you take them out of the oven, let the cakes sit for about 1 minute. This allows the structure to stabilize before you flip them out. Patience is a virtue here!
Step 9: Plate and Serve
- Carefully run a knife around the edge of each ramekin. Then invert it onto a plate. Give it a gentle tap on the bottom of the ramekin, and voilà! The cake should slide right out.
- Serve immediately—preferably with a scoop of vanilla ice cream on top!
Notes
- Use High-Quality Chocolate: Your cake’s flavor hinges on the chocolate! Go for brands with high cocoa content (70% or higher).
- Room Temperature Ingredients: Ensure your eggs and butter are at room temperature for even mixing.
- Watch the Baking Time: Not all ovens are the same. Start checking at 10 minutes for the perfect molten center.
- Experiment with Flavors: Add espresso powder or orange zest for a hint of something special.
- Gelatin Option: For a firmer center, add a small amount of gelatin to the batter.
Nutrition
Frequently Asked Questions
Why did my lava cake not flow?
There could be several reasons: Overbaking, not enough chocolate, or a lack of aeration in the batter. Make sure to keep an eye on your baking time and use high-quality chocolate.
Can I prepare these cakes ahead of time?
Absolutely! You can make the batter, fill the ramekins, and refrigerate up to a day in advance. Just bring them to room temperature before baking.
What is the best way to serve molten lava cake?
Serve it warm, accompanied by vanilla ice cream or whipped cream. Berries and fresh mint are fantastic garnishes too!
Can I make a larger cake instead of ramekins?
Yes, you can! Just make sure to adjust the baking time. A larger cake will require a longer bake, but keep the center molten
Is it normal for the cake to collapse as it cools?
Yes! The cakes may deflate a bit after resting. This is perfectly normal and doesn’t affect the flavor.
Conclusion
Creating molten lava cakes is a delightful experience that can bring anyone a sense of joy. I hope my journey through the ingredients, steps, and tips has inspired you to try this decadent treat.
The combination of rich chocolate and the thrill of that molten center makes each bite absolutely divine. So, whether you’re making this for a special occasion or simply treating yourself, enjoy every moment—and every gooey bite. Happy baking!