This post contains affiliate links. As an Amazon Associate I earn from qualifying purchases.
Before diving into the recipe, let’s chat about what to pair with these cheesy delights. Zaxby’s cheese bites are a wonderful snack, perfect for game days or cozy evenings at home. Serve them alongside a zesty marinara sauce or ranch dressing for dipping.
You can also pair them with a fresh garden salad for balance. And for those who appreciate a bit of zest, a side of sliced jalapeños or pickled veggies can add a fun kick.

Let me take you on a little culinary journey today. Imagine biting into a crispy, golden exterior, only to discover a gooey, cheesy center waiting for you. It’s a sensation like no other, isn’t it? Zaxby’s cheese bites have a reputation for being irresistible, and who wouldn’t want to recreate that magic at home?
It’s more than just cheese; it’s an experience. Having whipped these up several times, I can confidently share my secrets. Here’s everything you need to know.
You will also like the following Delicious recipes!
- Best Pan Seared Lamb Chops Recipe
- How to make Homemade Quick Pickled Jalapenos
- Easy Zaxby’s Hot Honey Mustard Recipe
What is Zaxby’s Cheese Bites Recipe?
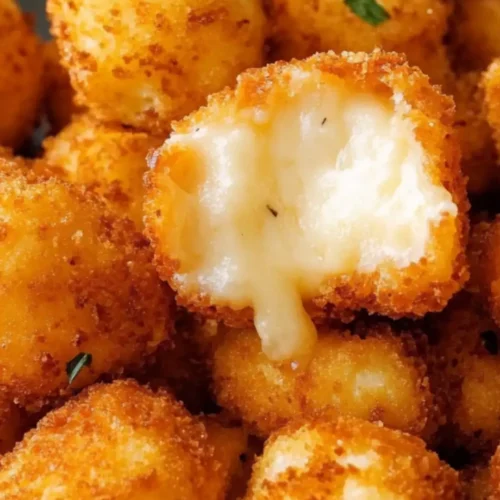
Zaxby’s cheese bites are a popular appetizer featuring mozzarella cheese sticks, coated in seasoned breadcrumbs, and deep-fried to perfection.
This dish is all about texture – the crunch from the breadcrumbs outside paired with the melting cheese inside makes a delightful contrast. The recipe is simple yet yields results that can compete with any restaurant’s.
How Does It Taste?
The flavor profile is stunningly straightforward yet rich. When you bite into a cheese bite, the first sensation is the crisp coating. Then, a warm wave of mozzarella hits your palate.
If you opt for the cayenne pepper, you might also get a slight zing that perfectly elevates the experience. The perfect pairing of crunch and creaminess is simply divine.
Why You’ll Love This
What’s not to love? These cheese bites are easy to make, and they give you control over the ingredients. You can customize them to fit your taste preferences.
Moreover, they are a fantastic way to impress guests while keeping things simple. Soon enough, your friends and family will be asking for your take on those Zaxby’s cheese bites!
Ingredients
Gather your ingredients:
- 2 large eggs
- ¼ cup whole milk
- 1 cup all-purpose flour
- 1 cup Italian-style breadcrumbs
- 10 oz mozzarella string cheese (about 10 sticks)
- A pinch of cayenne pepper (optional)
- ½ teaspoon garlic powder

Step-by-Step Directions
Step 1: Prepare Your Setup
Start by gathering everything you need. This includes your ingredients, bowls for mixing, and a frying pan. Set your frying oil in a large pot or deep skillet over medium heat, about two inches deep.
Step 2: Slice the Cheese Sticks
Cut the mozzarella sticks in half. This way, you’ll create bite-sized pieces that are perfect for snacking. Some may like them whole, but half is the right call for a quick munch.
Step 3: Create Your Dipping Stations
In a bowl, whisk together the eggs and milk until well combined. In another bowl, mix the flour with garlic powder, and in a third bowl, place your breadcrumbs and cayenne pepper if you chose to add it. You’ll have an assembly line: flour, then egg mixture, then breadcrumbs.
Step 4: Coat the Cheese Sticks
Take each piece of mozzarella, coat it gently in the flour, then dip it in the egg mixture, and finally coat it well with breadcrumbs. Make sure that they are completely covered to ensure a perfect crunch after frying.
Step 5: Fry Them Up
Once your cheese bites are all coated, gently place them in the hot oil. Fry for about 2-3 minutes on each side until golden brown. Keep an eye on them – no one likes burnt cheese!
Step 6: Drain and Serve
Use tongs to remove the cheese bites from the oil and allow them to drain on a paper towel. This step helps to rid them of excess oil. Serve them hot with your favorite dipping sauce.
Tips on Making Zaxby’s Cheese Bites Recipe
- Use Fresh Cheese: Fresh mozzarella sticks result in a better melting experience.
- Thermometer Check: Ensure your oil is at 350°F. Too hot and the outside will burn before the cheese melts, too cool and they’ll become greasy.
- Batch Cooking: If you’re making a lot, do it in batches. Frying too many at once can drop the oil temperature.
- Leftover Cheese: Don’t let the extra cheese go to waste. The breading will stay crispier if you store them separately before frying.
- Bake Instead: If you want a healthier alternative, bake the cheese bites at 400°F for 10-12 minutes. Use a cooking spray to help achieve that crunch.

How Do You Store This Zaxby’s Cheese Bites Recipe?
You can store leftover cheese bites in an airtight container in the refrigerator for up to three days.
To reheat, place them back into an oven or air fryer to revitalize that crispiness, rather than microwaving. This will help avoid a rubbery texture.
What Other Substitutes Can You Use in Zaxby’s Cheese Bites Recipe?
If you want to mix things up, consider these alternatives:
- Pepper Jack Cheese: Offers a spicy kick that complements the crispy coating well.
- Cheddar Cheese: For those who prefer a sharper taste, cheddar has the richness that is hard to resist.
- String Cheese Alternatives: Mozzarella is great, but you can also use provolone or gouda for unique flavors.
- Breadcrumb Variations: Swap out the Italian-style breadcrumbs for panko to add more texture.
- Spices: Feel free to play around with different seasonings in your breadcrumb mixture, like Italian seasoning or smoked paprika.
Zaxby’s Cheese Bites Recipe
Equipment
- Deep skillet
Ingredients
- 2 large eggs
- ¼ cup whole milk
- 1 cup all-purpose flour
- 1 cup Italian-style breadcrumbs
- 10 oz mozzarella string cheese about 10 sticks
- A pinch of cayenne pepper optional, adds a mild heat
- ½ teaspoon garlic powder for a savory kick
Instructions
Step 1: Prepare Your Setup
- Start by gathering everything you need. This includes your ingredients, bowls for mixing, and a frying pan. Set your frying oil in a large pot or deep skillet over medium heat, about two inches deep.
Step 2: Slice the Cheese Sticks
- Cut the mozzarella sticks in half. This way, you’ll create bite-sized pieces that are perfect for snacking. Some may like them whole, but half is the right call for a quick munch.
Step 3: Create Your Dipping Stations
- In a bowl, whisk together the eggs and milk until well combined. In another bowl, mix the flour with garlic powder, and in a third bowl, place your breadcrumbs and cayenne pepper if you chose to add it. You’ll have an assembly line: flour, then egg mixture, then breadcrumbs.
Step 4: Coat the Cheese Sticks
- Take each piece of mozzarella, coat it gently in the flour, then dip it in the egg mixture, and finally coat it well with breadcrumbs. Make sure that they are completely covered to ensure a perfect crunch after frying.
Step 5: Fry Them Up
- Once your cheese bites are all coated, gently place them in the hot oil. Fry for about 2-3 minutes on each side until golden brown. Keep an eye on them – no one likes burnt cheese!
Step 6: Drain and Serve
- Use tongs to remove the cheese bites from the oil and allow them to drain on a paper towel. This step helps to rid them of excess oil. Serve them hot with your favorite dipping sauce.
Notes
- Use Fresh Cheese: Fresh mozzarella sticks result in a better melting experience.
- Thermometer Check: Ensure your oil is at 350°F. Too hot and the outside will burn before the cheese melts, too cool and they’ll become greasy.
- Batch Cooking: If you’re making a lot, do it in batches. Frying too many at once can drop the oil temperature.
- Leftover Cheese: Don’t let the extra cheese go to waste. The breading will stay crispier if you store them separately before frying.
- Bake Instead: If you want a healthier alternative, bake the cheese bites at 400°F for 10-12 minutes. Use a cooking spray to help achieve that crunch.
Nutrition
Frequently Asked Questions
1. Can I make these cheese bites ahead of time?
Certainly! Prep the cheese bites, coat them, and keep them in the fridge. You can fry them just before serving.
2. What if I cannot eat gluten?
You can easily substitute regular flour and breadcrumbs with gluten-free options. There are plenty of gluten-free brands available now.
3. Are there vegetarian versions of this recipe?
This recipe is inherently vegetarian due to its use of cheese, flour, and eggs. Just ensure all your ingredients are vegetarian-friendly.
4. Can I freeze cheese bites?
Yes! You can freeze un-fried cheese bites. When ready to cook, do not thaw; just fry them for a minute longer.
5. What are some great dipping sauces?
Classic marinara, ranch dressing, or spicy sriracha mayo make an excellent accompaniment to cheese bites.
6. Are they kid-friendly?
Absolutely! Kids adore these cheese bites. Just watch the oil temperature closely if kids are helping out in the kitchen.
Conclusion
In the end, making Zaxby’s cheese bites from home is as satisfying as it is delicious. You get the comfort of knowing what goes into your food while enjoying an impressive snack. This recipe not only delivers in taste but also offers a fun culinary adventure.
You can whip these up for a family gathering or a relaxing night in. So, roll up your sleeves, channel your inner chef, and dive into this delightful cheesy experience. Trust me; you will not get tired of these bites! Enjoy!