24 Hour sous vide short ribs
Today, we’re diving into the world of sous vide cooking, particularly focusing on an unbeatable dish: 24-hour sous vide short ribs. This method transforms a simple rack of meat into something incredibly tender, juicy, and packed with flavor. Whether you’re hosting a summer barbecue or just fancy a weekend delight, these short ribs are a home run every time.
Equipment
- Sous vide precision cooker
- large pot or cooler
- food saver bags
- grill
Ingredients
- To whip up a mouthwatering batch of 24-hour sous vide short ribs here’s what you’ll need:
- 1 rack of baby back pork ribs St. Louis-style can work too
- 1/2 tablespoon extra-virgin olive oil
- 3/4 cup homemade pork dry rub divided (you can use a mix of brown sugar, paprika, garlic powder, onion powder, salt, and pepper)
- 1 teaspoon smoked paprika for a deeper smoky flavor
- 1/2 cup BBQ sauce or more, to taste
Instructions
Step 1: Prepare the Sous Vide Bath
- Start by filling a large pot or cooler with water, making sure it is deep enough to fully submerge your ribs. I personally find that a cooler is perfect for this because it retains the temperature much better, especially if you’re cooking multiple racks. Now, preheat your sous vide water bath to 152°F. Attach your sous vide machine according to the manufacturer’s instructions.
Step 2: Make the Spice Combination
- In a medium bowl, mix together all your spices for the pork dry rub. You’ll want to get this recipe right—it’s the key to adding rich flavors to your ribs. Set aside about half of this mixture; you’ll use it later for a flavorful coating just before grilling.
Step 3: Prepare the Ribs
- Take your rack of ribs out of its packaging and place it on a large baking sheet. Using a sharp knife, gently cut the rack in half to fit into your bags better. Flip the ribs over and peel off the white membrane on the back. This is a crucial step as it allows the rub to penetrate better. Discard that membrane; it won’t contribute anything to the final product.
Step 4: Apply the Dry Rub Generously
- With your ribs cleansed and ready, sprinkle the half-cup of dry rub all over them. Don’t skimp here! Use your hands to massage the rub into every crevice, both front and back. This step is where the magic begins, as all those spices coat the ribs, elevating the final flavor.
Step 5: Seal and Sous Vide
- Place each half rack of ribs in separate food saver bags. Remove as much air as you can from the bags and seal them tightly. Submerge the bags in the preheated water bath. Use clips to attach them to the pot’s side, keeping them upright to ensure they don’t float to the surface.
- Cover the pot with a piece of tin foil, leaving just enough room for the sous vide wand to stick out. This will minimize evaporation as your ribs tackle their lengthy cooking time. Set your timer for 24 hours.
Step 6: Monitor and Finish Cooking
- As the cooking progresses, occasionally check the water level to ensure it doesn’t run dry. If it does, simply add warm water to keep everything submerged. Once the 24 hours is up, carefully remove the bags from the water bath, giving the ribs a full chance to soak in all that seasoning.
Step 7: Final Touches
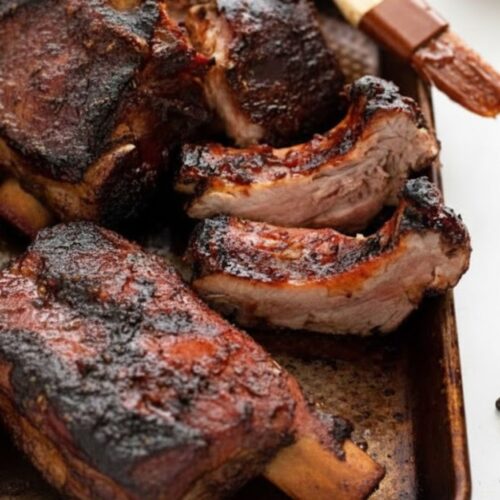
- Open the vacuum-sealed bags with scissors and pour out any juices. Place your cooked ribs on top of a paper towel to blot away excess moisture. Generously apply around 1/4 cup more of your dry rub on both sides. For an added zing, brush on your favorite BBQ sauce. Feel free to use as much or as little as you like!
Step 8: Grill for that Finishing Touch
- Preheat your grill to 450°F. Lightly oil the grill grates with olive oil or spray with nonstick cooking spray. Grill the ribs for about 5-6 minutes on each side, just enough to achieve that lovely charred edge that everyone loves.
Step 9: Serve and Enjoy
- Once finished on the grill, let your ribs rest for about 5-10 minutes. This step will allow the juices to redistribute throughout the meat, ensuring that each bite is juicy and flavorful.
Notes
Always ensure the water level does not drop. This can affect cooking time and temperature.
Experiment with the rub. Add spices according to your preference for a custom flavor.
Use high-quality BBQ sauce. A good sauce can elevate the dish dramatically.
Resting is vital. It may be tempting to dig in right off the grill, but resting ensures even juiciness.
Store leftovers properly. If you have any ribs left, they can easily be reheated for tasty leftovers!
Nutrition
Serving: 4g
Tried this recipe?Let us know how it was!